12d Synergy operates on files on a 'check-in' / 'checkout' basis. This means that files must first be locked by 'checking it out' for making edits, and later uploaded and released by 'checking it in', or by cancelling the checkout if no edits need to be saved.
While a file is checked out by another user, it cannot be edited, but it can still be viewed.
If you are logged in as a Collaborator, you will only have read-only access to the files of selected jobs or folders. Please contact your 12d Synergy Administrator for more details.
1.1. How to Create a New File
You can create a new file in a folder in one of the following ways:
Using MS Word or MS Excel
Using a file from a template library
Using a pre-existing file of any type
A Template Library is a job or folder containing templates for documents, drawings, MS PowerPoint presentations, etc. These templates contain predefined and custom attributes along with content that you can use while creating new files.
You can access the template library only if your IT Administrator has set the location of the template library at 12d Synergy Administration application > Jobs tab > Job Settings tab, the File template job attribute.
1.1.1. How to Create a File without a Template Library
Select a folder in the job you are working on.
The Folder view is displayed.Depending on the size of the browser or if you are using the 12d Synergy Mobile App, this option is displayed either on the ribbon or under the
 top-left menu.
In the Files tab, click the New File
 button.

The following three options are displayed.MS Word 2010 Document
MS Excel 2010 Document
Create from other file
Depending on the size of the browser or if you are using the 12d Synergy Mobile App, the New File button is displayed either on the ribbon or as an option in the
 menu at the bottom-right of the page in the Folder view.
Do one of the following:
To create a new Word document or an Excel 2010 Spreadsheet, select the MS Word 2010 Document or MS Excel 2010 Document option, respectively.
The Describe this Change dialog box is displayed.

To create a file of any type based on another existing file, do the following:
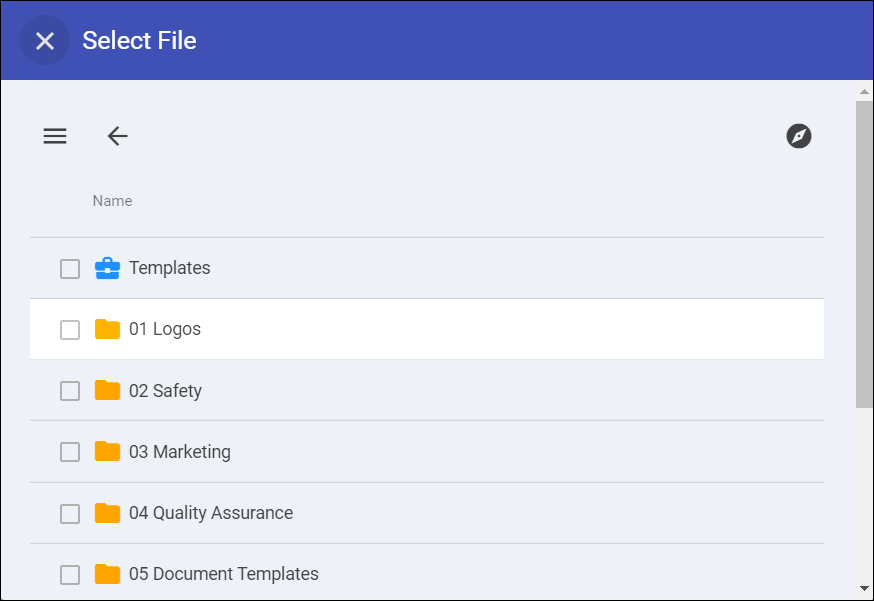
Select the Create from other file option.
The Select a File dialog box with the folders and files of the job you are working on is displayed.

To select a file from a different job, click the Change job
 icon and search for the required job in the Job search dialog box that is displayed.
Browse and select the file based on which you want to create a new file.
The Describe this Change dialog box is displayed.
If the selected file already exists in the folder you are working on, then a dialog box informing the same is displayed. You can either choose to rename the file being created or add a new version of the existing file.

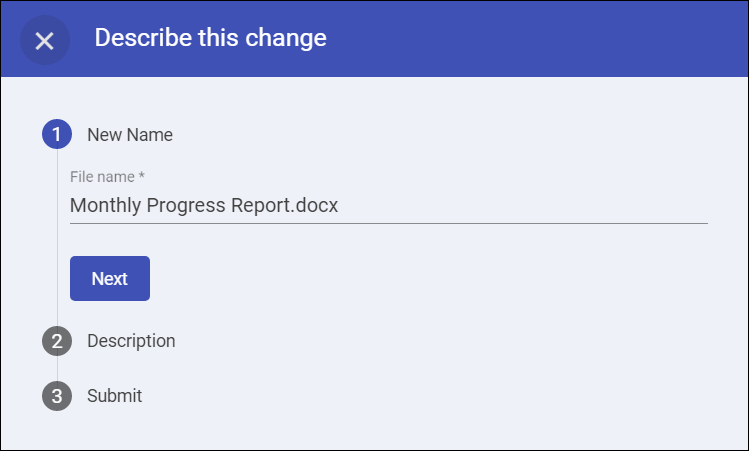
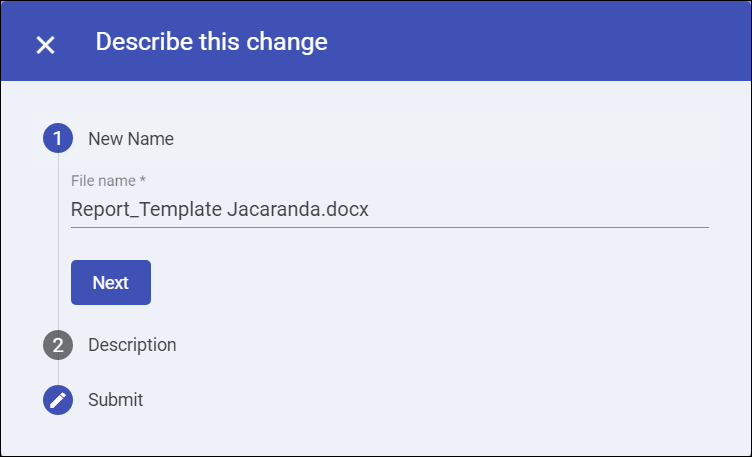
Enter the name of the new file in the New Name field.
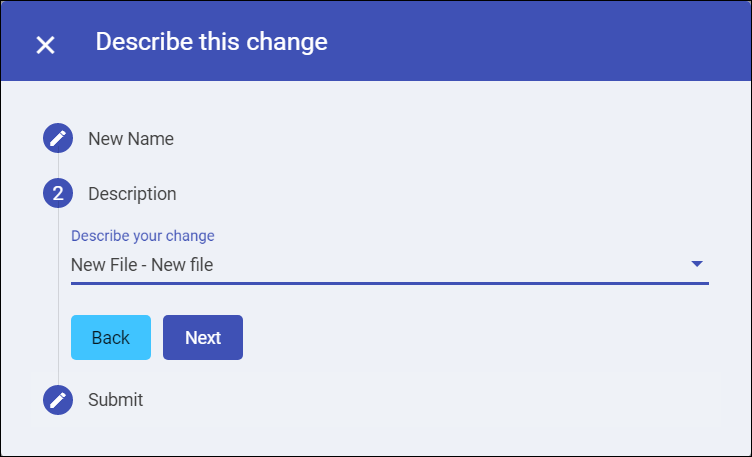
Click the Description field to select a pre-defined description from the list displayed.
The Description field is displayed only if your 12d Synergy Administrator configures the change descriptions for creating a new file.
Select the Enter manually option from the options displayed in the Description field to enter a description of your choice.
Click the Next button.
Click the Submit button.
The new file is created and is displayed in the Folder view.If any file naming rules include attributes that need inputs while adding a file, then an appropriate prompt requesting your input is displayed.
1.1.2. How to Create a File from a Template Library
Select a folder in the job you are working on.
The Folder view is displayed.
Depending on the size of the browser or if you are using the 12d Synergy Mobile App, this option is displayed either on the ribbon or under the
 top-left menu.
In the Files tab, click the New File
 button.
Depending on the size of the browser or if you are using the 12d Synergy Mobile App, the New File button is displayed either on the ribbon or as an option in the
 menu at the bottom-right of the page in the Folder view.
The Select a File dialog box with the template library is displayed.

Browse and select the template based on which you want to create a new file.
The Describe this Change dialog box is displayed.
Enter the name of the new file in the New Name field.
Click the Description field to select a predefined description from the list displayed.

The Description field is displayed only if your 12d Synergy Administrator configures the change descriptions for adding a file.
Select the Enter manually option from the options displayed in the Description field to enter a description of your choice.
Click the Next button.
Click the Submit button.
The new file is created based on the selected template and is displayed in the Folder view.If any file naming rules include attributes that need input while adding a file, then an appropriate prompt requesting your input is displayed.
1.2. How to Add a New File(s)
Select a folder in the job you are working on.
The Folder view form is displayed.Depending on the size of the browser or if you are using the 12d Synergy Mobile App, this option is displayed either on the ribbon or under the
 top-left menu.
In the Files tab, click the Add File
 button.
Depending on the size of the browser or if you are using the 12d Synergy Mobile App, the Add File button is displayed either as a selection option below the 12d Synergy ribbon or as an option in the
 menu at the bottom-right of the page in the Folder view.
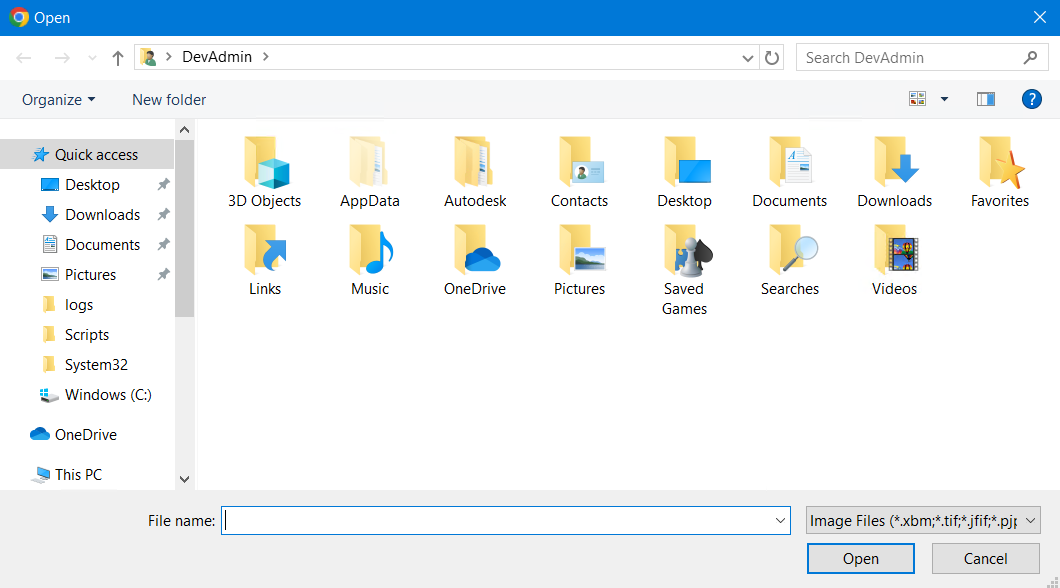
The Downloads folder of the system you are working on is displayed.
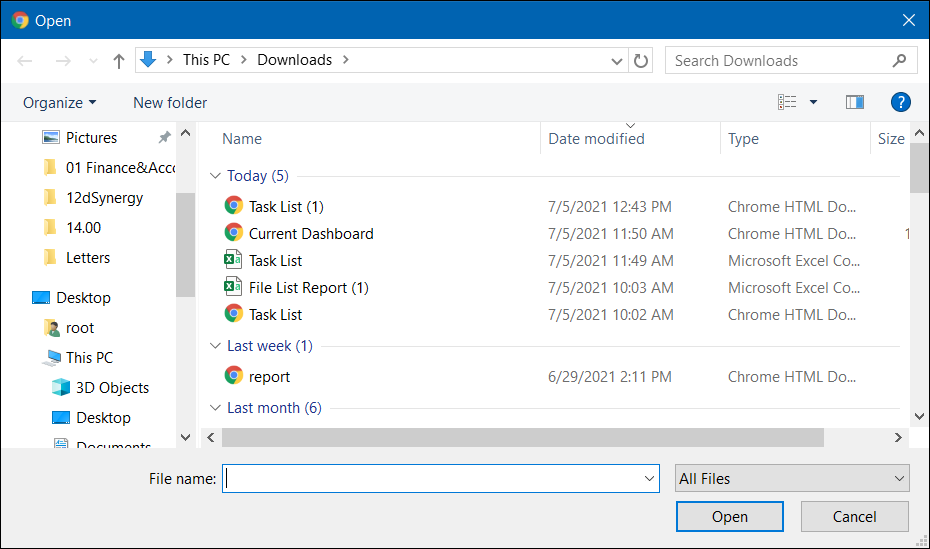
Browse and select the file(s) you want to add to the 12d Synergy Web App or 12d Synergy Mobile App.
The Describe this Change dialog box is displayed.

The Describe this change dialog box is displayed only if your 12d Synergy Administrator configures the change descriptions for adding a file.
You can also drag and drop a file from Windows Explorer into the 12d Synergy Web App.
If the file to be added already exists in the Folder view you are working on, then a dialog informing the same is displayed. You can either choose to rename the file being added or add a new version of the existing file.
If any file naming rules include attributes that need inputs while adding a file, then an appropriate prompt requesting your input is displayed.
If there are any file attributes set for the folder to which you are adding the files, the File Attributes field is displayed.
If you are adding multiple files to a folder which may have attributes, naming rules with attributes, or workflows set on it, then the Combined File Name and Attribute editor is displayed. It enables you to add all the required details in one window instead of having to enter the required details for each file separately.
Click the Description field to select a predefined description from the list displayed.
Click the Next button.
If there are any file attributes set for the folder to which you are adding the files, select the values for these attributes in the File Attributes field.
If the file attribute is a list attribute that has a workflow created from it, then click the
 icon in the workflow column to view the workflow.
 Click the Next button.
If you are adding multiple files, then select the Use these values for all occurrences of these attributes checkbox to apply the attribute values entered in the File attributes field to all the files.
Click the Submit button.
The file is added and is displayed in the Folder view.
1.3. How to Upload Multiple Images
Select a folder in the job you are working on.
The Folder view form is displayed.Depending on the size of the browser or if you are using the 12d Synergy Mobile App, this option is displayed either on the ribbon or under the
 top-left menu.
In the Files tab, click the Multiple Image upload
 button.
The Multiple Image Upload dialog box is displayed.
Depending on the size of the browser or if you are using the 12d Synergy Mobile App, the Multiple image upload button is displayed either as a selection option below the 12d Synergy ribbon or as an option in the
 menu at the bottom-right of the page in the Folder view.
Click the Choose
 button.
The file explorer of the system you are working on is displayed.
If you are using the 12d Synergy Mobile app, you will be prompted to choose the images from either the photo library, or to click a new photo.
Browse and select the images you want to add to the 12d Synergy Web App or 12d Synergy Mobile App.
The selected images are displayed in the Multiple Image Upload dialog box.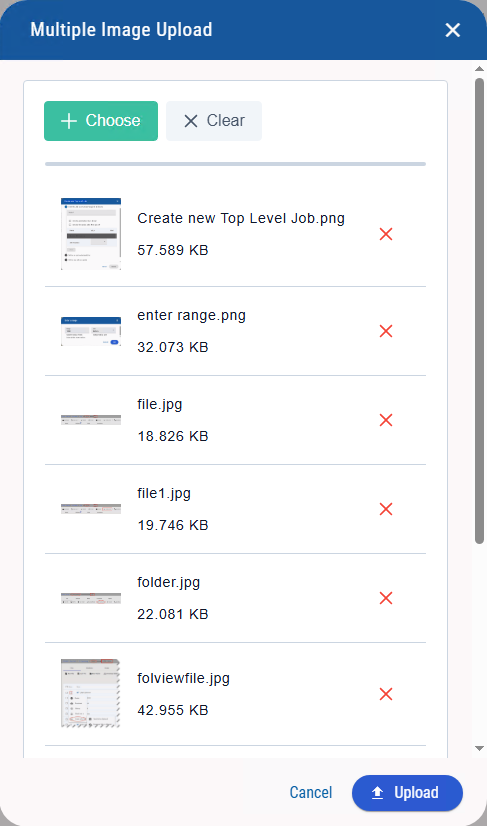
If you select any files other than images, then an error saying Invalid file type is displayed.
You can click the
.png) icon displayed against an image file if you do not want to upload it.
icon displayed against an image file if you do not want to upload it.
Click the Upload button.
The Describe this Change dialog box is displayed.

The Describe this change dialog box is displayed only if your 12d Synergy Administrator configures the change descriptions for adding a file.
You can also drag and drop a file from Windows Explorer into the Multiple Image Upload dialog box.
You cannot add the same image multiple times.
If any file naming rules include attributes that need input while adding a file, then an appropriate prompt requesting your input is displayed.
If there are any file attributes set for the folder to which you are adding the files, the File Attributes field is displayed.
If you are adding multiple images to a folder that has attributes, naming rules with attributes, or workflows set on it, then the Combined File Name and Attribute editor is displayed. It enables you to add all the required details in one window instead of having to enter the required details for each file separately.
Click the Description field to select a predefined description from the list displayed.
When you select multiple files to be added to a folder, the Use this description for all check box is displayed in the Describe this change dialog box. Select this checkbox to apply the selected description to all files added in that instance.
Select the Enter manually option from the options displayed in the Description field to enter a description of your choice.
Click the Next button.
If there are any file attributes set for the folder to which you are adding the files, select the values for these attributes in the File Attributes field.
If the file attribute is a list attribute that has a workflow created from it, then click the
 icon in the Workflow column to view the workflow in the Status workflow dialog box.
 Click the Next button.
Since you are adding multiple images, the Use these values for all occurrences of these attributes checkbox is selected and disabled.
Click the Submit button.
The images are added and displayed in the Folder view.
1.4. How to Check Out a File
Browse the jobs and folders to find the required file, then click it.
Depending on the size of the browser or if you are using the 12d Synergy Mobile App, this option is displayed either on the ribbon or under the
 top-left menu.
The details of the file are displayed in the File view.

The following tabs are displayed.General – Displays the general details of the file, such as file name, file size, file creation date, etc.
Attributes – Displays the list of defined attributes and their values
Notes – Displays the notes added to this file. You can do the following:
Click a note and reply to it
Delete a note using the Delete
 icon displayed against the note.
 Add a new note using the
 icon.
icon.
Associations — Displays the list of items associated with this file. You can do the following:
Add an association using the
 icon at the bottom-right of the page
Delete an association using the Delete
icon displayed against the association in the Delete column
Issues — Displays the issues attached to this file. You can do the following:
Add an issue on the file you are viewing using the
icon at the bottom-right of the pageEdit an issue using the Edit
.png) icon displayed against the issue in the Actions column
icon displayed against the issue in the Actions columnDelete an issue using the Delete
icon displayed against the issue in the Actions column When you add an issue from the Issues link in the job tree, and attach an entity to it, then the issue is displayed in the Issues tab of that entity (file, managed folder or 12d model project) in its view.
Forms — Displays all the form fills for which this file is an output file. You can view all the completed forms, review forms submitted by anonymous users and resubmit completed forms from this tab.
Click the Check-out
 button on the ribbon.
Depending on the size of the browser or if you are using the 12d Synergy Mobile App, this option is displayed either on the ribbon or under the
 bottom-right menu.
The following two options are displayed.

Check-out & Download – Select this option to check out the file and download it onto your local Downloads folder. The file is now locked, and you can edit it on your local system. Once checked out, no other user can work on the file.
Check-out only—Select this option to check out the file, so that it is locked and unavailable for other users to download or edit.
However, in both options, other users can view the checked-out files.
If no edits have been made to the checked-out document, the check-out can be cancelled using the Cancel check-out
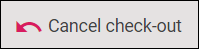 button. The document is, however, still available in the local Downloads folder, but any edits made to this will not reflect in the version of the file that is on the App.
If you want to view all the items you have checked out, click the
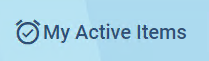 button on the homepage and select the Check outs
 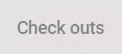 tab.
tab.
1.5. How to Check in a File
Once a user has checked out a file, it has to be checked in by the same user.
Browse the jobs and folders to find the required checked-out file, then click it.
Depending on the size of the browser or if you are using the 12d Synergy Mobile App, this option is displayed either on the ribbon or under the
 top-left menu.
The details of the file are displayed in the File view.

Click the Check-in
 button on the ribbon.
Depending on the size of the browser or if you are using the 12d Synergy Mobile App, this option is displayed either on the ribbon or under the
 bottom-right menu.
The following three options are displayed.
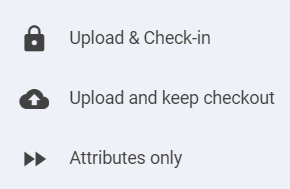
Upload & Check-in - Select this option to upload the latest copy of the file you have checked out from your local Downloads folder and also check it into the 12d Synergy App. This means the selected file is now available for other users to check out.
Upload only - Select this option only to upload the latest copy of the file you have checked out from your local Downloads folder. However, since the file is still checked out by you, only you can continue editing it. Other users will be able to view the uploaded version of the file.
Make sure you select the correct file from your local computer when uploading and checking it into the 12d Synergy Web App.
Attributes only – Select this option to check in the file with the updated attributes. However, if there has been any change to the contents of the file, they are not uploaded to the 12d Synergy App. This is useful when you are moving files through a workflow or updating the status of a file without having updated the file content.
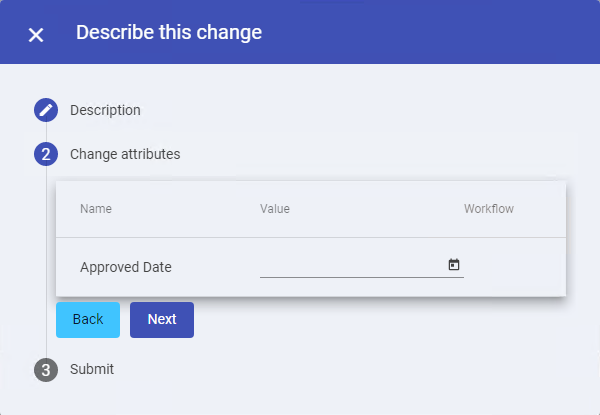
A Describe this change dialog is displayed if your 12d Synergy Administrator configures the change descriptions for changing a file.
If you have any file change attributes set on the selected file, you will be prompted to enter their values when checking in the document.
1.6. How to View the Latest Version of a File
To view the latest version of the document, whether it is a checked-out document or a checked-in document, do the following:
Browse the jobs and folders to find the required file, then click it.
Depending on the size of the browser or if you are using the 12d Synergy Mobile App, this option is displayed either on the ribbon or under the
 top-left menu.
The details of the file are displayed in the File view.

Click the Download
 button on the ribbon or the
  link on the Preview.
Depending on the size of the browser or if you are using the 12d Synergy Mobile App, the Download
 button is displayed either as a button on the ribbon or as an option in the
  ellipsis menu at the bottom-right of the page.
The file is downloaded into your local Downloads folder. You can access the file and view its details. However, any changes that you make to the file will remain local to the system.
If a file has been checked out by you initially, then doing a Download again will overwrite the file that was downloaded during the checkout.
1.7. How to View the History of a File
Whenever a file is checked in, a new version of it is created. You can view and download any version of a file in the 12d Synergy App.
Browse the jobs and folders to find the required file, then click it.
Depending on the size of the browser or if you are using the 12d Synergy Mobile App, this option is displayed either on the ribbon or under the
 top-left menu.
The details of the file are displayed in the File view.

Click the History
 button on the ribbon.
Depending on the size of the browser or if you are using the 12d Synergy Mobile App, the History
 button is displayed either as a button on the ribbon or as an option in the
  ellipsis menu at the bottom-right of the page.
The History for <file name> dialog box is displayed.
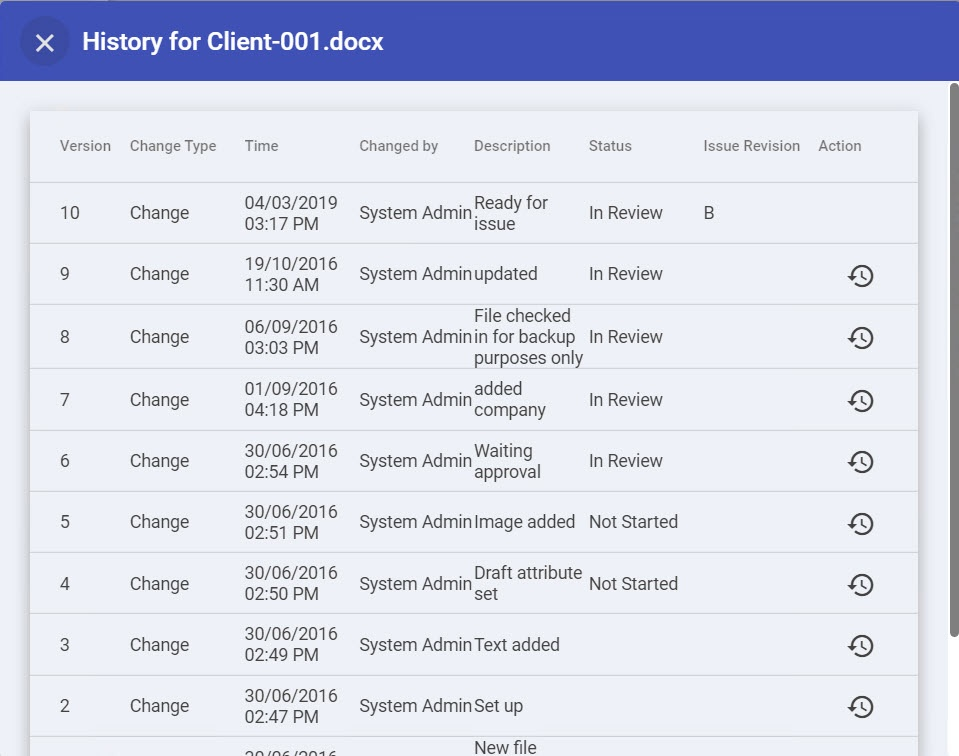
All the available versions of the selected file and their corresponding details are displayed in the dialog box.
1.7.1. How to Download a Previous Version of the File
In the History for <file name> dialog box, click on any details of the required version of the document.
The <file name (version number)> dialog box is displayed..png)
Click the Download <version number of the file>
 button.
The selected version of the file is downloaded onto your local Downloads folder.
1.7.2. How to Rollback to a Previous Version of the File
Do one of the following:
In the History for <file name> dialog box, under the Action column, click the
 button against the version of the file you want to rollback to.
 .png)
Click the file you want to rollback to from the History for <file name> dialog box and then click the <Make <file version number> Latest Version>
 icon in the <file name (version number)> dialog box.
.png)
If the selected file has a workflow created for it, then it cannot be rolled back to a previous version.
If the selected file has attributes tagged to it, the following 12d Synergy prompt is displayed for you to select the required option to update attributes.
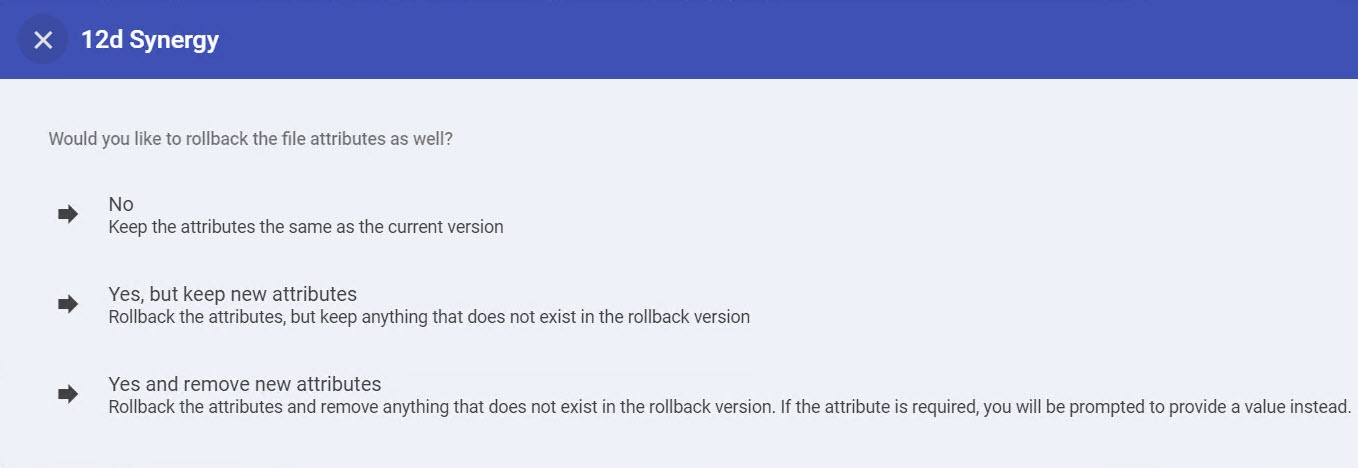
The file is rolled back to the selected version and a confirmation message is displayed.
A new version is created from the selected older version of the file, making it the latest version of the file.
This is displayed in the History for <file name> dialog box..png "image-1693958431387(1).png")
1.8. How to Create a Link of the File
You can create a link of a file by following this procedure.
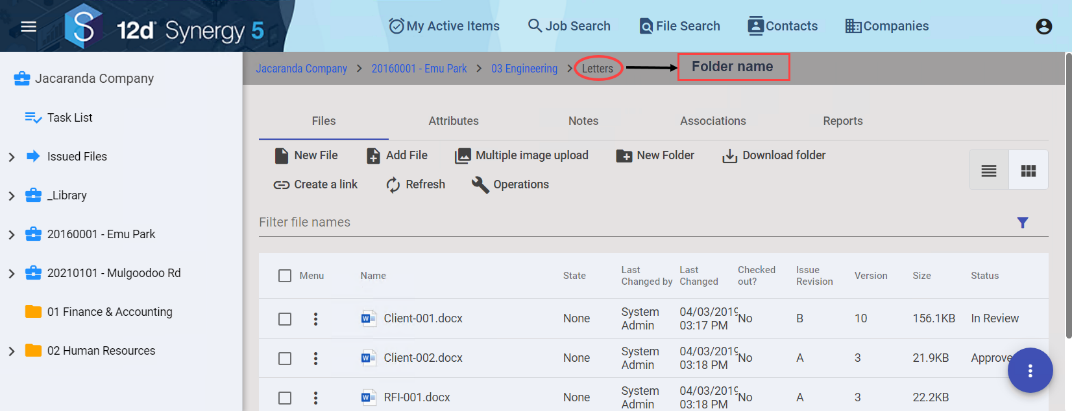
1.9. How to Move or Copy a Single File
Browse the jobs and folders to find the required file, then click it.
Depending on the size of the browser or if you are using the 12d Synergy Mobile App, this option is displayed either on the ribbon or under the
 top-left menu.
The details of the file are displayed in the File view.

Click the Operations
 button on the ribbon.
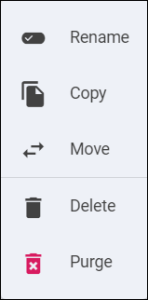
The following options are displayed.Rename – To rename the selected file
Copy – To copy the selected file
Move – To move the selected file
Delete – To delete the file, but still have it in the system when viewing deleted files
Purge – To permanently delete the file from the system
Depending on the size of the browser or if you are using the 12d Synergy Mobile App, the
 button is displayed either as a button on the ribbon or as an option in the
  ellipsis menu at the bottom-right of the page.
Do one of the following:
Select the Copy option to select a job and/or a folder into which you want to copy the file.
Select the Move option to select a job and/or a folder into which you want to move the file.
The selected file is copied or moved into the selected destination folder.
You can select the Rename, Delete or Purge option to rename the file, delete the file from the Web App, or delete the file permanently from the 12d Synergy system respectively.
When you perform any of the above-listed actions, a Describe this Change dialog is displayed if your 12d Synergy Administrator configures the change descriptions for changing a file.
To view the tree structure of jobs and folders for easy navigation, click the Show Tree
 icon.
icon.To move/copy the file to a job and/or folder in a different job, click the Change Job
 icon to search for the required job.
If there are any naming rules or mandatory attributes set on the destination folder, then appropriate dialogs prompting for inputs are displayed.
When you copy or move a file, the attributes attached to the file are copied or moved with it. If the destination folder also has any required attributes that are not already attached to the file, you will be prompted for inputs.
1.10. How to Move, Copy or Issue Multiple Files
Select the folder containing the multiple files you need to move, issue, or copy.
Depending on the size of the browser or if you are using the 12d Synergy Mobile App, this option is displayed either on the ribbon or under the
 top-left menu.
The list of files in the selected folder is displayed in the Folder view.
Select the checkboxes against the files you want to move or copy.
Click the Bulk action
 button.
Depending on the size of the browser or if you are using the 12d Synergy Mobile App, the Bulk Action button is displayed either as a button on the ribbon or as an option in the
 ellipsis menu at the bottom-right of the page.
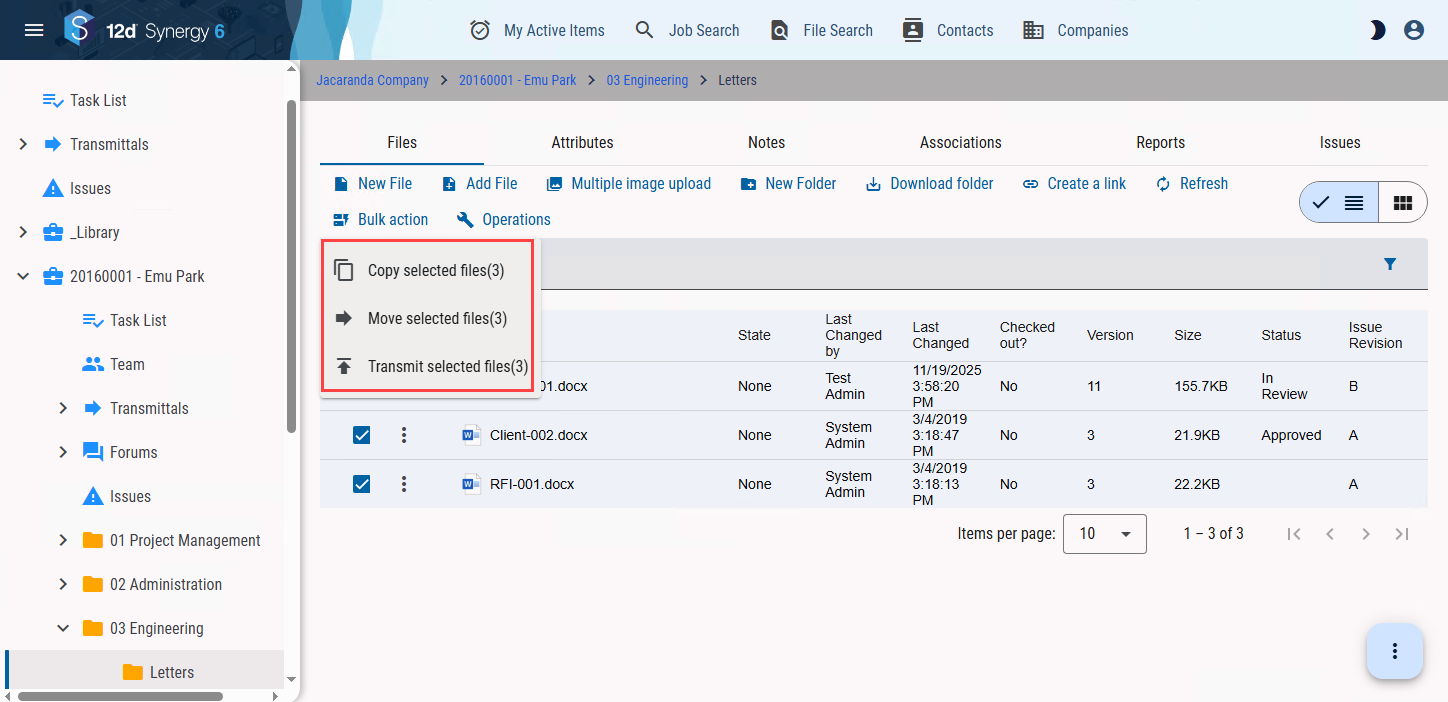
The following three options are displayed.Copy selected files
Move selected files
Transmit selected files
Do one of the following:
To copy the selected files to a different job/folder, do the following:
Select the Copy selected files option.
The Select Folder dialog box is displayed.

Select the job and/or folder into which you want to copy the files.
The selected files are copied into the destination folder.A Describe this change dialog is displayed when your 12d Synergy Administrator configures the change descriptions for changing a file.
To view the tree structure of jobs and folders for easy navigation, click the Show Tree
icon.To move the files to a job and/or folder in a different job, click the Change job
 icon to search for the required job.
If there are any naming rules set or mandatory attributes on the destination folder, then appropriate dialogs prompting for inputs are displayed.
When you copy or move a file, the attributes attached to the file are copied or moved with it. If the destination folder also has any required attributes that are not already attached to the file, you will be prompted for input.
To move the selected files to a different job/folder, do the following:
Select the Move selected files option.
The Select Folder dialog box is displayed.
Select the job and/or folder into which you want to move the files.
The selected files are moved into the destination folder.A Describe this change dialog is displayed when your 12d Synergy Administrator configures the change descriptions for changing a file.
To view the tree structure of jobs and folders for easy navigation, click the Show Tree
icon.To move the files to a job and/or folder in a different job, click the Change job
 icon to search for the required job.
If there are any naming rules set on the destination folder, then appropriate dialogs prompting for inputs are displayed. The file is named accordingly in the destination folder.
To transmit the selected files, refer to Transmittals.
1.11. How to Search for a File
You can search for a file with the following parameters:
Name of the file
Contents of the file
Custom and defined attributes of the file
On the 12d Synergy ribbon, click the File Search
 button.
Depending on the size of the browser or if you are using the 12d Synergy Mobile App, this option is displayed either on the ribbon or under the
 top-left menu.
Do any of the following:
To specify the file search limit, select one of the following options from the Limit To list.
Current job only
Current job and sub-jobs
Current folder only
Current folder and subfolders
To search based on the name of the required file, enter the name of the required file in the File Name box.
To search based on the contents of the required file, enter any search string from the content of the required file in the Contents box.
To include deleted files in the file search, select the Show deleted files checkbox.
To search based on configured attributes of the required file, do the following:
Click the Add Attributes
 button to configure the search based on relevant attributes. The Attribute Search form is displayed.
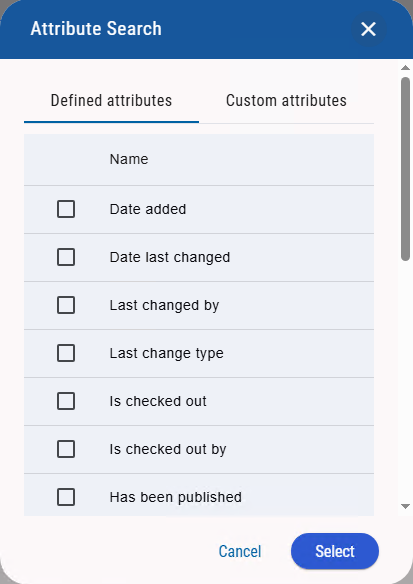
In the Defined attributes and Custom attributes tabs, select the checkboxes against the required attributes.
If you select an attribute of address or location type, you can use the map to select values for these attributes.
Click the Select button.
The selected attributes are displayed in the table below the Add attributes button.
Configure the search parameters for the selected attributes.
Click the Search Files
 button.
The search results are displayed in the <Top-level Job Name> > Search > Result form.
You can view the files in the Result form in Detail view ![]() or in Tiles view
or in Tiles view![]() .
.
You can perform the following actions on a file from this Result form by clicking the vertical ellipsis ![]() button displayed against the file.
button displayed against the file.
View the details of a file
Download a file
Go to the folder that holds the file