Admin Content
The Publishing feature allows you to send files to external parties for download via their Web browser. These downloads are tracked and can be password-protected. You can set up notifications for yourself and others on the team to know when the files are downloaded by the recipients.
1.1. How to Configure Publishing
In the 12d Synergy Administration application, click the System Settings tab.
Click the Web Access tab.
Ensure you have configured access to the Web using How to Configure Web Access procedure.
Click the File Publishing tab.
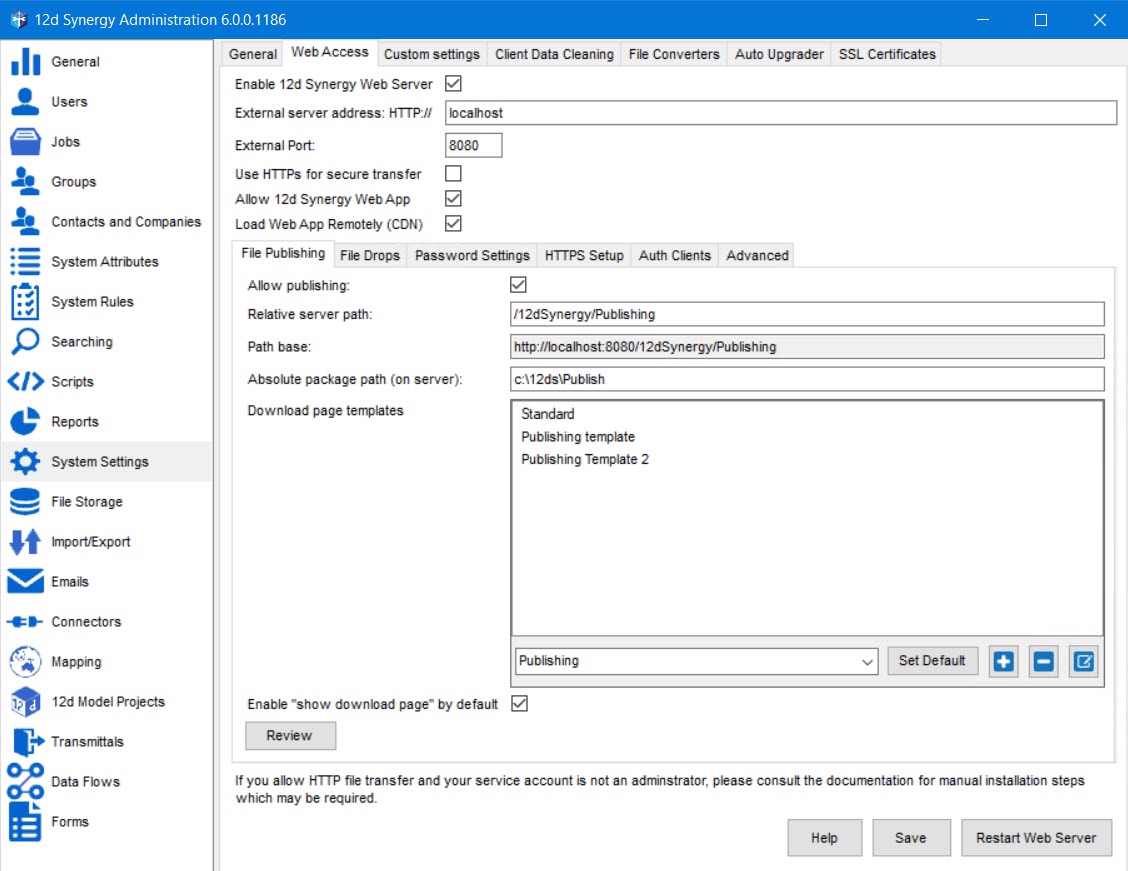
Select the Allow Publishing check box.
Enter a URL base for any publishing request in the Relative Server Path box.
The final URL will be displayed in the Path base box.
Enter a location on the server or a network drive via a UNC path where all the zipped published files have to be saved in the Absolute package path (on server) box.
A download page is the page displayed when a published file is being viewed by the recipient of the published files/package. You can choose whether or not to display the download page. Refer to step 9 in this procedure.
Here’s an example of a download page.
.jpg "pubdlpg(3).jpg")
.jpg)
In the above image, you can do any of the following:You can select a template for use. From the list numbered 1, select whether you wish to have just a publishing template ( Publishing option) or a download page template with a password ( Publishing with Password option) that gives you access to the published file or package. Based on the option you select, the existing templates of that type are displayed in the Download page templates box (numbered as 3). You can select one of the displayed templates to use it.
You can create a download page template of one of the two types ( Publishing or Publishing with Password) by clicking the
 button.
The Enter Page Template Name window is displayed.
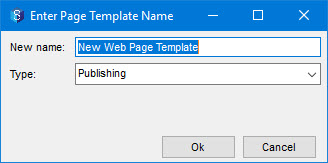
Enter the name for the new template you want to create in the New name: box and select the type of publishing template you want to create from the Type: list. And then click the Ok button.
The template editor is displayed, and you can create it as per your requirements.
.jpg "editor(2).jpg")
You can set default templates for each type of publishing. Select the type of publishing from the list numbered 1, and then select a template from the ones displayed in the box numbered 3. Click the Set Default button (numbered 2).
The selected template is now set as the default template for the publishing type you have selected in the list numbered 1. And it is marked as DEFAULT (numbered as 6) in the Download page templates box (numbered 2).
You can edit the format of a template. Select the required template in the Download page templates box (numbered 2) and click the
 button.
The template editor is displayed and you can edit it based on your requirements.
You can delete a template. Select the required template in the Download page templates box (numbered 2) and click the
.png) button.
button.The selected template is deleted.
Select the Enable “show download page” by default check box (numbered 5 in the image of step 8) to always show a download page while downloading the published file or package. If this check box is not selected, the download page is not displayed.
If you select the Publishing with Password option from the list numbered 1 in the image of step 8, then you can set the rules for creating a password. In the Web Access tab only, select the Password Settings tab and define the rules.
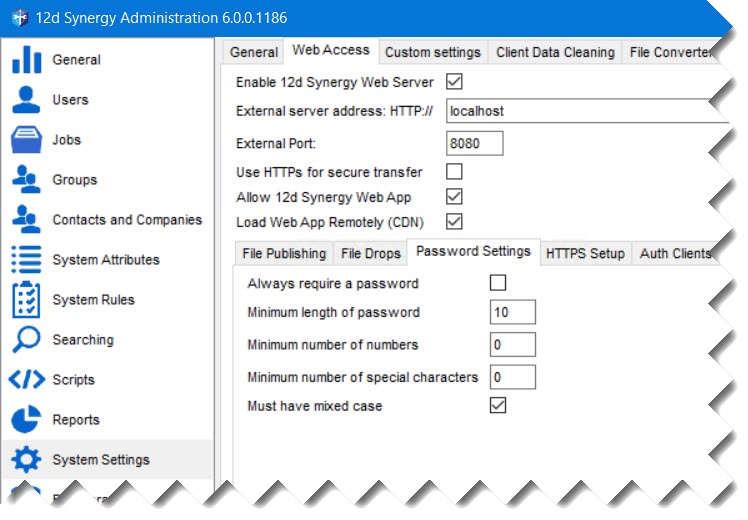
These password rules apply even to the Web File Drops feature.
Click the Save button.
1.2. How to Publish a File
Ensure to have the publishing permissions for the folder(s) that contains the files you want to publish.
You can publish the file as it is or as a package with other files, where it is zipped and published.
1.2.1. Publishing a Single File
In the 12d Synergy Client application, access the folder that contains the file that needs to be published.
Select and right-click the required file, and select the Data Out > Publish option.
The File Publishing window > New tab is displayed.
.jpg)
The Display name, Specific version:, Available until:, and Password fields are optional. Hence, you have to select the check boxes displayed against them to enable and use them.
The Existing tab in the above window displays all the created, published files and packages under two sections - Active and Inactive. The link to the published file is displayed in the Link: box.
.bmp "pub2(3).bmp")
You can select any published file and click the Info button to see the tracking details of a published file, such as who has downloaded it and when. In the Notifications tab, you can see and add the contacts who should receive an email when the published file is downloaded.

Similarly, when you select any published package, and click the Info button, you can view the Tracking details, the Notifications tab and the Package contents tab which displays the files included in the selected package. The package contents tab is displayed only when you select a published package and not a single file.

Do any of the following:
Select the checkbox against Display name box and enter a name for the file you want to publish. If this name is not given, then the name of the file being published is considered, by default.
Select the checkbox against Specific version: box and select the required version from the Select Version window which displays all the available versions of the selected file.
Select the checkbox against Available until: date list to select a date until when the published file will be available for download.
Select the checkbox against Password box to make the publishing password protected. You can either use a system generated password by clicking the Generate button or enter a password of your choice in the Password box.
Your 12d Synergy Administrator sets the password rules in the 12d Synergy Administration application > System Settings > Web Access > Password Settings tab.
Enter a description of the file you are publishing in the Description: box.
Select the required download page template from the Download Page: list for the file you are publishing.
Select the Send email check box to receive an email when the file is published.
Select the Always show download page check box to view the download page before downloading the published file.
Click the Notifications button and add mail recipients in the Publishing Notifications window. The selected email recipients will receive an email once the published file is downloaded by a contact.
Click the Publish button to publish the file.
One of the following happens based on whether or not you have selected the Send email check box in step 6 of this procedure.
If you have not selected the Send email check box, the file is immediately published, and a link to that is displayed in the Your file has been published prompt.

The link is also copied onto the clipboard and you can paste it on a web browser to see the download page and download the published file. You can download the file based on the options set up by your 12d Synergy Administrator in the 12d Synergy Administration application.
.jpg)
If you need to access the link to the published file, it is displayed in the Link: box in the Existing tab of the File Publishing window. This window is displayed when you right-click the required published file, and select the Data Out > Publish option.

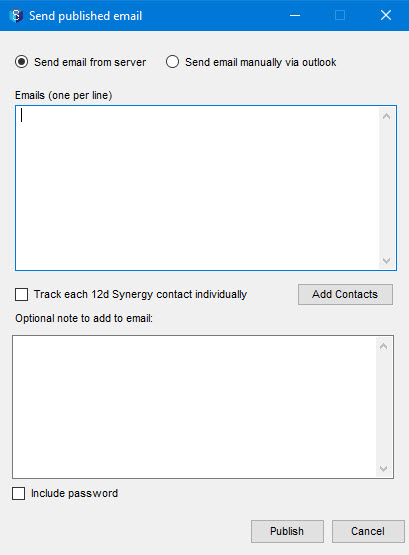
If you have selected the Send email check box in step 6 of this procedure, then the Send published email window is displayed.
Then do the following:
Select one of the following two options:
Send email from server - If this option is selected, then emails related to publishing are sent from the server.
Send email manually via Outlook - If this option is selected, then you have to send the publishing emails manually from MS Outlook.
Click the Add Contacts button to add the contacts to whom an email with the publishing details has to be sent. The added contacts are displayed in the Emails (one per line) box.
Select the Track each 12d Synergy contact individually check box to receive individual read receipts from the contacts once they download the published file.
If you want to add any content to the email, you can mention that in the Optional note to add to email: box.
If you want to include the password in the content of the email, select the Include password check box.
Click the Publish button.
The file is published and a link to that is displayed in the Your file has been published prompt.
The link is also copied onto the clipboard and you can paste it on a web browser to see the download page and download the published file. You can download the file based on the options set up by your 12d Synergy Administrator in the 12d Synergy Administration application.If you need to access the link to the published file, it is displayed in the Link: box in the Existing tab of the File Publishing window. This window is displayed when you right-click the required published file, and select the Data Out > Publish option.
.bmp "pub2(1).bmp")
You can also save the published fine as a QR code and download it on any system. Click the Save QR Code to Windows button to save the QR code as a .bmp file on your system. You can refer to it whenever you want to download the published form on any other system.
1.2.2. Publishing Files as a Package
If you want to publish multiple files as a package (or as a .zip file) then do the following:
Do one of the following:
Select multiple files, right-click and select the Data Out > Publish option.
Click the Build Package button (refer to image in step 2 of procedure 1.2.1).
The Publish as a package window is displayed.
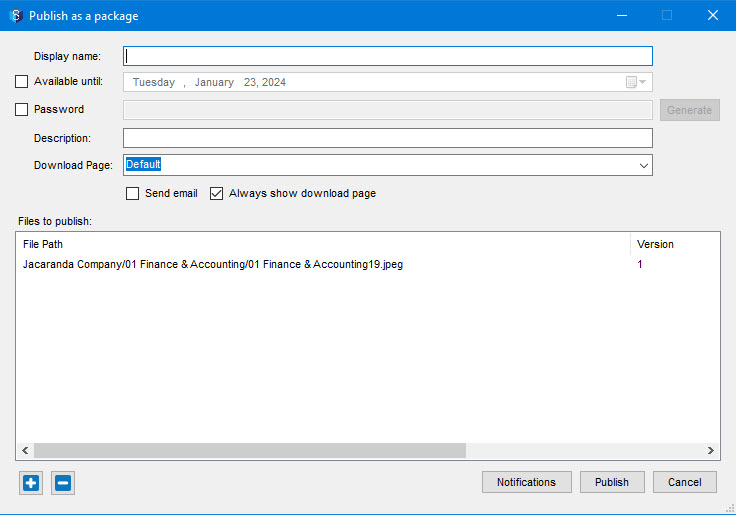
Enter the display name for the package you are creating with the files you initially selected in the 12d Synergy Client application, in the Display name: box.
Select the checkbox against Available until: date list to select a date until when the published package will be available for download.
Select the checkbox against Password box to make the published package password-protected. You can either use a system-generated password by clicking the Generate button or enter a password of your choice in the Password box.
Enter a description for the package you are publishing in the Description: box.
Select the required download page template from the Download Page: list for the package you are publishing.
Select the Send email check box to receive an email when the package is published.
Select the Always show download page check box to view the download page before downloading the published package always.
The contents of the package are displayed in the Files to publish: box. However, if you want to add more file(s) to the package, click the
button, and browse and select the required file(s) from any job or folder.The selected files get added to the Files to publish: box.
Click the Notifications button and add email recipients in the Publishing Notifications window. The selected email recipients will receive an email once the published package is downloaded by an end user.
Click the Publish button to publish the package.
The file is published, and the download page is displayed. You can download the .zip file from this page.If you need to access the link to the published file, it is displayed in the Link: box in the Existing tab of the File Publishing window. This window is displayed when you right-click the required published file, and select the Data Out > Publish option.
.bmp "pub2(2).bmp")
You also have the option to save the published file/package as a QR code and download it onto any system. Click the Save QR Code to Windows button to save the QR code as a .bmp file on your system. You can refer to it whenever you want to download the published file/package on any other system.
If you have opted to send an email about the published file, then the Send published email window is displayed. Please refer to step 9 of 1.2.1.
1.3. How to View the Published Files and/or Packages Dashboard
Admin Content
This feature is available in 12d Synergy Version 5.1.7 onwards.
In the 12d Synergy Administration application, click the System Settings tab.
Click the Web Access tab.
Ensure that you have configured access to the Web using How to Configure Web Access procedure.
Click the File Publishing tab.
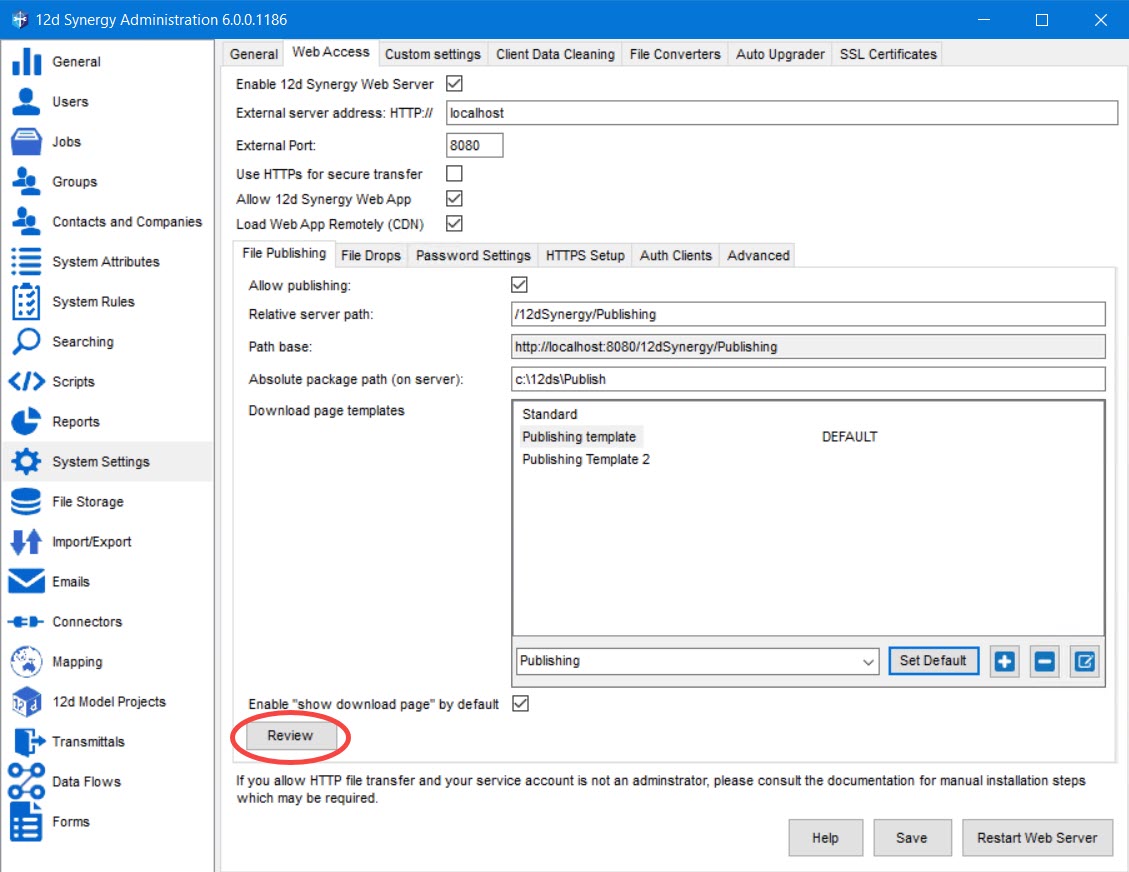
Click the Review button.
The Published Files and Packages window is displayed.

Number in the above window
Name of the UI Element
Description
1
Show: list
You can choose to view inactive, active or all publishing transactions.
2
Expiry: list
You can choose to view the publishing transactions that expire within a set data range.
3
Any Expiry checkbox
You can also choose to see all the publishing transactions with any expiry date by selecting Any Expiry check box.
4
Password: list
You can choose to view the published transactions based on whether or not they have a password set on them for downloading the published file. You can also choose to see the transactions irrespective of the password setting.
5
Search button
Click the Search button to view the publishing transactions that match the entered search criteria.
6
The table of published files and packages
All the search results that match the search criteria are displayed in this grid.
7
Files in the package: box
This box is displayed only when you select a published package from the search results (6). It displays the files in that selected package.
8
Details about the published file or package selected in the table(6)
This small section displays the details of the selected published file or package. Note that the Was Issued detail shows whether or not the file has been issued via publishing.
9
Show Info button
When you select any published package, and click the Show Info button, you can view the Tracking details, the Notifications tab and the Package contents tab. In the Notifications tab, you can see and add the contacts of people who should receive an email when the published package is downloaded. The Package contents tab is displayed only when you select a package from the search results and it displays the files included in the selected package.
.jpg)
Similarly, when you select any published file and click the Show Info button, you can view the tracking details of a published file, such as who has downloaded it and when. In the Notifications tab, you can see and add the contacts of people who should receive an email when the published file is downloaded.
You can also save the published file as a QR code and download it on any system. Click the Save QR Code to Windows button to save the QR code as a .bmp file on your system. You can refer to it whenever you want to download the published file/package on any other system.
10
Go to File button
Click this button to move focus to the selected file or packaged files in the 12d Synergy Client application.
11
Delete button
Click this button to delete the selected file or package. Once deleted, the file or package is made inactive and is shown in the search results as an inactive file or package.