The Web File Drops feature allows you to request file uploads from external parties. This is useful when you need to submit data that is larger than standard email allowances. You can also capture data at submission time such as attribute values. You can set notifications for receiving web file drops and also inform other contacts that web file drops are available.
1.1. How to Configure Web File Drops
Admin Content
In the 12d Synergy Administration application, click the System Settings tab.
Click the Web Access tab.
Ensure that you have configured access to the Web using How to Configure Web Access procedure.
Click the File Drops tab.
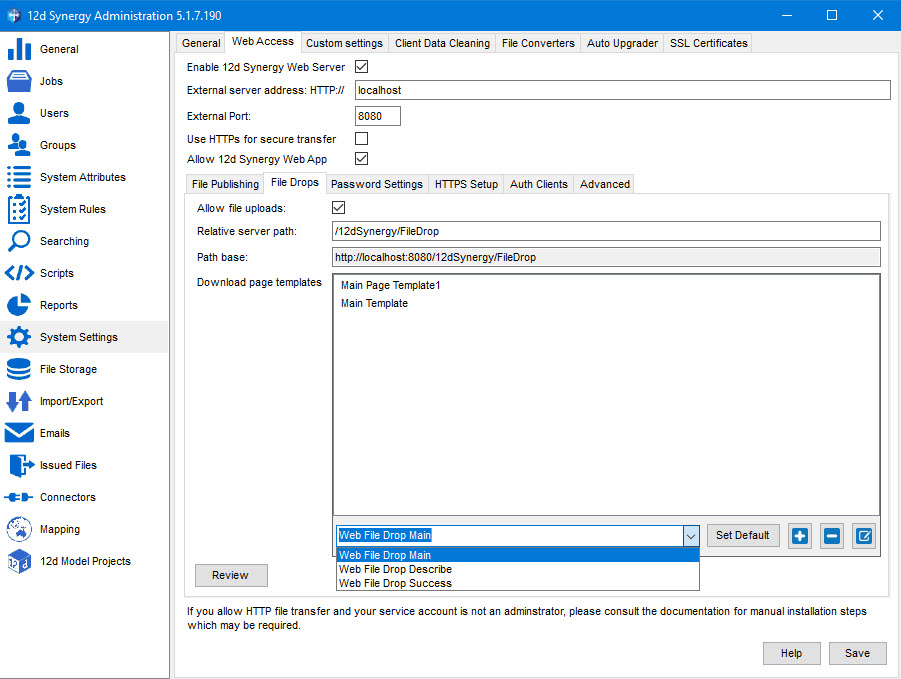
Select the Allow file uploads check box.
Enter a URL base for any web drop requests in the Relative Server Path box.
The final URL will be displayed in the Path base box.
In the Download page templates box, you can do any of the following:
From the list in the Download page templates box, select the method of publishing files for which you want to set a download page template.
Add a new template you might use as a download page while publishing files using the
 button. It gets displayed in the Download page templates box.
Select a template from the Download page templates box that you want to use as the default download page while publishing files and click the Set Default button. The word DEFAULT is displayed against the selected template.
Select a template to edit the format of the template using the
 button.
If you want to set the rules for creating a password for using the Web File Drops feature, click the Password Settings tab and define the rules.
These password rules will apply when you set a password for uploading the files to the 12d Synergy Server via a Web browser.
These password rules will also apply to the Publishing feature.
Click the Save button.
1.2. How to Create Web File Drops
In the 12d Synergy Client application, select the folder in which you wish to receive files.
Right-click the folder, and select the Other > Web File Drops option. The Web File Drops window is displayed. If there are any existing web file drops set on the selected folder, they are displayed in this window.
Click the Create New Drop button. The Create a Web File Drop window is displayed.

Enter the following details.
Tab Name
UI Element
Description / Action
Basic
Name: box
Enter a name for the Web Drop.
Description box
Describe the web drop you are creating.
Max size: box
If you want to place a limit on the size of the web drops, enter it in the Max size: box and select the unit of quantity of data from the list beside. If you do not enter anything in this box, there is no limit set on the size of web drops.
Allowable extensions: box
If you want to specify what type of files are allowed in the web drops, then you can mention their extensions here. If nothing is mentioned, then all type of files can be dropped into 12d Synergy.
Mode: list
Once a web drop is received by 12d Synergy, there are three modes to save the web drop.
Create a new folder for each drop — Each file drop is dropped into a new sub folder of the folder on which the web drop is created.
Upload to the current folder with unique file names — Each web drop is dropped into the folder on which the drop is created. The drops are given unique names.
Upload to the current folder but create a new version for existing files — Each web drop into the folder on which the drop is created, but the web drops are saved as new versions of the existing files.
It is mandatory to select a mode for a web drop.
Password box and Generate button
If you want the web file drops to be password protected, then enter the password here, or click the Generate button for the system to generate a password for you. If you leave this box blank, then no password is required for the web file drops.
Expiry Date check box and Calendar list
If you want the web file drops’ invite (link to receive web drops) to expire by a certain date, select the check box and set a date in the Calendar list. This would mean that any web file drops being received beyond this date will not be successful.
Close each contact drop after submission check box
Select this check box to restrict the contact from sending multiple web drops using the link emailed to them.
If this check box is not selected, then the contact can use the web drops link to send multiple web drops.
Custom Pages:
Main Page list
Describe Page list
Success Page list
This section is for defining the pages that are displayed while using the web drops feature. You can create and design multiple templates for each of these pages in the 12d Synergy Administration application > System Settings > Web Access > File Drops tab. Here you can choose which template you want to use for the web drops from the respective lists.
Main page is the page that is displayed when the web drops link is clicked by the contact. It is a page that opens up in a web browser and has the space to upload / drop files.
Describe page is the page that is displayed after uploading the files and clicking the Next button. You have to enter a brief description of the web file drops in this page. It is mandatory to enter a description.
Success page is the page that is emailed to a contact to notify them about a successful file drop upload.
Attributes
You can add attributes that need to be updated when dropping files into 12d Synergy.
You can either create or edit an existing attribute using the
 button.
Contacts
Enter the contacts who have to upload the files into 12d Synergy. You can also access the link to the web drops in this tab.
Notifications
Enter the email addresses of the contacts who have chosen to be notified if any web drop is uploaded from the web page.
After entering all details, click the Create button to create the web file drop.

The web drop is created and is displayed in the Web File Drops window.
Click the Close button.
1.3. How to Upload Web File Drops
If you have been nominated or added as the contact to drop files, you will receive a mail with a link to upload the files once a web drop is created.
Click the link to open the web file drop upload page ( main page) in a web browser.
You can choose to drag and drop the required files in the given space or browse and select the required files that constitute the web drop.
Click the Next button.
The Description page is displayed.Enter the description in the space provided and click the Submit button.
A page that informs you the status of the web file drops is displayed. This page is called the success page.Note that your 12d Synergy Administrator can create and edit the templates for the Main page, Description page and Success page in the 12d Synergy Administration application.
1.4. How to Edit a Web File Drop
1.4.1. From the 12d Synergy Client application
In the 12d Synergy Client application, select the folder which has the required web file drops set.
Right-click the required folder, and select the Other > Web File Drops option. The Web File Drops window is displayed. If there are any existing web file drops set on the selected folder, they are displayed in this window.
Select the web file drop you want to edit and click the Edit button. The Edit Web Drops window is displayed.
.bmp "webdrop3(1).bmp")
Make the necessary edits in this window and click the Save button. For a description of the fields in this window, please refer to step 4 in How to Create Web File Drops procedure.
1.4.2. From the 12d Synergy Administration application
Admin Content
In the 12d Synergy Administration application, click the System Settings tab.
Click the Web Access tab > File Drops tab.
Click the Review button.
The Web Drops window is displayed.
Select the web file drop that you want to close and click the Edit button. The Edit Web Drops window is displayed.

Make the necessary edits in this window and click the Save button. For a description of the fields in this window, please refer to step 4 in How to Create Web File Drops procedure.
1.5. How to Close a Web File Drop
When a web file drop is closed, it means that the upload link of that web file drop is no longer active and hence no more file drops can be uploaded to 12d Synergy.
You can close a web file drop completely using the 12d Synergy Administration application or you choose to close a web file drop for a single contact from the 12d Synergy Client application.
1.5.1 Closing a Web File Drop from the 12d Synergy Administration application
Admin Content
In the 12d Synergy Administration application, click the System Settings tab.
Click the Web Access tab > File Drops tab.
Click the Review button.
The Web Drops window is displayed.
Select the web file drop that you want to close and click the Close Drop button.

A confirmation prompt is displayed.Click the Yes button.
The selected web file drop is closed and the status of the selected web file drop is changed to Closed in the State column.
1.5.2. Close a Web File Drop for a Specific Contact from the 12d Synergy Client application
In the 12d Synergy Client application, select the folder which has the required web file drops set.
Right-click the required folder, and select the Other > Web File Drops option. The Web File Drops window is displayed. If there are any existing web file drops set on the selected folder, they are displayed in this window.
Select the web file drop which has the file drop you want to close and click the Edit button.
The Edit Web Drops window is displayed.Select the Contacts tab.
Select the contact who’s web file drop link you want to close. This means that this contact can no longer upload any web file drops to 12d Synergy.
Click the Close Drop button.
Click the Save button.
On the same lines, you can also open a Web file drop by the same procedure mentioned above. Select the web file drop to edit it in the Web File drops window, go to the Contacts tab in the Edit Web Drops window and select the closed (False) web file drop for each contact and click the Open button. The same can be done from the 12d Synergy Administration application, while reviewing the web file drops.
1.6. How to View the Web File Drops Dashboard
Admin Content
This feature is available in 12d Synergy Version 5.1.7 onwards.
In the 12d Synergy Administration application, click the System Settings tab.
Click the Web Access tab.
Click the File Drops tab.
.jpg)
Click the Review button.
The Web Drops window is displayed and its elements are explained below.

Number in the above window | Name of the UI Element | Description |
1 | Show: list | You can choose to view inactive, active or all web drops. |
2 | Expiry: list | You can choose to view the web drops that expire between a set data range. |
3 | Any Expiry checkbox | You can also choose to see all the web drops with any expiry date by selecting Any Expiry check box. |
4 | Password: list | You can choose to view the web drops based on whether or not they have a password set on them for downloading the web file drops. You can also choose to see the web file drops irrespective of a password. |
5 | Search button | Click the Search button to view the web file drops that match the search criteria. |
6 | The table of web file drops | All the web file drops that match the search criteria are displayed in this table along with their details. The State column displays whether or not the web file drop link is open for uploading more file drops. |
7 | Details about the web file drop you select from the table | This small section displays the details of the selected web file drop. Note that the Open detail shows whether or not the selected web drop is active and how many contacts can upload web file drops. The Closed detail tells us if any of the web file drop is inactive. |
8 | Edit button | Select a web file drop in the table and click this button to be able edit the web file drop. |
9 | Go to Folder button | Click this button to move focus to the selected folder in the 12d Synergy Client application which is receiving web file drops . |
10 | Close Drop button | Click this button to close the selected web drop. Once the web drop is closed, is is no longer active, but is still displayed in the search results. |
11 | Close button | This button is to close the Web Drops page. |