Client Content
This feature was initially called Issuing, and is now renamed to Transmittals.
The Transmittals feature in the 12d Synergy is an in-built secure data transmission tool. Documents or files to be transmitted are grouped into file sets. These sets can then be transmitted to one or more individuals who are added as Synergy contacts, both internal and external. During the process, receipt transmittals can be automatically populated from a built-in template if desired. The Transmittals section of 12d Synergy captures a snapshot of the files as they were at the time of transmitting, ensuring files can be recalled if needed later.
There are various options for transmitting file sets. A brief description of each is mentioned below:
Via Email (Server) – This option transmits the transmittal via an automated email from the 12d Synergy Server. The recipient’s email size limit is a limitation in this method. While this method tracks the details of the transmittal sent, there is no proof that the files have been received and accessed by the recipients.
Via Email (Outlook) – This option transmits the transmittal via an editable email from your Outlook. The recipient’s email size limit is a limitation in this method. While this method tracks the details of the transmittal sent, there is no proof that the files have been received and accessed by the recipients.
Via Publishing – This option transmits the transmittal via a secure web link that can be password-protected. It then sends an automated template email with the web link to recipients. This option can track both the transmittal details and the receipt details.
Via Publishing (Outlook) – This option transmits the transmittal via a secure web link that can be password-protected. It then creates an editable email with the link from your Outlook. This option tracks the transmittal details and receipt details of the first contact mentioned in the To field of the transmittal email in Outlook. If you want to track the details of all contacts, it is suggested that you transmit the file set via publishing (NOT using Outlook).
Manually – This option zips the transmittal and saves it in the local Downloads folder for manual submission. A record is maintained that a transmittal was transmitted manually.
Internally – This option saves the transmittal to a location in the 12d Synergy Client application and shares an automated link with 12d Synergy users via email. A record is maintained that a transmittal has been transmitted internally.
1.1. How to Create a File Set
In the 12d Synergy Client application, click the Transmittals link in the job tree.
The File Set Types are displayed in the tree structure and also in the right panel of the window. Your 12d Synergy Administrator creates these file set types to organise your transmittals..png)
Click the required file set type.
All the file sets of that file set type are displayed in the top-right panel of the window..png)
Click the Create Set
 icon.
icon.
The Create a File Set window is displayed.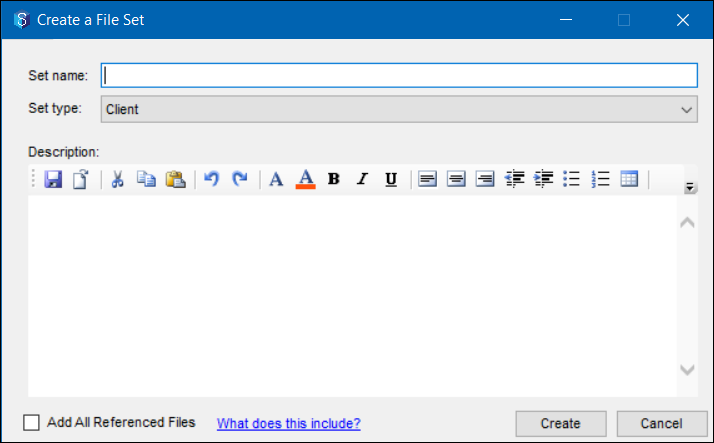
Enter a name for the file set you are creating in the Set name box.
Select the required file set type from the Set type list.
Enter a description for the file set in the Description text editor.
Select the Add all referenced files checkbox if you want to add all relevant references for the files being transmitted. The relevant references are determined when the files are transmitted.
Click the Create button.
A prompt is displayed asking if you want to select the files to be transmitted..png)
Select the Yes option to browse and select the files to be transmitted as a part of the file set you are creating from the Select files to transmit - <job name> window.
The file set is created and is displayed in the top-right panel of the Transmittals view. The files selected as a part of the file set are displayed in the Files tab of the bottom-right panel of the Transmittals view.Select the No option to define the file set later.
The file set is created and displayed in the top-right panel of the Transmittals view.
1.2. How to Create a File Set with a Folder Structure
You can transmit a folder with subfolders and files in the 12d Synergy Client application.
In the 12d Synergy Client application, select a folder from the job tree structure that needs to be transmitted with all its contents (files, subfolders, and their contents).
Right-click the folder to select the Data Out > Transmit option.
.png)
The Pick a File Set Type window is displayed.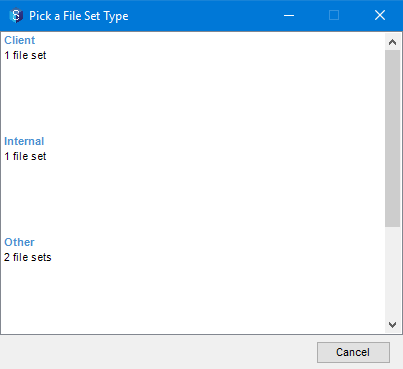
Click the required Set Type.
The following 12d Synergy window is displayed.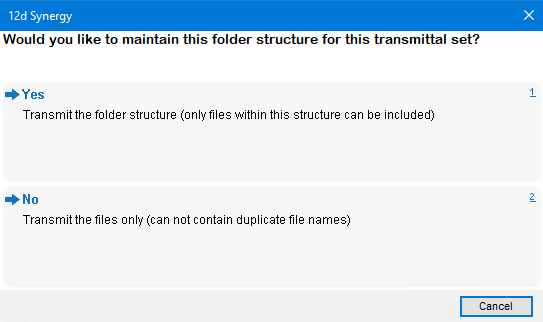
Do one of the following:
To transmit the selected folder structure and the files included in the structure, click Yes.
To transmit only the files with unique names in the selected structure, click No.
The Create a File Set window is displayed.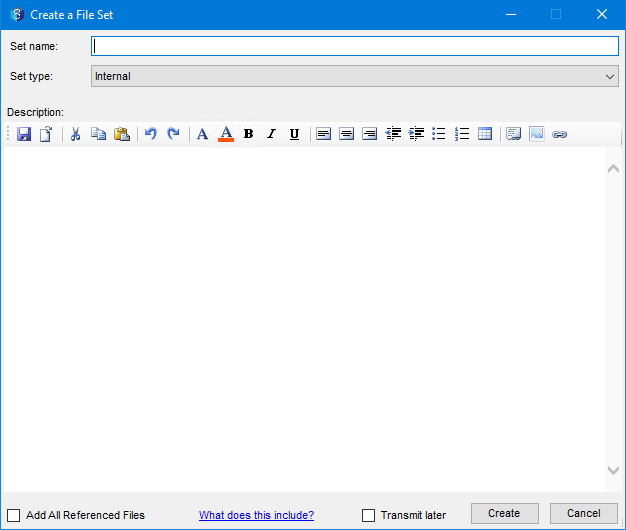
If there are two files in the selected folder structure with the same names, then the application prompts a message notifying the file name which has been used for naming more than one file. Unless you change the names of the files to unique names, you will not be allowed to create a file set with the selected files.
Enter a name for the file set you are creating in the Set name box.
Select the required file set type from the Set type list.
Enter a description for the file set in the Description text editor.
Select the Add all referenced files checkbox if you want to add all relevant references for the files being transmitted. The relevant references are determined at the time of transmission.
Click the Create button.
A prompt is displayed asking if you want to select the files to be transmitted.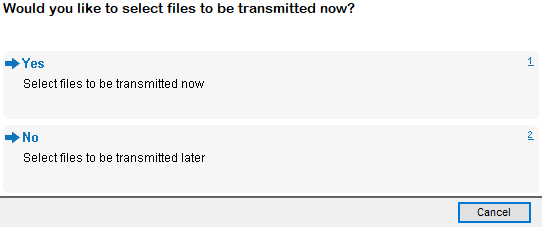
Select the Yes option to browse and select the files to be transmitted as a part of the file set you are creating from the Select files to transmit - <job name> window.
The file set is created and is displayed in the top-right panel of the Transmittals view. The files selected as a part of the file set are displayed in the Files tab of the bottom-right panel of the Transmittals view.Select the No option to define the file set later.
The file set is created and displayed in the top-right panel of the Transmittals view.
You can now transmit the file set like any other file set.
1.3. How to Transmit a File Set
In the 12d Synergy Client application, click the Transmittals link in the job tree and then click the required File Set Type.
Select the required file set from the top-right panel of the window.
The contents of the file set are displayed in the Files tab of the bottom-right panel.Click the Transmit
 icon.
icon.
The Transmit Set window is displayed..png)
By default, the File set version is the Current version (or the latest version) of the file set.Once a file set has been transmitted, a version of the file set is created. You can transmit previous versions of the file set by clicking the Change
 button displayed against the File set version field and selecting a different version from the Change File Set Version window.
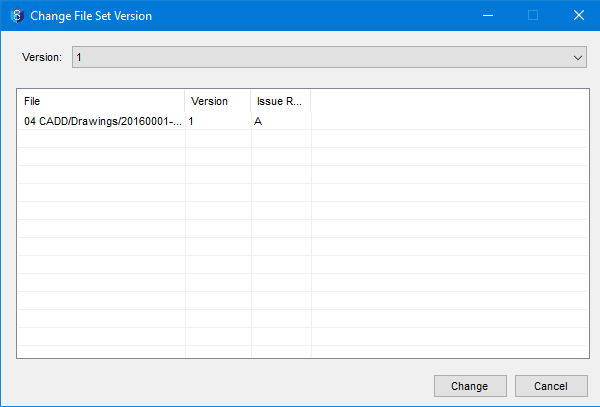
In the Transmittal Mode section, select one of the following options from the Transmit these files list:
Via Email (Server) – This option will transmit the file set via an email from the Server.
Via Email (Outlook) – This option will transmit the file set via an email from Outlook.
Via Publishing – This option will publish the file set over the internet, which is viewable in any web browser.
Via Publishing (Outlook) – This option will publish a link to the file set via an email from Outlook.
Manually – This option will transmit the file set in a zip format for download. It can be downloaded to the default Downloads folder on your system. A record is maintained that a file set has been transmitted manually.
Internally – This option will save the file set at a specific location within the 12d Synergy Client application. This location is then shared with selected 12d Synergy users via email.
In the Required Attributes section, enter the values for the required attributes that are displayed.
In the Contacts section, do the following:
In the To tab, using the Quick Search option and
 icon, add the contacts to whom the file set has to be transmitted.
In the CC tab, using the Quick Search option and
 icon, add the contacts to whom a copy of the email with the transmitted file set has to be sent.
In the Receipts tab, select the relevant checkboxes to add the contacts to whom a notification of a transmitted file set with a transmittal has to be sent.
You can click the Add Team
 button in the To, CC, and Receipts tabs to send emails, notifications, or receipts respectively to the entire Team. To know who constitutes a team, refer to the Teams page.
Select the Include transmittal cover sheet checkbox to include an overview of the files being transmitted as the cover sheet.
Select the Zip files checkbox to zip the files before transmitting them.
Based on the mode selected for transmitting the file set, one of the following events occurs.
1.3.1. If the Transmittal Mode is ‘Via email (Server)’, then do the following:
Click the Transmit button.
The Email files window is displayed.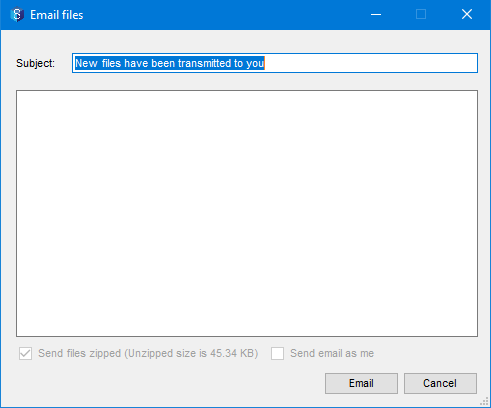
Enter a different subject for the email, if required, in the Subject box.
If you want to add any additional information to the email, enter it in the box below the Subject box.
Click the Email button.
A prompt notifying that the file set has been transmitted successfully is displayed.
1.3.2. If the Transmittal Mode is ‘Via email (Outlook)’, then do the following:
Click the Transmit button.
An email is drafted in your Outlook with the file set attached..png)
You can make any edits to the email if required and then click the Send button.
A prompt asking you if you want to add the message to 12d Synergy after the email is sent is displayed.Click Yes to save it in one of the respective jobs using a Select a Job window and then send the email.
Click No to just send the email.
1.3.3. If the Transmittal Mode is ‘Via Publishing’, then do the following:
Click the Transmit button.
The Publish this transmittal window is displayed.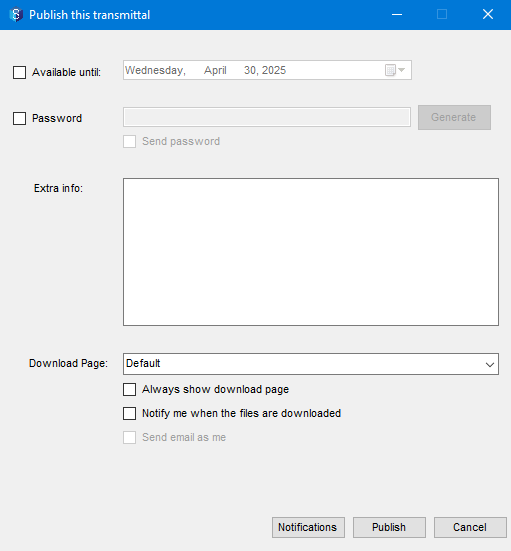
Select the Available Until checkbox and click the calendar
 list to select a date until when the transmittals will be available for download.
Select the Password checkbox and enter a password if you want the files to be password-protected.
Select the Send password checkbox to send the password in the published email to the selected recipients. If this checkbox is not selected, then the password has to be communicated to the recipients manually.
Enter any information you want the recipients to know in the Extra info field.
Select the required template for the download page from the Download Page list.
Select the Always show download page checkbox to view the download page for downloading the checkbox. If this checkbox is not selected, the transmittals are directly downloaded into your Downloads folder.
Select the Notify me when the files are downloaded checkbox to receive a notification when the recipients download the published files.
If your 12d Synergy Administrator allows you to send transmittals from different email addresses, then the Send email as me checkbox is enabled. You can select this checkbox to send the transmittals as emails from your email address.
Click the Notifications
 button to add notification recipients in the Publishing Notifications window, and then click the Set button.
Click the Publish button.
1.3.4. If the Transmittal Mode is ‘Via Publishing (Outlook)’, then do the following:
Click the Transmit button.
The Publish this transmittal window is displayed.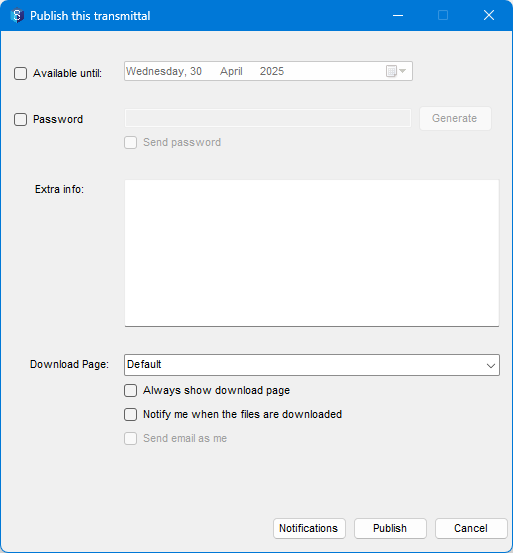
Select the Available Until checkbox and click the calendar
 list to select a date until when the transmittals will be available for download.
Select the Password checkbox and enter a password if you want the files to be password-protected.
Select the Send password checkbox to send the password in the published email to the selected recipients. If this checkbox is not selected, then the password has to be communicated to the recipients manually.
Enter any information you want the recipients to know in the Extra info field.
Select the required template for the download page from the Download Page list.
Select the Always show download page checkbox to view the download page for downloading the checkbox. If this checkbox is not selected, the transmittals are directly downloaded into your Downloads folder.
Select the Notify me when the files are downloaded checkbox to receive a notification when the recipients download the published files.
If your 12d Synergy Administrator allows you to send transmittals from different email addresses, then the Send email as me checkbox is enabled. You can select this checkbox to send the transmittals as emails from your email address.
Click the Notifications button to add notification recipients in the Publishing Notifications window, and then click the Set button.
Click the Publish button.
An email with the link to the published files is drafted in your Outlook.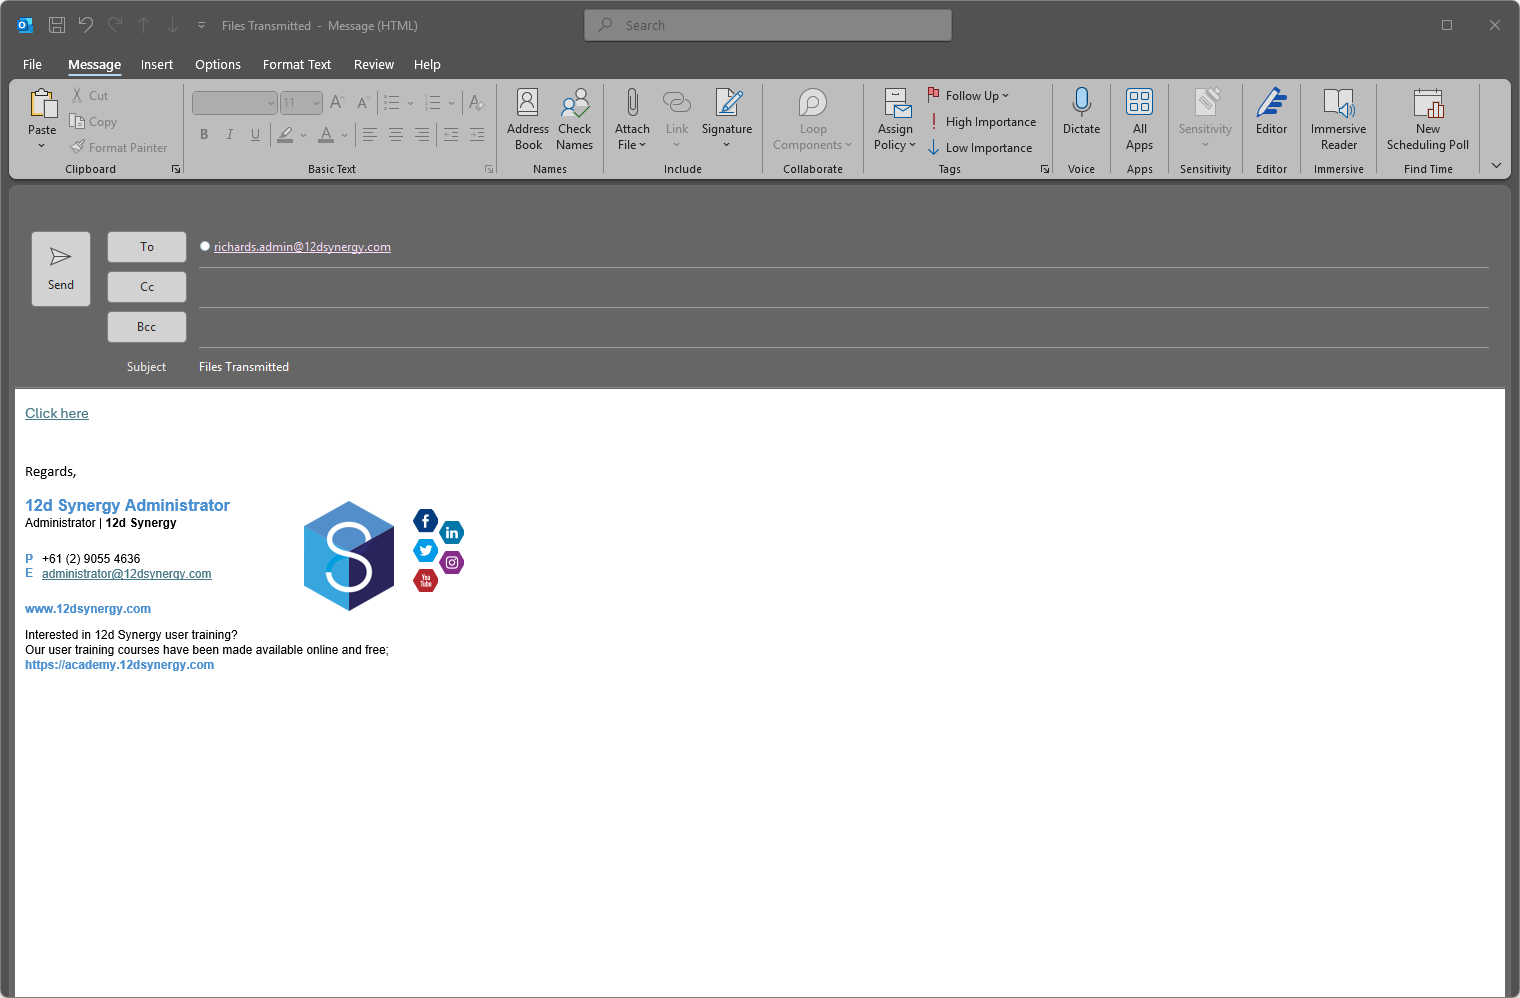
You can make any necessary edits and then click the Send button.
A prompt is displayed asking if you want to add the message to 12d Synergy after the email is sent.Click Yes to save it in one of the respective jobs using a Select a Job window, and then send the email.
Click No to send the email.
1.3.5. If the Transmittal Mode is ‘Manually’, then do the following:
Click the Transmit button.
The Browse for Folder window is displayed.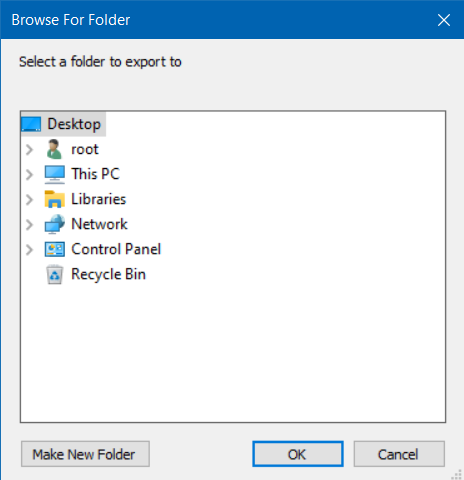
Select the location on the system where you want to save the transmitted file set and click the Ok button.
Click the Make New Folder button in the Browse for Folder window to create a new folder in the selected location for saving the transmitted file set.
1.3.6. If the Transmittal Mode is ‘Internally’, then do the following:
Click the Transmit button.
The Select a Folder window with the tree structure of the 12d Synergy Client application is displayed.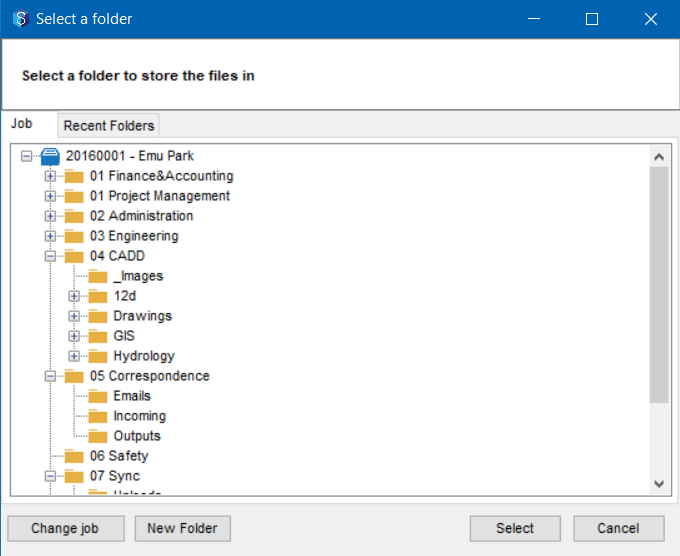
Select a folder to save the transmitted file set.
Click the Change job button to save the transmitted file set in a different job using the Find a job window.
Select a folder or job in the job tree and click the New folder button to create a new folder using the Create a Folder window.
Click the Select button.
The Email files window is displayed..png)
Enter a different subject for the email, if required, in the Subject box.
If you want to add any additional information to the email, enter it in the box below the Subject box.
Click the Email button.
A prompt is displayed notifying that the file set has been transmitted successfully.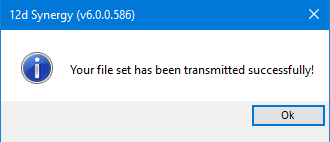
1.4. How to Modify a File Set
A file set can have different versions of itself. A version of a file set is created after you transmit a file set and then modify it. You can modify the file set by adding a new file to it, deleting an existing file, or changing the version number of a file in it. The different versions of the file set are displayed in the File Set view > Files tab page in the bottom-right panel.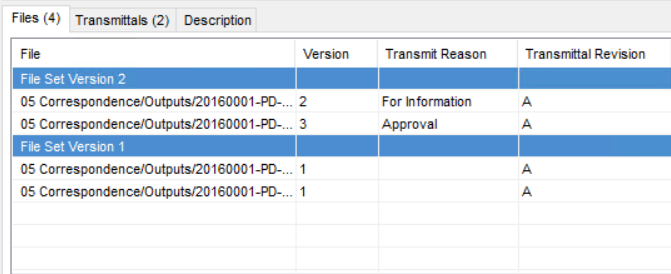
If the latest version of the file set in the Files tab is NOT yet transmitted, then all the modifications you make will apply to that file set version only.
In the 12d Synergy Client application, click Transmittals in the job tree and then click the required File Set Type.
Select the required file set from the top-right panel of the window.
The version-wise contents of the file set are displayed in the Files tab of the bottom-right panel.Click the Modify
 icon.
icon.
The Modify File Set window is displayed.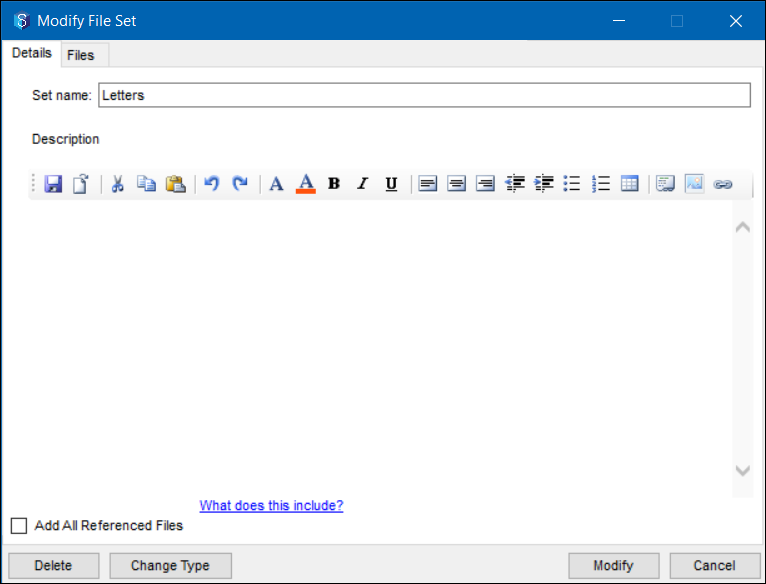
In the Details tab, you can modify any of the following:
Set name field – the name of the file set.
Add all referenced files checkbox – whether or not to include the files referenced by the files of the file set at transmit time.
Description – a description of the transmitted file set.
Change Type – the file set type of the transmitted file set.
Delete – delete the file set permanently.
In the Files tab, you can modify any of the following:

To Add files to the file set, click the Edit
 icon to browse and select more files from the Select Files to transmit - <job name> window and click the Select button.
When trying to modify a file set created out of a folder structure, you can add, modify, or delete only the contents within the structure. To add files to be transmitted as a part of the structure, you must first add the files using the Add files
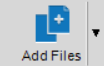 button in the Folder View and then modify the file set to include the newly added file.
To Delete files from the file set, select the file in the Modify File Set window and click the Delete
 icon.
icon.
The selected file is deleted from the file set.To Change the version of a file in the file set, hover the mouse on the version column of the required file and click the Change button to select the required version of the file from the Select Version window.
To change the file's version to its latest version, select the file and click the Update Versions button. You can also select multiple files by pressing the Ctrl button while selecting them.
When you modify the file set name in the Set Name field, select or clear the Add all referenced files checkbox, or add a description to the file set, a new version of the file set is NOT created. It is only created when you make changes to the files included in a transmitted file set, like adding or deleting files and changing the version number of the included files.
Click the Modify button.
The file set is modified and is displayed as the next version in the Files tab.
You can also add a file to a file set or create a new file set from the Folder view by using the right-click options Data Out > Transmit > Use existing transmittal set option and Data Out > Transmit > Create a new transmittal set option, respectively..png)
1.5. How to View Transmitted File Details
In the 12d Synergy Client application, click Transmittals in the job tree and then click the required File Set Type.
Select the required file set from the top-right panel of the window.
.png)
The version-wise contents of the file set are displayed in the Files tab of the bottom-right panel.
Click the Transmittals tab to view the transmitted file sets.
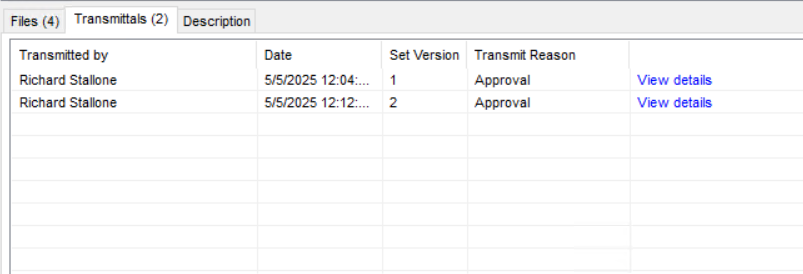
To view the details of any transmitted file set, click the View details link of that transmitted file set.
The Transmittal Details window is displayed. You can view all the details related to the transmitted file set in this window..png)
1.6. How to View Publishing Information
In the 12d Synergy Client application, click Transmittals in the job tree and then click the required File Set Type.
Select the required file set from the top-right panel of the window.
Click the Transmittals tab to view the transmitted file sets.
Click the View details link of the required transmitted file set.
The Transmittal Details window is displayed.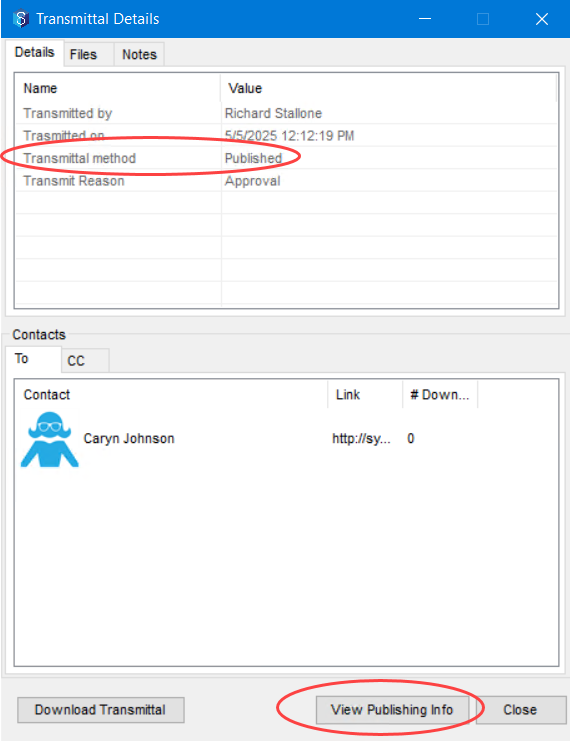
In the Details tab, if the value of the Transmittal Method is Published, then the View Publishing Info button is displayed.
Click the View Publishing Info button.
The Publishing Information window is displayed.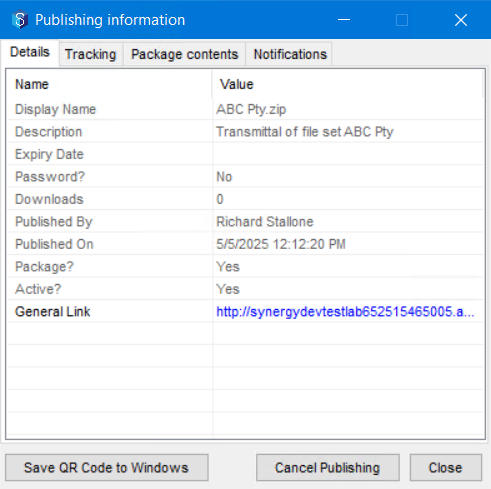
1.6.1. To view the Publishing Information on your Mobile Device
You now have the option to view the publishing information on your mobile device by scanning the QR code generated for the required published file set.
In the Publishing Information window, click the Save QR Code to Windows button.
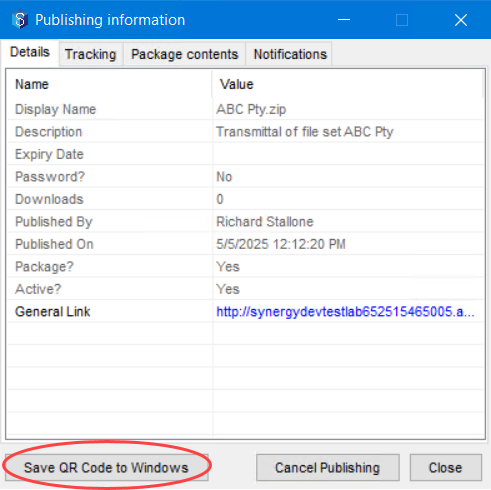
Save the QR code as an image on your local system.
Access the image and scan the QR code using your mobile device.
You will be able to view the publishing information on your mobile device.
1.7. How to View and Download a Transmittal
A transmittal is a document that summarises the details of a transmitted file set. It can be sent as a cover page when a file set is being transmitted.
In the 12d Synergy Client application, click Transmittals in the job tree and then click the required File Set Type.
Select the required file set from the top-right panel of the window.
Click the Transmittals tab to view the transmitted file sets.
Click the View details link of the required transmitted file set.
The Transmittal Details window is displayed.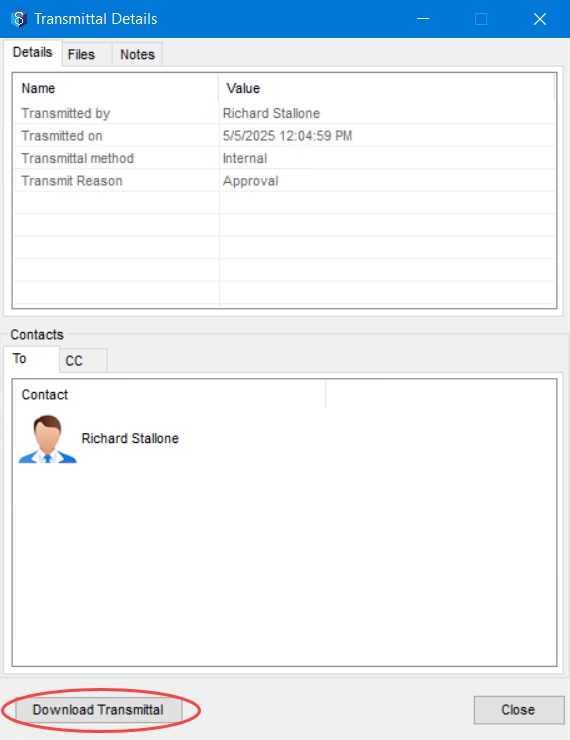
Click the Download Transmittal button.
The Save transmittal File as window is displayed.Enter a name for the transmittal in the File name box.
Click the Save button.
A prompt is displayed asking if you want to view the transmittal file.Click Yes.
The transmittal is displayed in .html format in your browser..png)