Admin Content
Customisation files can now be transferred from 12d Synergy to a configured location on each user’s machine, outside of the workspace. The location, by default, is the 12d model customisation location, such as c:\12d\14.00. While it can also be at any other location that suits your environment, it must necessarily be outside your workspace.
The 12d model customisation location MUST be outside your workspace location.
You can have folders for each version of the 12d model environment you will be working on. You can therefore work across multiple versions of the 12d model on the same system. Your standard 12d model environment configuration file (env.4d or env.configs.4d) should point to this location.
1. 12d Model Settings
1.1. How To Configure the Global 12d Model Customisation Settings
In the 12d Synergy Administration application, click the 12d Model Projects tab.
Click the Customisation tab.
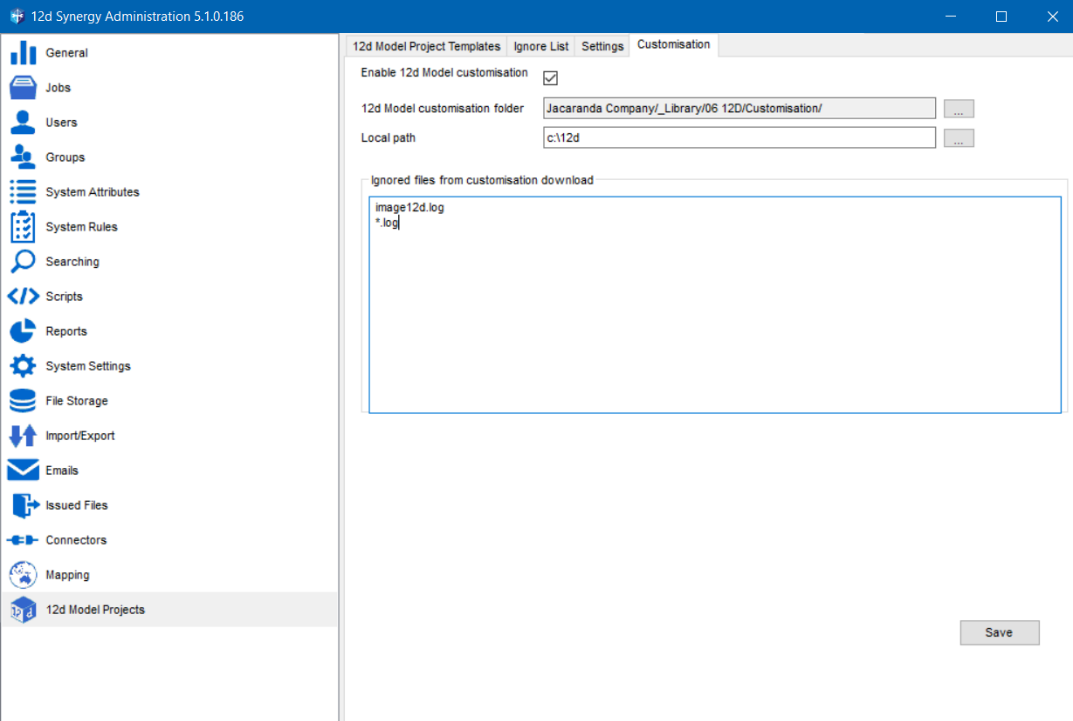
Select the Enable global 12d Model customisation checkbox, as these settings are global and apply to all jobs in the application. If this checkbox is disabled, you cannot configure global customisation settings.
If you want to define job level customisation settings, please read section 1.2.3.9. here.
Click the ellipsis
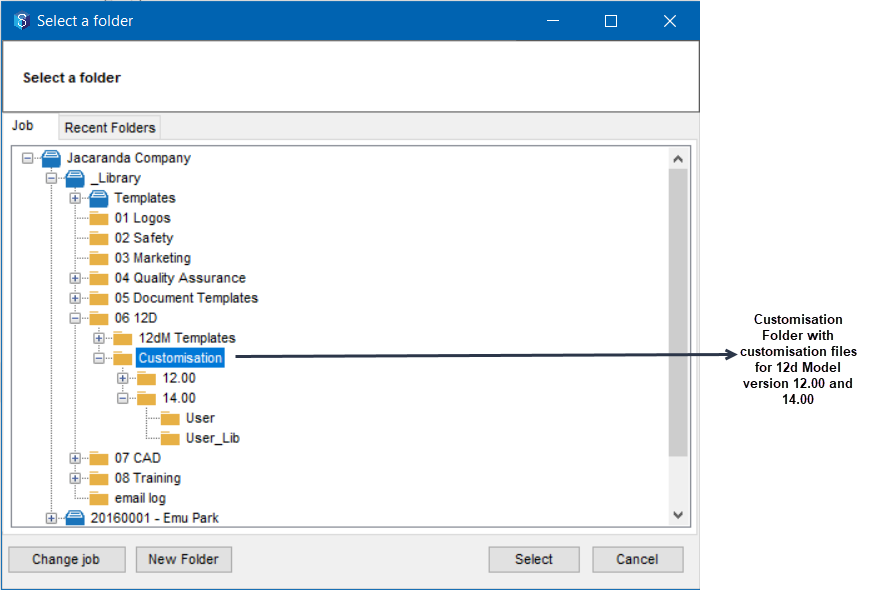
 button displayed against the 12d Model customisation folder box to select the location of the customisation folder in your 12d Synergy project folder. This location should contain subfolders for each 12d Model project version you work with. For example, if you are working with 12d Model version 14, you should have a subfolder called 14.00, and it should contain the relevant version 14 customisation files.
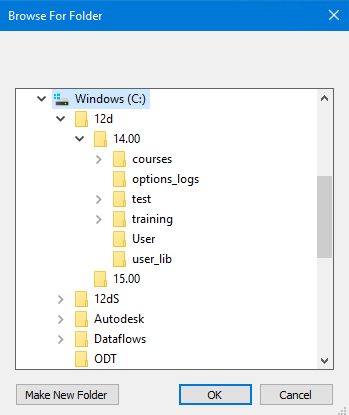
Click the ellipsis
 button displayed against the Local path box to select the location at which you want to save the customisation folder in your local path.
Generally, the customisation folder for each project version (12d Model version 11.00 and upwards) is saved at c:\12d. While it can also be at any other location that suits your environment, it MUST be outside of your workspace.
In the Ignored files from customisation download section, mention the list of files from the customisation folder that can be ignored during the download. For instance, the .log files can be ignored as they are automatically generated by the 12d model and are not a part of the customisation environment.
Click the Save button.
The customisation settings are saved.
After configuring these settings, you must restart the 12d Synergy Client application for these settings to take effect.
1.2. 12d Field
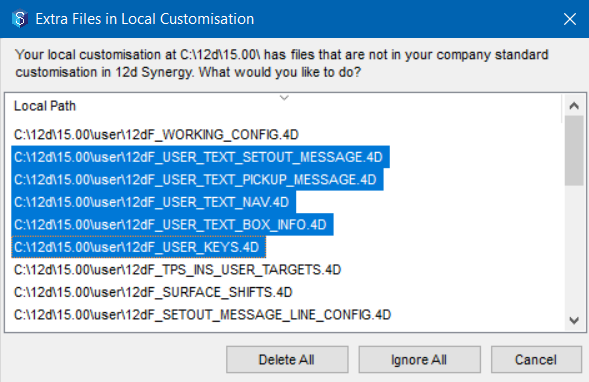
In case you come across the message below while launching a 12d Model project, please read on.
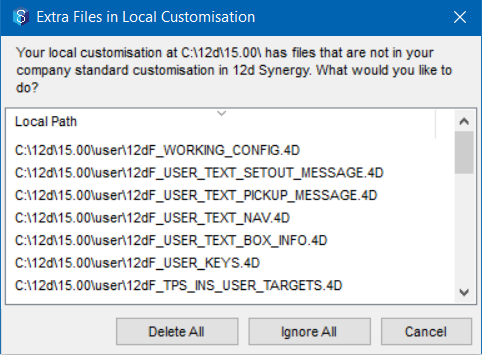
When opening a 12d Model project from 12d Synergy, if the required 12d Field core files are not automatically transferred to the customisation folder residing on the user's local machine, then the above message is displayed. The settings that lead to this message are listed below.
12d Synergy Administration application > 12d model Projects > Settings tab > Default Customisation list is set to the Dynamic option.
12d Synergy Administration application > 12d model Projects > Customisation tab > Enable global 12d model customisation check box is selected.
To resolve this, please follow the procedure below.
In the above displayed image, select all the required customisation files, and use the Ctrl + C keys to copy them.
Paste the selected files using the Ctrl + V keys into 12d Synergy Administration application > 12d model Projects > Settings tab > Customisation > Ignored files from customisation download section.
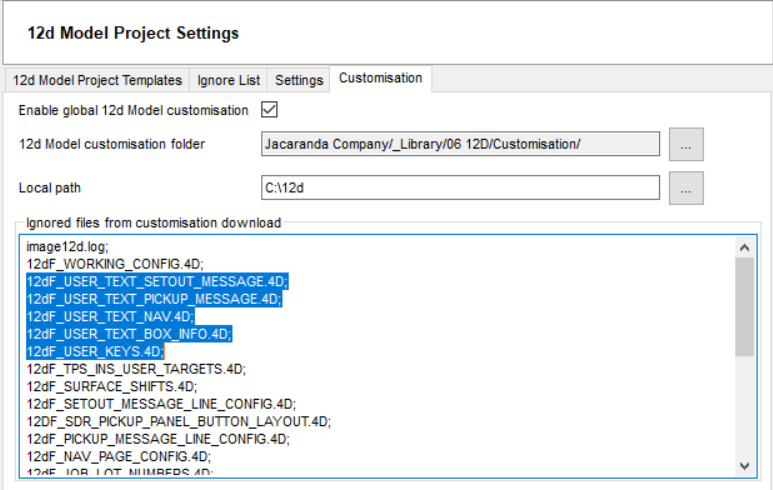
Click the Save
 button.
Now open the 12d project again from the 12d Synergy Client application.
If any new configurations or enhancements are made to the 12d Field files, they must be reconfigured for each 12d Model upgrade. This way, the survey managers, survey leaders, and data managers can standardise the format of the 12d Field messages for all on-site surveyors. Once the 12d Field core files are standardised, the users can perform validation checks on the metadata that is stored as attribute information (within 12d Model) upon every measured/stored point, and report them at any given time. For example, the acceptable tolerances recorded can be validated.
1.3. How To Set up 12d Model
It is easy to set up and use your 12d Model environment.
When creating your 12d Model Project, please make sure the customisation mode is set to Dynamic.
If you are storing your customisation files under the default location for customisation, such as c:\12d, you do not have to do anything further to set it up.
Otherwise, you should change your environment configuration file (env.4d or env_configs.4d) to point to the location where you have stored your user and user_lib.
If you need assistance with this part of the process, we recommend contacting 12d Solutions support.