Admin Content
12d Synergy manages 12d Model customisation in multiple ways, all with the aim of ensuring your customisation is centrally controlled and managed.
When you open a 12d model project, 12d Synergy scans through the customisation files on the server and the local system, and accordingly prompts for your action in the following cases:
a) If there is a change in the customisation files
b) If new files that should not be in the customisation environment are created
This new feature is quick and efficient as no additional checks or downloads are performed if there are no changes to your customisation environment. It is particularly useful if you need to work offline, as the 12d model will not attempt to connect to the 12d Synergy server via your network. However, it may not be a suitable approach for more complex customisation environments that require visibility and access control across files, or where customisation varies between projects.
1.1. How to Work with 12d Model Customisation
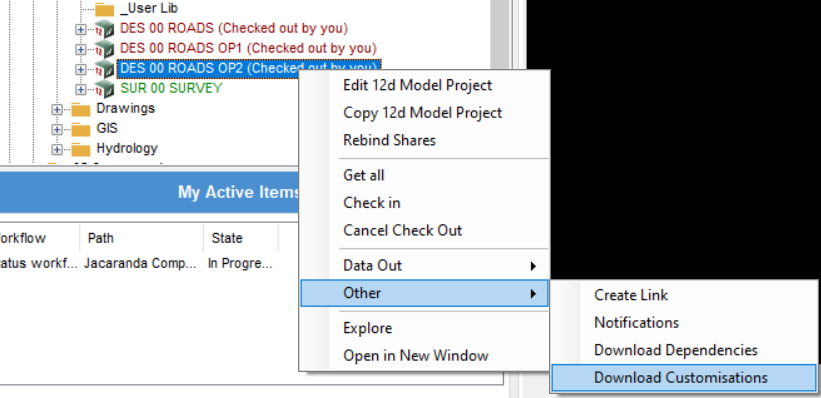
12d Model customisation is downloaded to your local configured path when you open a 12d Model Project. If you want to manually download the customisation file, right-click the required 12d model project folder and then select the Other > Download Customisations option.
In the 12d Synergy Client application, navigate to the 12d Model project and click the Open
 button on the ribbon.
The Open a 12d Model Project window is displayed.
Click the Open button.
If no files are changed and customisation files exist in the configured local path, then no files are downloaded, and the 12d Model project is opened.
If no files are changed and customisation files (setup files) do not exist in the configured local path, then all the files are downloaded, and the 12d Model project is opened.
If changes are made to the customisation (setup files) files, do one of the following:
If any changes are made to any of the customisation files on the server, 12d Synergy lists the changed files and prompts you to click one of the following buttons:
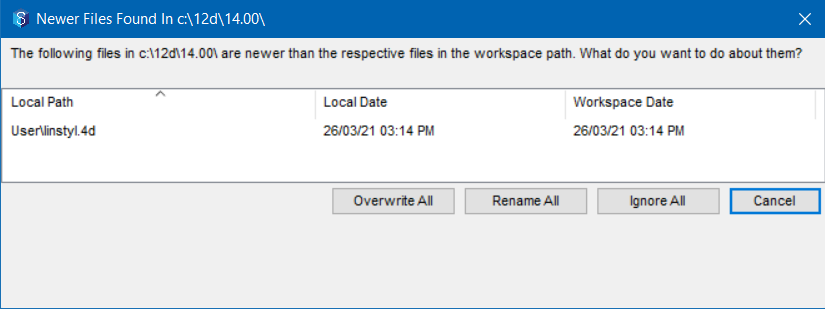
Overwrite All – Overwrite the existing file in the workspace with the newer version.
Rename All – Rename the new file from the server and save it in the configured local path.
Ignore All – Ignore the newer version of the file from the server and continue using the existing file in the workspace.
Cancel – Cancel the operation
The 12d Model project is opened accordingly.
If there are new customisation (setup files) files in the local path but are NOT on the 12d Synergy Server/workspace, 12d Synergy lists the new files and prompts you to click one of the following buttons:

Delete All – Delete file(s) from the local configured path
Ignore All – Ignore the missing file(s)
Cancel – Cancel the operation
The 12d Model project is opened accordingly.
To ensure that you are working on the latest updated and correct 12d Model customisation files, check with your 12d Synergy Administrator if the Default Customisation option is set to Dynamic in the 12d Synergy Administration application > 12 Model projects tab > Settings tab.
If your 12d Synergy Administrator has selected the Clean Client data? checkbox in the 12d Synergy Administration application > System Settings tab > Client Data Cleaning tab > General tab, then the customisation folder is ignored for the clean-up.
1.2. Legacy Customisation Modes
12d Synergy applications continue to support customisation modes prior to V5. These modes provide benefits like automatic checkout from within the 12d Model, but have less flexibility in terms of #includes and are generally slower to use.
1.2.1. How to Work with Legacy Customisation Modes
Select one of the following customisation modes from the Customisation list when doing one of the following:
Mode
Description
Dynamic
This is the default mode where every request to a customisation file stored in 12d Synergy is checked against the server. This mode is slower, but it ensures that you are always working with the correct files. You will not be able to download files referenced in #includes, as #includes may not contain 12d Synergy paths. This is a known 12d Model limitation.
Note that if you are working with the new 12d Model Customisation mode, then this Dynamic mode must be selected.Use Current Local Customisation
In this mode, the copy of the customisation data that is currently saved in your workspace is used. This mode is compatible with #includes, provided they are already downloaded. However, you will have to manually perform a 'Get All' on the customisation folders before you start working on the data.
Download Customisation at 12d Model Startup
In this mode, every time your 12d Model starts, your environment is checked for any customisation folders stored on the server. If any are found, a 'Get All' is automatically performed to download any changed data to your workspace. This data is used as customisation for the 12d Model session. This mode is compatible with #includes, provided they are in your workspace or are included in the customisation download.
Edit your configuration file (env.4d) to point the appropriate customisation folder(s) to the full link path of the 12d Synergy folder.