Admin Content
1.1. How to Create a Job
1.1.1. Creating a Top-level Job from the 12d Synergy Client Application
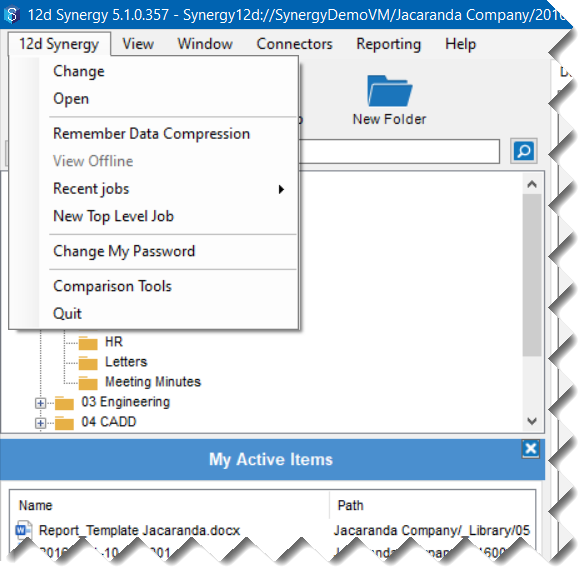
In the 12d Synergy Client application, click the 12d Synergy menu option and select the New Top Level Job option.
The Create New Job window is displayed.
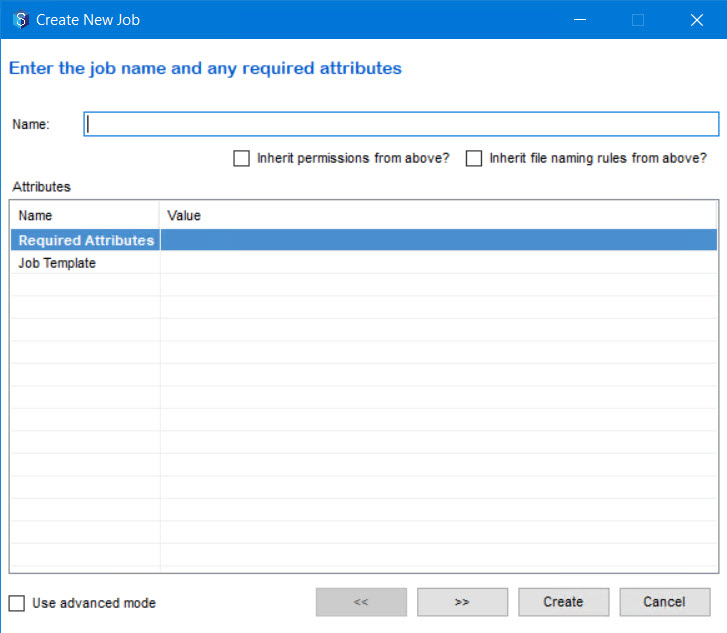
In the above window, the job is created in wizard mode, where you only enter the name of the job and the necessary attribute values, and also select the inheritance check boxes as needed.
You can also create a job with more details by creating it in Advanced Mode. For this, select the Use advanced mode check box in the above window. The following window is displayed.

Do one of the following:
1.1.2. Creating a Top-level Job from the 12d Synergy Administration application
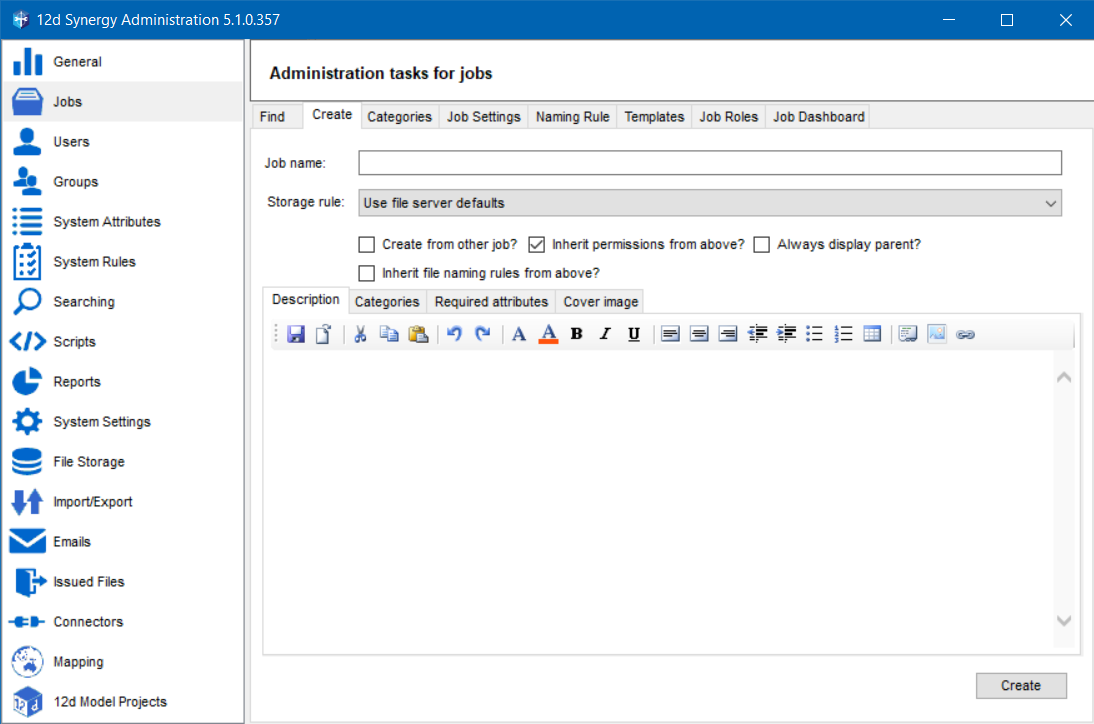
In the 12d Synergy Administration application, select the Jobs tab > Create tab.
Do one of the following:
1.1.3. Creating a Sub Job from the 12d Synergy Client application
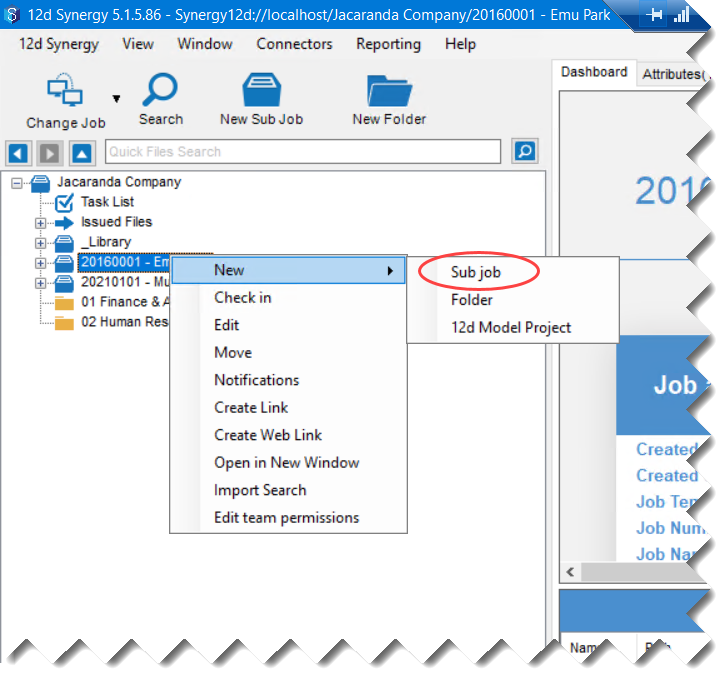
In the 12d Synergy Client application, right-click the required folder, job or sub job under which you want to create a sub job.
Select the New > Sub job option.
The Create New Job window is displayed.In the above window, the job is created in wizard mode, where you only enter the name of the job and the necessary attribute values, and also select the inheritance check boxes as needed.
You can also create a job with more details by creating it in Advanced Mode. For this, select the Use advanced mode check box in the above window. The following window is displayed.

Do one of the following:
1.1.4. Creating the Job Without a Template
In the below procedure, creating a job in Advanced Mode is explained. To create a job in Wizard mode, simply select the Use wizard mode check box in the Create New Job window. For this, select the Use advanced mode check box in the above window.
Enter a name for the new job in the Job Name box.

If a system-level job naming rule is created by your 12d Synergy Administrator in the 12d Synergy Administration application, then the format of the naming rule is displayed in the Job Name box. If the naming rule has attributes that need you to enter/select a value for them, then you will be prompted for it.
Select the required storage rule from the Storage rule list. By default, the Use file server defaults option is selected.
Do any of the following:
Select the Create form other job? check box if you want to copy all the data and configuration from another job.
Select the Inherit permissions from above? check box to inherit its permissions from the job above it If this is the topmost job, this checkbox has no effect.
Select the Always display parent? check box if what you are creating is a sub-job and you always want the parent job to be displayed in the tree structure.
Select the Inherit file naming rules from above? check box if you want the new job to inherit the file naming conventions from the job above it. If this is the topmost job, this checkbox has no effect.
In the Description tab, enter a brief description of the job you are creating.
In the Categories tab, select any permission categories that apply to the job you are creating.
In the Cover Image tab, click the ellipsis button against the Image box and select an image as a cover image for the job you are creating.
In the Required Attributes tab, select or enter the value for any mandatory attributes set at a system level or a parent job level. If job templates are set up, you may be required to select options that result in no template selection.
Click the Create button.
A new job is created and the Edit a Job:<job name> window is displayed for you to configure the job based on your requirement.
1.1.5. Creating the Job Using Job Templates
If you want to create a job using the job templates, you must select/enter the values for those Match attributes displayed in the Required attributes tab (or section), to determine which job template has to be applied for the job you are creating.
Accordingly all the predefined values and naming rules set for the job template are displayed in the Create New Job window. In this procedure, the job is being created in wizard mode.
Click the Create button to create the job. The Edit a Job: < name of the job just created> window is then displayed for you to configure the job based on your requirements.
1.2. How to Edit a Job
1.2.1. From the 12d Synergy Client application
In the 12d Synergy Client application, select the required job from the tree structure.
If the job you need to edit is not displayed in the tree structure, click the Change Job
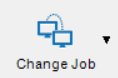 icon in the 12d Synergy Quick access toolbar to find the required job.
Right-click the required job and select the Edit option.
The Edit a Job:<job name> window is displayed.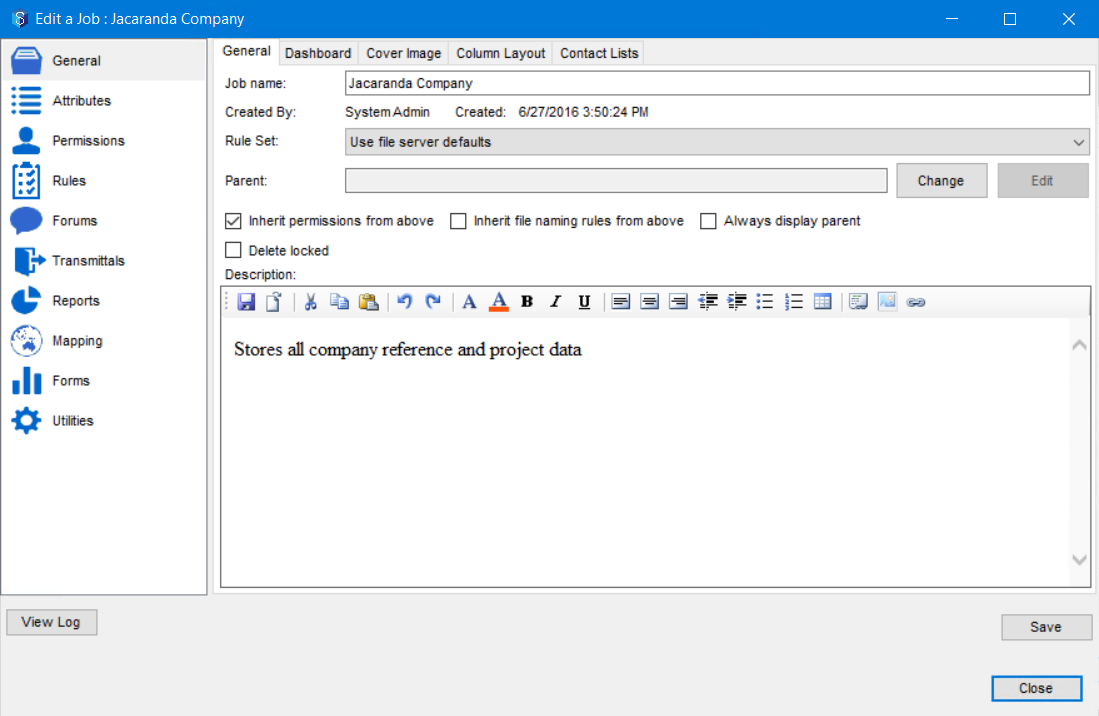
Make the necessary edits and click the Save button.
1.2.2. From the 12d Synergy Administration application
In the 12d Synergy Administration application, select the Jobs tab > Find tab.
Enter the search parameters for the required job (optional) and click the Find button.
The Edit Jobs window displays the matching jobs for the entered search criteria.Select the required job and click the Edit button.
The Job Tree window is displayed.
Make the necessary edits and click the Save button.
1.2.3. Edit a Job
You can edit a job by doing any of the following from the above window.
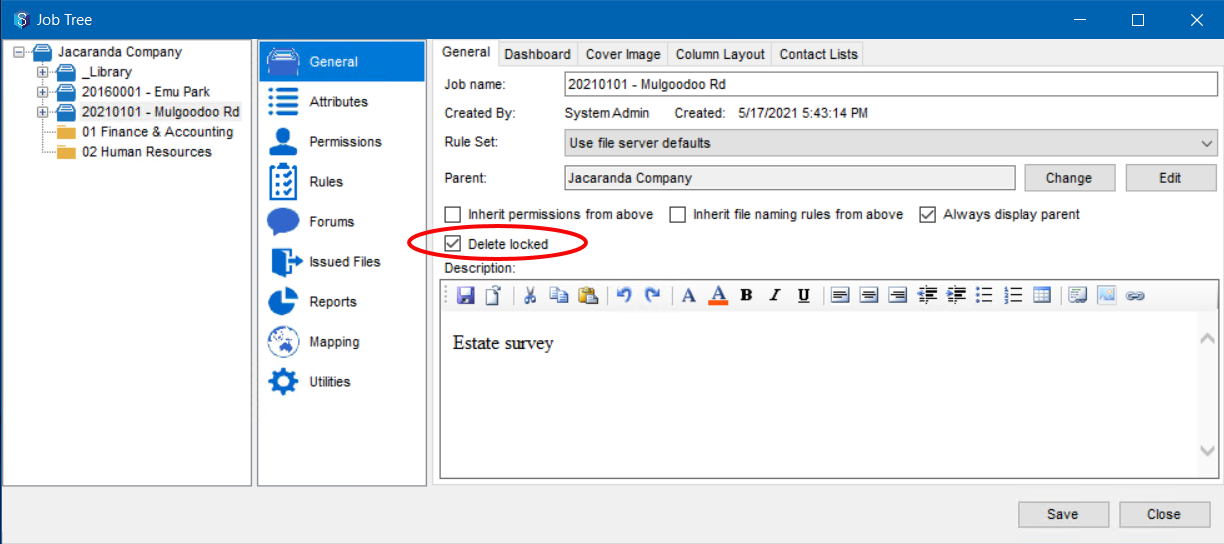
1.2.3.1. General tab
General – You can edit the basic details of a job like its name, parent job and inheritance details. You can also specify if you do not want a job to be deleted by selecting the Delete locked checkbox.
Dashboard – Dashboard is the first thing you see when you log in to the 12d Synergy Client application. You can design a dashboard to see important information about the job, like some metrics or the status of the tasks. This can be done at two levels – the system level and the job level. From this tab, you can design the dashboard for the selected job using the Dashboard Editor. If you do not make any edits in this tab, the dashboard set at the system level is displayed by default.
Cover Image – You can edit the cover image of the job. This image can be an existing external file, a file within 12d Synergy or an image sourced from Google Maps.
Column Layout – You can set the default order of columns that display details about a selected file for the job. Right-click the column titles and select the Select Columns option. In the Column Selection prompt, select the check boxes against the columns that you want to display and select a column name to re-position it using the Move Up and Move Down buttons.
Contact Lists – You can create and edit mailing lists with the required contacts from this tab.
1.2.3.2. Attributes tab
Job Attributes – You can add, modify, or delete job attributes that apply to the selected job.
File Change Attributes – You can add, modify, or delete file change attributes that apply to the selected job. You can also specify the default values of these attributes from this tab.
File Attributes – You can add, modify, or delete file attributes that apply to the selected job. You can also specify the default values of file change attributes from this tab.
1.2.3.3. Permissions tab
This tab enables you to view, define, modify, or delete permissions to different types of user entities. You can tag the user entities with either a permission set (group of related permissions) or with explicit permissions.
Users – You can add users to the job and select them to apply either permission sets or explicit permissions to them. You can also generate a report of the permissions that are applied to all users by clicking the Report button.
Groups – You can add user groups to the job and select them to apply either permission sets or explicit permissions to them. You can also generate a report of the permissions that are applied to all users by clicking the Report button.
Job Roles – You can add job roles to the selected job and select them to apply either permission sets or explicit permissions to them. You can also define the number of positions of a specific role for the selected job. This is the most recommended way to define permissions as it makes the system role-dependent instead of it being user-dependent.
You can also create job roles and positions for each job rule using the 12d Synergy Administration application > Jobs tab > Job Roles tab.
Categories – You can add categories to the selected job and select them to tag users, apply either permission sets or explicit permissions to them. You can add multiple categories to a job.
You can also create, edit or delete categories using the 12d Synergy Administration application > Jobs tab > Categories tab.
Collaborators – You can create or add collaborators to the selected job and also configure their access details from this tab.
This tab is displayed only if you have a valid Collaborators license.
1.2.3.4. Rules tab
Naming Rules– You can specify naming rules that apply to the files and sub-jobs within the selected job. A naming rule defines how entities such as sub-jobs or files must be named.
You can also configure the naming rules for jobs using the 12d Synergy Administration application > Jobs tab > Naming Rule tab.
Notifications– You can manage the notification subscriptions for a user, a role, or a group from this tab.
You cannot edit your own notification subscriptions from this tab. You can do that by right-clicking on the required job and selecting the Notifications option.
CAD Layout Templates – You can create or edit a CAD Layout Template and define the attributes that apply to it from this tab.
CAD Layout templates are used to import a set list of fields/attributes into 12d Synergy from a drawing file. If additional fields/attributes not listed in the layout template are found within the drawing, they will be ignored and not imported.
CAD Publishing – You can add the location of the folder where you will save all the published CAD files in the selected job from this tab.
Download Dependency Rules – You can define rules to download dependencies when working with files of a job. You can set rules such that when working with files of specified extensions, the related dependent files should automatically get downloaded. For instance, when working with a .dwg file, you can set a rule that the necessary customisation files must be downloaded.
1.2.3.5. Forums tab
You can use this tab to create, edit or delete forums associated with the job. A forum is a platform for job users to discuss, communicate and collaborate.
After a forum is added, users may need to reconnect to the job to use it.
1.2.3.6. Transmittals tab
Transmittal File Types – You can create File Set Types from this tab. The File Set Types are logical categories that help you organise your transmitted files and may depend on your processes. You can also do this from the 12d Synergy Administration application > Transmittals tab > File Set Type tab.
Email Template – You can design the email template for transmittals using the variable components provided in this tab. A transmittal is the summary of a transmitted file set and is displayed once the file set has been transmitted.
1.2.3.7. Reports tab
There are many reports that you can generate for a job, such as the Job Usage report, the File List report, the Permissions report, the Structure report, etc. Some reports may have multiple variations, such as a Job Usage report.
You can generate a Job Usage report to understand how many users are using a job, or how many jobs a user is accessing, or which users are accessing which jobs for a set period. Thus, the Job Usage report has three variations. However, the triggering points for these variations differ as they are reporting different entities.
To understand the number of users using a job for a set period, you (a job administrator or a 12d Synergy Administrator) have to access the report while editing a job or from the Reports tab of a job. On a similar note, to understand how many jobs a user is using, you have to access the report while editing a user. To see which users are accessing which jobs for a set time, you can generate the report from the Reports tab in the 12d Synergy Administration application.
For all job-specific reports, you can configure the following report settings in this tab.
Report Schedules – You can configure the inputs, schedule, and delivery format and the recipients of job-specific reports from this tab.
Report Transformations – You can set or download an XSLT (Extensible Stylesheet) for transforming the basic report output to customised reports. An XSLT is used for converting XML data into CSV format for importing it into MS Excel, or into HTML for the required cosmetic display.
1.2.3.8. Mapping tab
Active Job Layers – You can add and configure a job-level map layer using this tab.
Parent Level Layers (Not Active) – You can only view the system-level map layers using this tab as the parent of job-level map layers is system-level map layers. They are created in the 12d Synergy Administration application >Mapping tab > Map Configuration tab.
1.2.3.9. Utilities tab
General tab – You can do the following maintenance tasks from this tab:
Export data from the job to a location on the server or your network. Note that this option exports only the data without any of its attributes, metadata, or configuration details.
.png)
You must specify the destination folder path in the Destination on server machine box. This path is relative to the server hosting the 12d Synergy Server. The job is then exported to the specified folder.
Ensure that the destination path is accessible by the 12d Synergy Server.
Ensure there is sufficient space at the location where you want to export the job.
If the job is too large, it is suggested that you export it in small chunks, either as subjobs or as folders. If you want to know the size of the job you want to export, you can run a Job File Storage Report from the 12d Synergy Administration Application > Reports tab > Generate a Report tab.
All references are resolved while exporting data.
Copy the attributes of this job to other jobs or from other jobs to this job
Copy the permissions applied to this job to other jobs
Copy the job naming rules applied to/created for this job to other jobs
Copy the download dependency rules created for this job to other jobs
Copy the CAD Publish Settings of this job to other jobs
With all the copy functions listed above, if you are editing a template job and are copying its updated attributes, settings and rules to another job, then all the jobs that are based on this template job also get updated. These updates cannot be rolled back. Hence, be doubly sure when you want to copy these details to other jobs. This feature is very handy when you want to update all jobs based on a template job.
Triggers tab – You can design triggered activities or workflows to various changes in the system, and their conditions, using this tab.
12d Model Customisation tab – You can now configure the customisation for a job or inherit the customisation configured for the parent job, if any. If the parent job does not have any customisation configured, then the customisation set at the global level in the 12d Synergy Administration application > 12d Model Projects tab > Customisation tab comes into play. If customisation is configured at both, the job and global levels, then the settings made at the job level are applied.
To configure the customisation at the job level, you need to first select the Enabled option from the State list and then define the settings, which are similar to those of the global ones made in the 12d Synergy Administration application. However, if you choose to inherit the global customisation settings, select the Inherit option from the State list.
1.3. How to Move a Job
You can move a job to any different level in the job tree structure by either changing the parent of the job or by just selecting the level to which you want to move it to. All the folders in the job are also moved accordingly.
You must be a 12d Synergy Administrator to perform these procedures.
1.3.1. Changing the Parent of a Job
Changing the parent of a job moves the job from one parent to another. The new parent job selected can be at any level in the job tree structure.
In the 12d Synergy Client application, select the job for which you want to change the parent.
Right-click the job and select the Edit option.
The Edit a Job: <job name> window > General tab is displayed.
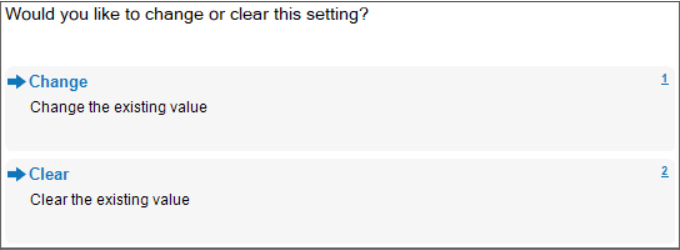
The parent job of the selected job is displayed in the Parent: box.Click the Change button displayed beside the Parent: box.
The following prompt is displayed.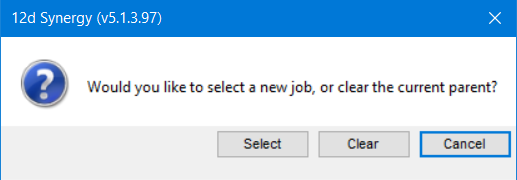
This prompt is displayed only if the selected job belongs to a parent job. If there is no parent job, the Find a Job window is displayed. You can search for the required job and add it as a parent to the selected job.
Do one of the following:
Click the Clear button to remove any job tagged as a parent to the selected job. This will make the selected job a top-level job with no parent.
Click the Select button to find and select a new parent job. The Find a Job window will be displayed for you to search and select the new parent job.
Click the Save button on the Edit a Job window.
The changes made to the Parent: box will be updated.Restart the 12d Synergy Client application to see the updated job structure.
1.3.2. Moving a Job
You can directly move a job from one level to another in the job tree structure.
In the 12d Synergy Client application, select the job you want to move.
Right-click the job and select the Move option.
The following options are displayed: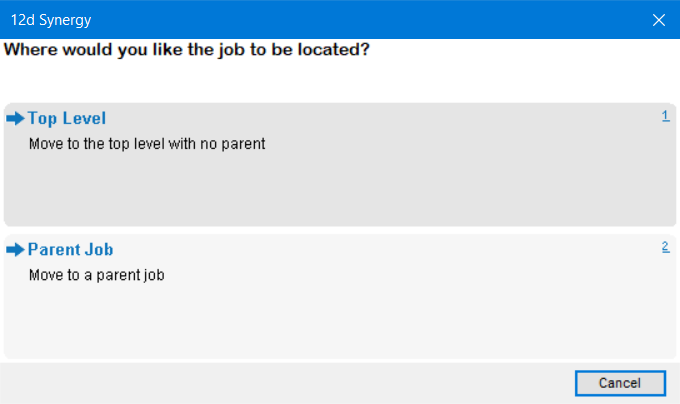
Do one of the following:
Select the Top Level option to move the job to the top-most level in the tree structure.
The job will be instantly moved to the top-most level and will no longer have a parent job.Select the Parent Job option to move the job to a different parent in the tree structure.
The Find a Job window will be displayed for you to search and select a new parent job.
The selected job is now moved to the new location in the tree structure.
1.3.3. Moving Multiple Jobs to Another Job on Any Level
Available in version 5.1.7 or later
You can move multiple jobs to any other job on any level.
In the 12d Synergy Client application, select one of the jobs you want to move.
Right-click the job and select the Move Many option.
The Select Entities to Move window is displayed. It displays the selected job in the job tree structure.
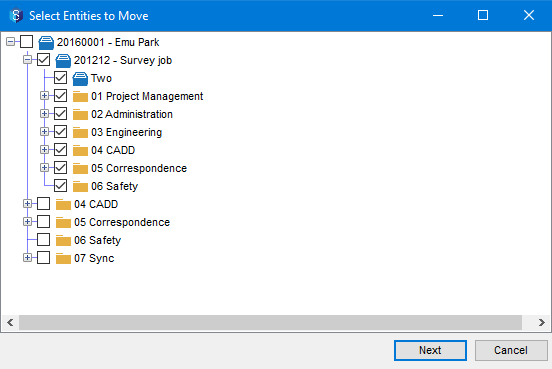
Select the check boxes displayed against the multiple jobs you want to move. Remember that by selecting a job, all its subfolders and subjobs are automatically included.
Click the Next button.
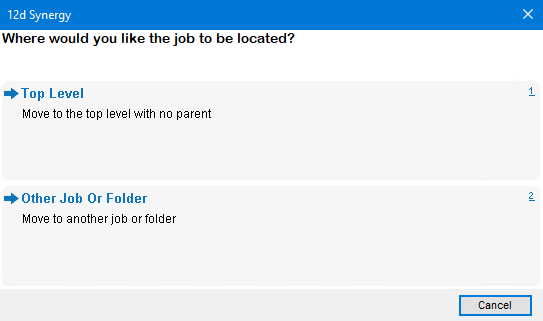
Do one of the following:
Select the Top Level option to move the jobs to the top-most level in the tree structure.
The jobs are moved but not seen because they are at the same level as the current parent job in the display. Click the Change Job
 icon in the quick access toolbar and select any of the newly created top-level jobs to access them.
 You can alternatively click the tiny arrow beside the Change Job
 icon to view the list of recently accessed jobs and select the required job from there.
Select the Other Job or Folder option to move the selected jobs to a different job in the tree structure.
The Select a Destination window is displayed and do the following.
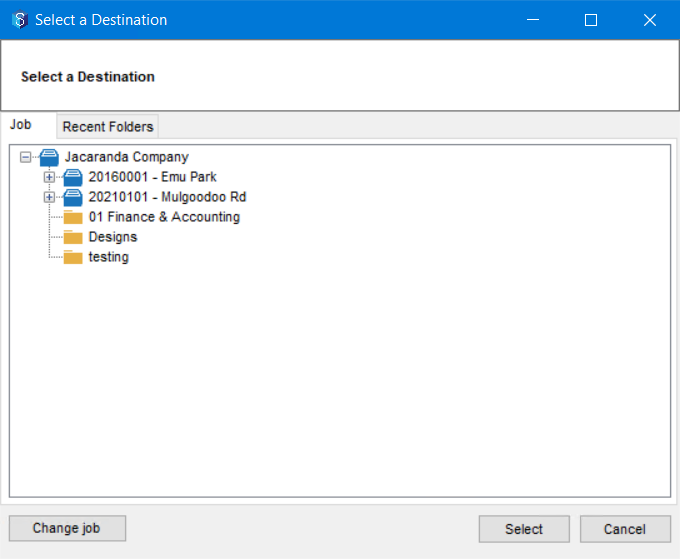
Select the required destination job in the displayed structure under which you want to move the jobs. If you want to select a destination job from another parent job, then click the Change job button.
Note that if you select the Recent Folders tab and attempt to move a job to a folder, the system shows an error message, as you cannot move a job under a folder.
Click the Select button.
The jobs are moved under the selected destination job. Click the Change Job
icon in the quick access toolbar and select any of the moved jobs to access them.
1.4. How to Delete a Job
Any user who has the Administrative (Admin), Read and Write permissions to a job, like a Job Administrator or a 12d Synergy Administrator, can delete jobs. However, if the Only Sys Admins can delete a job system setting is set to Yes in the 12d Synergy Administration application, then only the 12d Synergy Administrator can delete the job.
1.4.1. From the 12d Synergy Client Application
In the 12d Synergy Client application, select the required job from the tree structure.
If the job you need to edit is not displayed in the tree structure, click the Change Job
 icon in the 12d Synergy quick access toolbar to find the required job.
Right-click the required job and select the Edit option.
The Edit a Job:<job name> is displayed.
1.4.2. From the 12d Synergy Administration Application
In the 12d Synergy Administration application, select the Jobs tab > Find tab.
Enter the search parameters for the required job (optional) and click the Find button.
The Edit Jobs window is displayed with the matching jobs for the entered search criteria.Select the required job and click the Edit button.
The Job Tree window is displayed.
1.4.3. Delete the Job
In the Job Tree window or Edit a job :<Job name> window, select the General tab > General tab.
If the Delete locked checkbox is selected, clear it.
If the Delete locked checkbox is selected, then you cannot delete the job.
Click the Save button.
The job settings are saved.Select the Utilities tab.

In the Delete section, click the Delete button.
The following message is displayed..png)
To confirm the job deletion, enter the name of the job you are deleting in the provided box.
In the 12d Synergy Administration application > System Settings tab > General tab, there is a setting for confirming the permanent deletion of jobs. It is Require name based confirmation when purging jobs. The value of this setting is set to Yes, by default. Hence, the above confirmation for job deletion is asked for.
Click the Continue button.
The job, including all its files and folders, is deleted permanently (purged).
Click the Close button.
1.5. How to Set a Template Library for the Files Created in a Job (Move to Files)
Whenever you create a new file in a job, you have the option of selecting a template for the file. These templates are generally stored in a Library job or folder (The name of the job containing file templates can vary based on your Company's requirements). You can set the template library to pop up while creating a new file by following the procedure below.
In the 12d Synergy Administration application, select the Jobs tab.
Select the Job Settings tab.
Double-click under the Value column against the File Template Job row.
The following prompt is displayed.
Select the Change option to add the folder that holds all the templates of the files that may be used in the Job.
The Find a job window is displayed.Enter the search parameters (optional) for the required job and click the Find button.
The Select a job window is displayed.Browse and select the Library folder.
The Library folder is displayed in the Value column of the Job Settings tab.