Let us expand further on the simple business workflow we discussed in What is a Workflow page.
Please note that Issuing are now called Transmittals.
1.Workflow Description
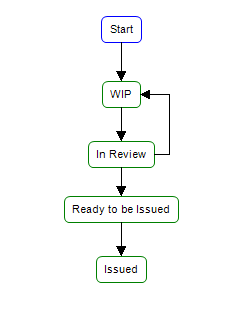
In this workflow, the Designer works on a drawing and passes it on to a Design Lead (previously known as the reviewer) who reviews the drawing.
The Design Lead can do one of the following:
Send it back to the Designer for more work with some review comments. In this case, the workflow will repeat itself until the drawing is approved by the Design Lead.
Approve the drawing and send it to the Project Manager for issuing/publishing the file to the Project Engineer (previously we have called this actor as Client).
When the file is with the Project Manager, he/she issues/publishes the file to the Project Engineer.
1.1. Actors
The full list of Actors in this expanded workflow are the Designer, Design Lead (reviewer), Project Manager (who issues the file to the Client) and the Project Engineer (who receives the issued/published file on the site).
Let us now see the above pictorial representation in a workflow.
1.2.Attributes Required
List type States attribute, where the intended states of the workflow are listed
Revision Number integer type attribute, to hold the revision number of the file.
1.3. Transitions
We will now describe the transitions between each of these states. A transition can include activities, conditions or data captures. Once we detail these, it will be easier for us to build the workflow in the 12d Synergy applications.
Transition | Description | Activities/Conditions/Data Captures |
|---|---|---|
Start → WIP | The workflow is assigned to the Designer and the file has to be locked for the Designer to work on it. | Activities - Assign workflow to Designer; Lock the File to the Designer |
WIP → In Review | The workflow is assigned to the Design Lead for review and the file is now locked for the Design Lead. | Activities - Assign workflow to Design Lead; Lock the File to the Design Lead |
In Review → Ready to be Issued | The Design Lead is satisfied with the Designer’s work and is sending the file to the Project Manager, stating that the file is now ready for issue. | Activities - Unlock the file; Assign the workflow to the Project Manager; Send an email to the Project Manager using a new or customised email template (Ready for Issue template) saying the file is ready to be issued to the Project Engineer. |
In Review → WIP | The Design Lead suggests more changes to the file and passes the file back to the Designer. The changes to be made are captured in a PDF Markup file. | Activities - Assign the workflow back to Designer; Lock the file for the Designer; Send an email to the Designer telling him that more work is needed on the file, based on his review comments. Data captures - Capture the review comments in a file as an Association in the transition |
Ready to be Issued → Issued | The Client has feedback and is sending the file back to the Designer for additional updates. | Activity - Assign the workflow to the Project Engineer; Send an email to the Project Engineer using a new or customised email template saying the file is issued; Increment Revision attribute by 1 |
2.How to build the Workflow in 12d Synergy Applications
To create the required attributes noted above, do the following in the 12d Synergy Administration application > System Attributes tab.
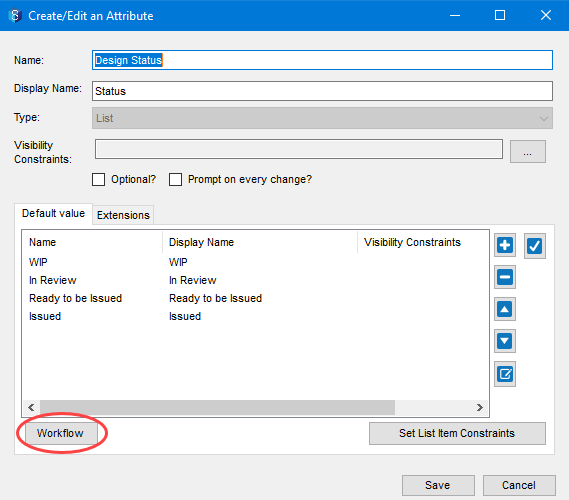
Create a list type attribute named Design Status, and add WIP, In Review, Ready to be Issued and Issued as its list items.
Create an integer attribute for versioning, named Revision Number, with an initial value of 1.
Note that you can create an attribute on any entity such as a job, folder, file, etc. This means that you can create a workflow on any of these entities.
You can create a workflow using one of the following methods.
In the 12d Synergy Administration application > System Attributes tab > select the list attribute created in the previous step > click the Edit button.
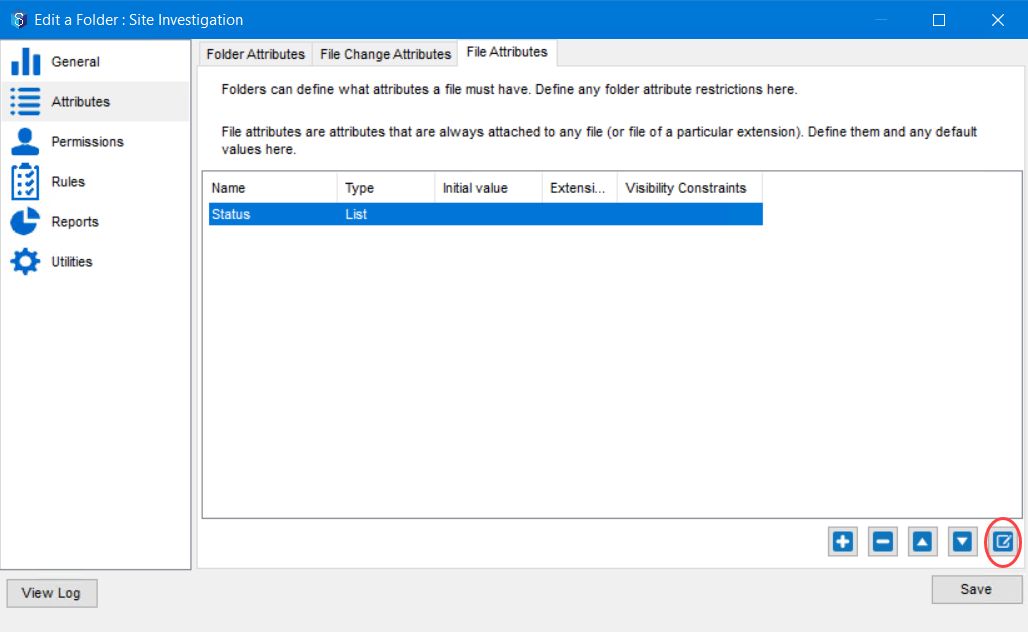
In the 12d Synergy Client application, access the required folder in the job tree > right-click the folder and select the Edit Folder option > Attributes tab in the Edit a Folder:<Folder name> window > File Attributes tab > Add the list attribute to this tab > click the Edit icon.
.png)
After creating both the attributes, Design Status list attribute and the Revision Number attribute, The Edit a Folder:<Folder name> window is displayed as shown below.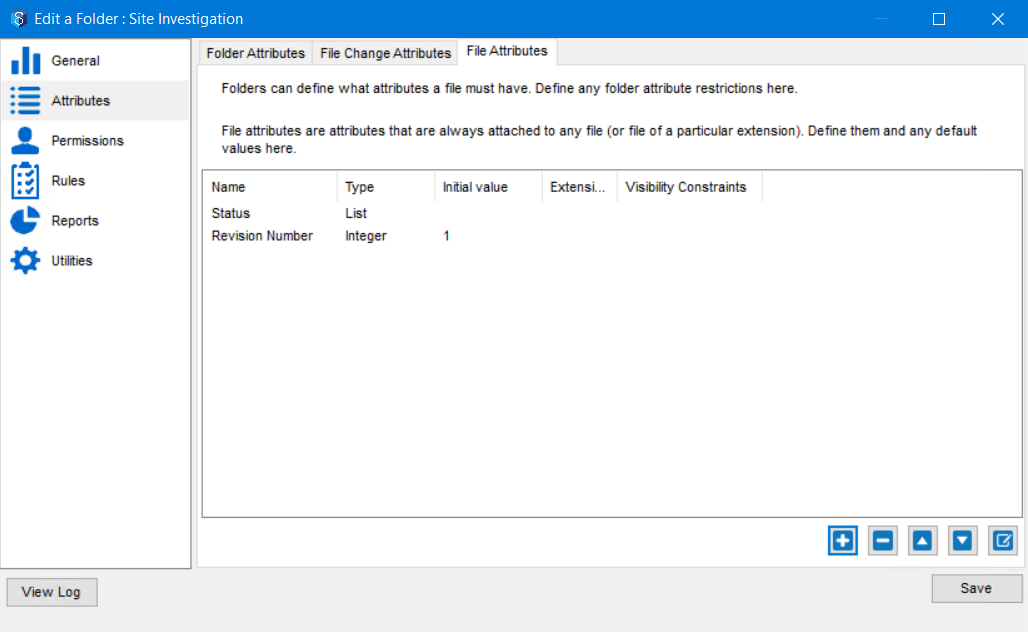
In the Create/Edit an Attribute window, click the Workflow button.
The Edit a Workflow window is displayed. The first state of the workflow, which is Start by default, is added to the workflow design.Click the Add all states button.
All the attribute list values are added as states to the Design tab.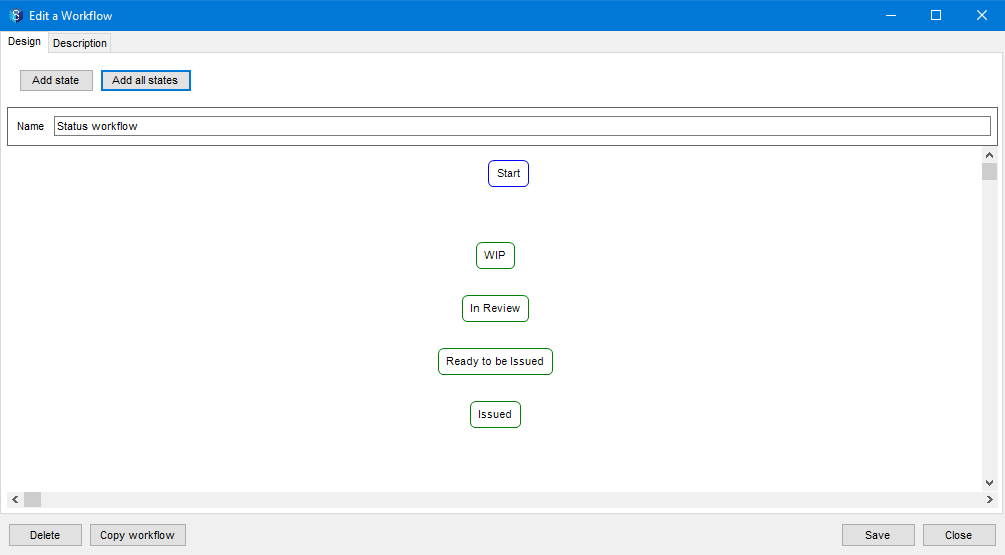
Connect all the states in the required order by clicking and dragging the mouse pointer from the side of one box to the other. Refer to the below workflow diagram and accordingly add the arrows.
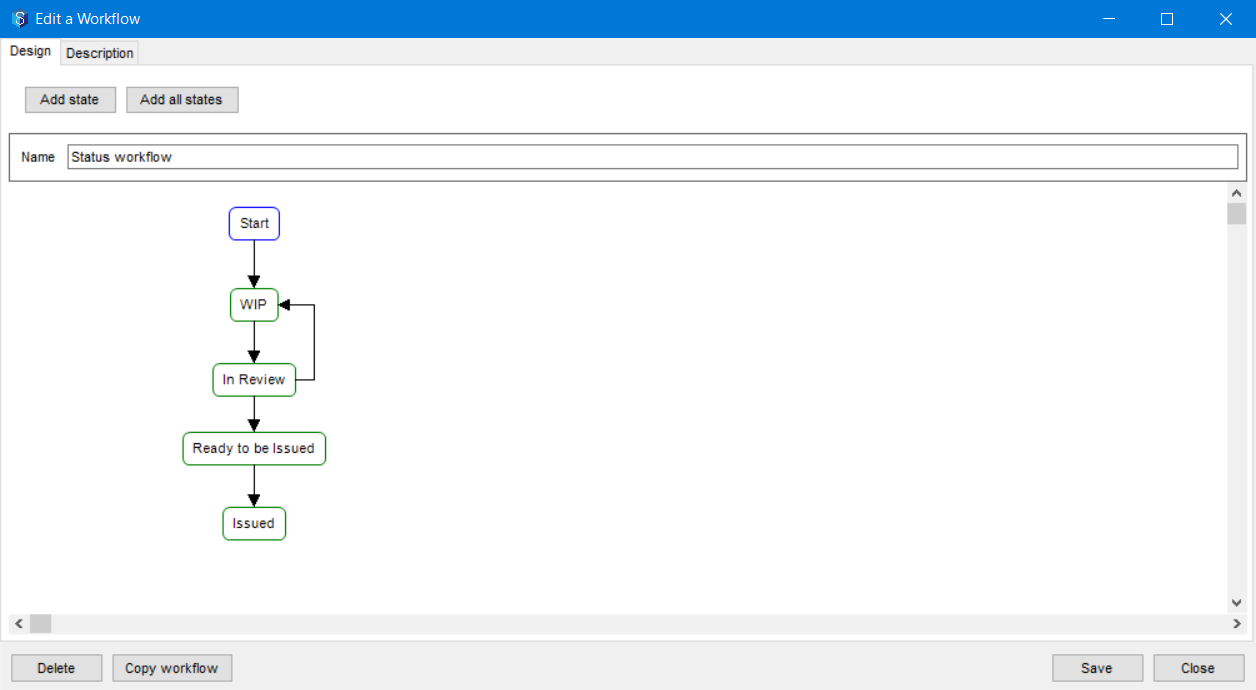
Now, let us define the functions to occur on the first transition. To define a transition between two states, click the arrow between them. It is highlighted in blue in the below image.
.png)
The right-panel is displayed and you can define the functions to add to the transition there.Let us now lock the file for the designer. In the Activities tab, click the
.png) button, select the Files category in the Add a New Transition Activity window and then double-click Lock a file activity (or select and use the Add button).
button, select the Files category in the Add a New Transition Activity window and then double-click Lock a file activity (or select and use the Add button).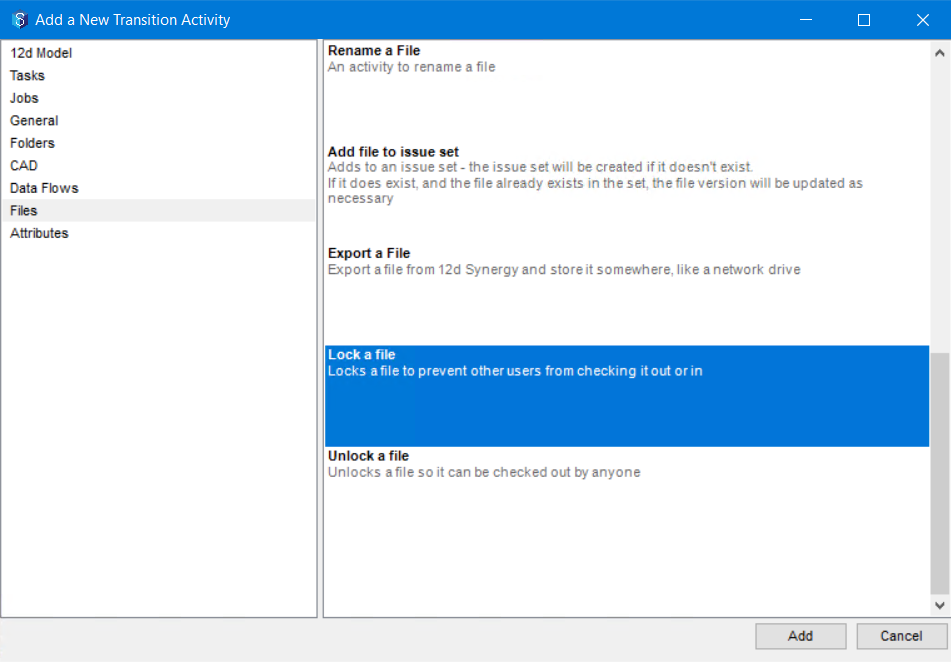
Please refer to the Activities table to know which actions fall under which category.
The New Lock a file activity is added to the Activities tab.
Enter an appropriate name for the activity in the Name box. Let us name it Lock the file for the Designer.
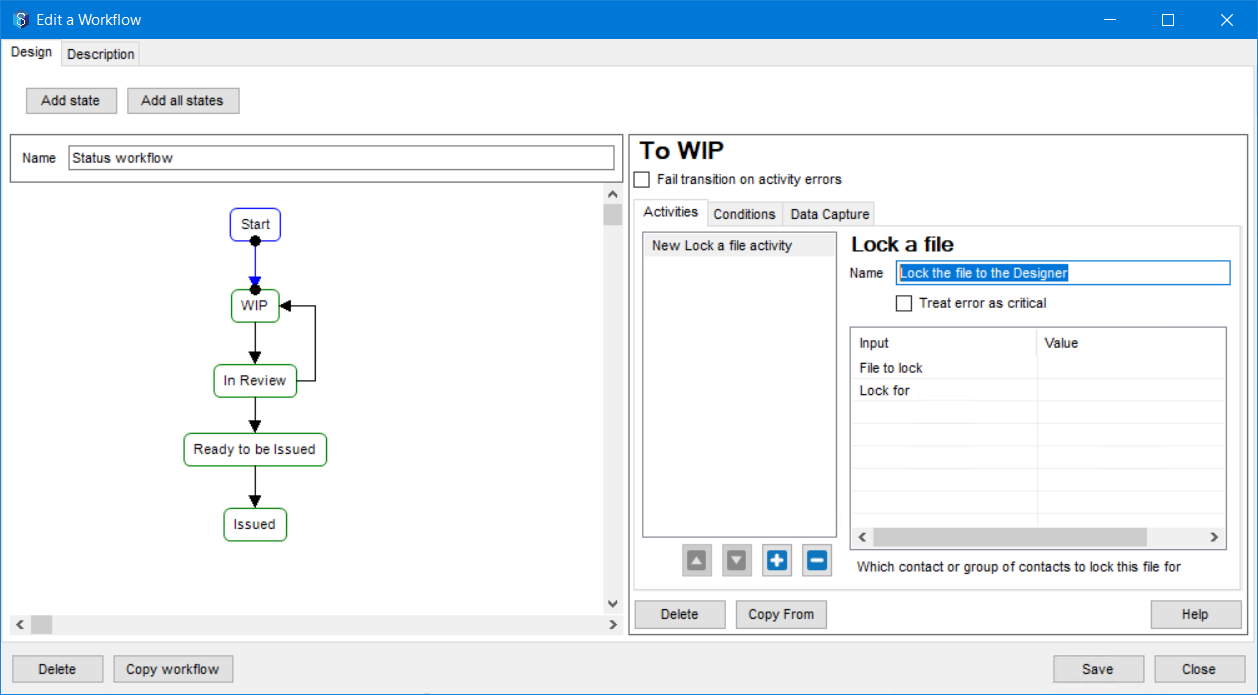
Note that the activities can be renamed, if desired, so that it is easier for anyone to understand the activity at a later point in time.
We now have to give values to the inputs for the activity. Click in the corresponding Value column of the input File to lock.
The following prompt window is displayed.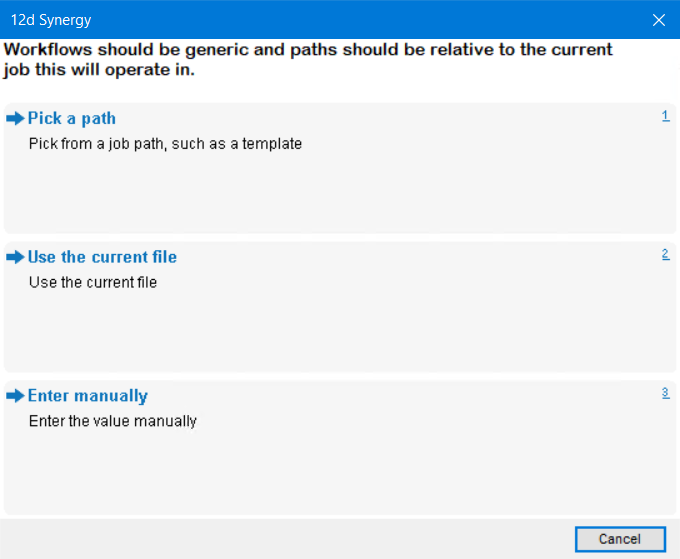
The following three options are displayed.
Pick a path option to locate and select the required file in a job.
Use the current file option to simply select the current file which when added to the folder has triggered this workflow.
Enter manually option to access the Expression Helper to build a variable expression for selecting a file when the workflow is running.
In our example, let us select the Use the current file option. This will add {Entity} as the value to the File to Lock input in the Activities tab.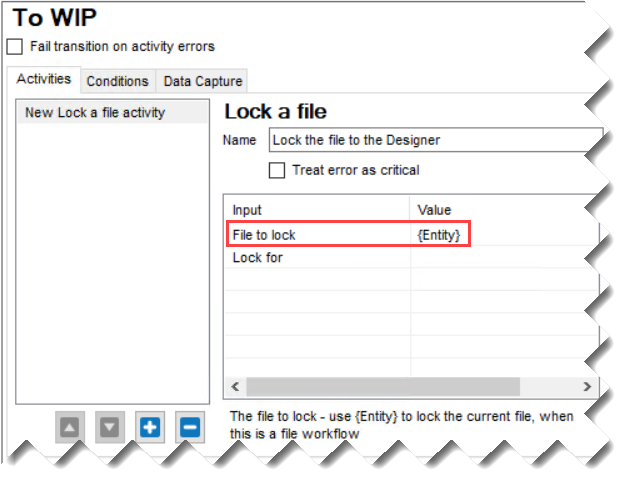
Click the the corresponding Value column of the input Lock for.
The following prompt is displayed for you to select a contact, group or role.
When locking a file in a transition, it is intended to limit the persons able to progress the file.
We can lock the file to any of the following options:
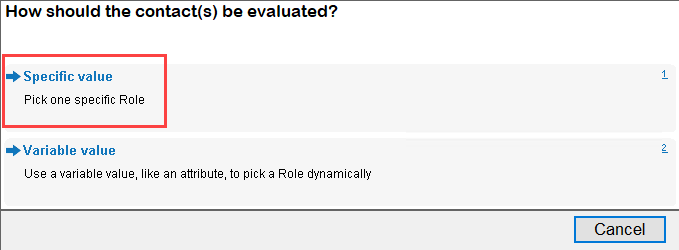
Contact — If you want a specific individual to work on the file, then this option can be used. You will be prompted to select either a Specific value option to find and select the required contact, or a Variable value option to access the Expression Helper to build a variable expression for selecting a contact when the workflow is running.
Group — If you want a specific group of users to work on the file, then this option can be used. You will be prompted to select either a Specific value option to find and select the required group, or a Variable value option to access the Expression Helper to build a variable expression for selecting a group when the workflow is running.
Role — If you want a specific user role to work on the file, then this option can be used. You will be prompted to select either a Specific value option to find and select the required user role, or a Variable value option to access the Expression Helper to build a variable expression for selecting a user role when the workflow is running.
In our workflow, let us select the Specific Value option and then the Designer role in the following Select a Role prompt.
The following prompt is displayed.

The value for the Lock for input is now set to Role: Designer. The Lock the file to the Designer activity is defined..png)
Let us now define another activity that is needed at this point. We need to assign the workflow to the Designer. In the Activities tab, click the
.png) button, select the General category in the Add a New Transition Activity window and then double-click Assign this workflow activity (or select and use the Add button).
button, select the General category in the Add a New Transition Activity window and then double-click Assign this workflow activity (or select and use the Add button).
The New Assign this workflow activity is added to the Activities tab.Enter an appropriate name for the activity in the Name box. Let us name it Assign the workflow to the Designer.
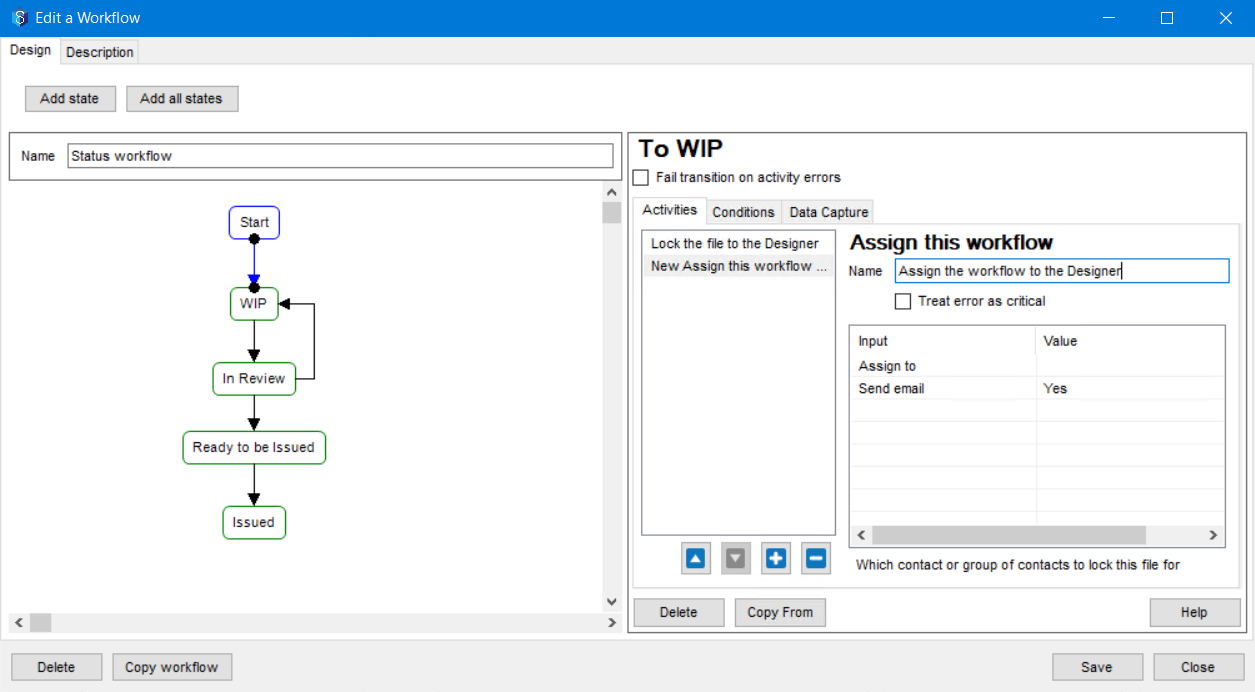
Click in the corresponding Value column of the input Assign to. Since we want to assign the workflow to the designer, select the Role > Specific Role > Designer option from the prompts that are displayed chronologically.
The Assign to input has its value set to the Role: Designer..png)
Click in the corresponding Value column of the input Send email. Let us leave this as Yes to send a generic automated email to the Designer mentioning that the workflow is now assigned to him as at this stage. You can also send a customised email. We will see how to create a customised email as an activity for a transition later in this procedure.
Click the Save button to save the activities we have defined for the Start —> WIP state. Note that for this transition we do not have any conditions or data captures. So we will move to the next transition.
For the next transition, select the arrow between the WIP and In Review state.
The right-panel is displayed and you can define the transition there.Using the a to l steps of the 6th step above, define the following activities.
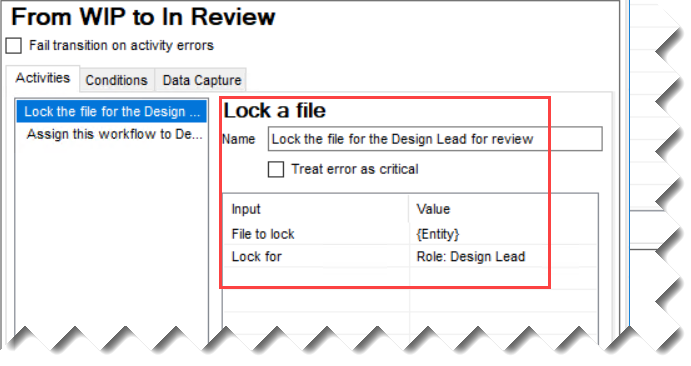
Lock the current file for the Design Lead using the Files > Lock a file activity. For the File to lock input value, select the Enter manually > Use the current file option in the prompts displayed. And for the Lock for input value, select the Role > Specific Role > Design Lead option from the prompts that are displayed chronologically.
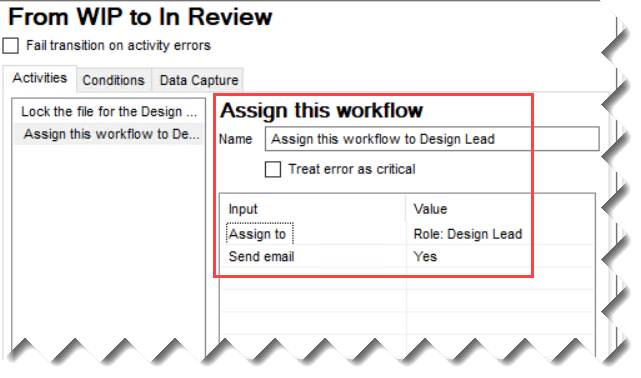
Assign the workflow to the Design Lead role using the General > Assign the workflow activity. For the Assign to input value, select the Role > Specific Role > Design Lead option from the prompts that are displayed chronologically. Leave the Send email input value as Yes.
Click the Save button as soon as you are done with defining an activity or a transition.
Moving on, let us define the transition In Review —> Ready to be Issued. Select the arrow between these two states.
The right-panel is displayed and you can define the transition there.The Activities that we want to create are as follows:
Unlock the file
Send a customised email to the Project Manager informing him that the file is ready to be issued to the Project Engineer
Assign the workflow to the Project Manager
Do the following to define these activities:
Unlock the file so that it can be sent to the Project Manager using the Files category > Unlock a file activity. For the File to unlock input value, select the Enter manually > Use the current file option in the prompts displayed.
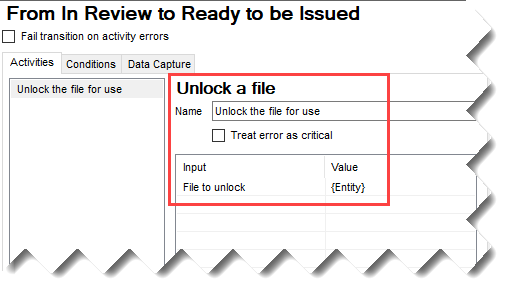
We unlock the file here as the file is updated and reviewed and finalised. No more work is pending on the file. Hence the file can be unlocked and sent for use.
Let us now look at how to send a customised email to the Project Manager.
In the Activities tab, click the
.png) button, select the General category in the Add a New Transition Activity window and then double-click Send an email activity (or select and use the Add button).
button, select the General category in the Add a New Transition Activity window and then double-click Send an email activity (or select and use the Add button).
The New Send an email activity is added to the Activities tab.Rename the activity to Send an email to the PM in the Name box.
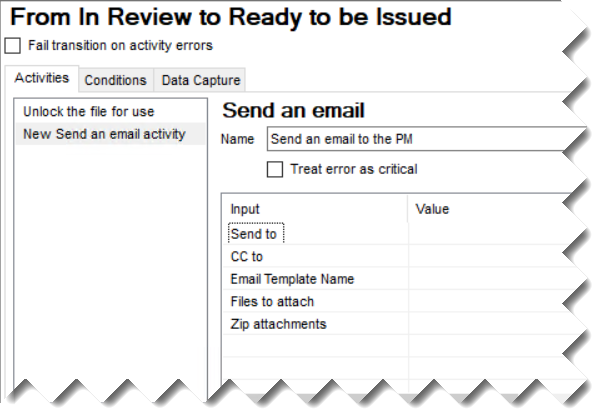
Click in the Value column row against the Send to input.
The Edit Contacts Input window is displayed.Click the
.png) button and select the Role > Specific Role > Project Manager option from the prompts that are displayed chronologically.
button and select the Role > Specific Role > Project Manager option from the prompts that are displayed chronologically.
The Role:Project Manager contact is added to the Edit Contacts Input windowClick the Set button.
The value for the Send to input is set.If you want to CC the email to anyone, click in the Value column against CC to input and add contacts as explained in step iv above. This is an optional field.
We now have to select an email template for the email being sent to the Project Manager. 12d Synergy offers a wide range of inbuilt email templates. And it also gives you the options to customize or create email templates. Click in the Value column against Email Template Name input.
The Select a Template window is displayed.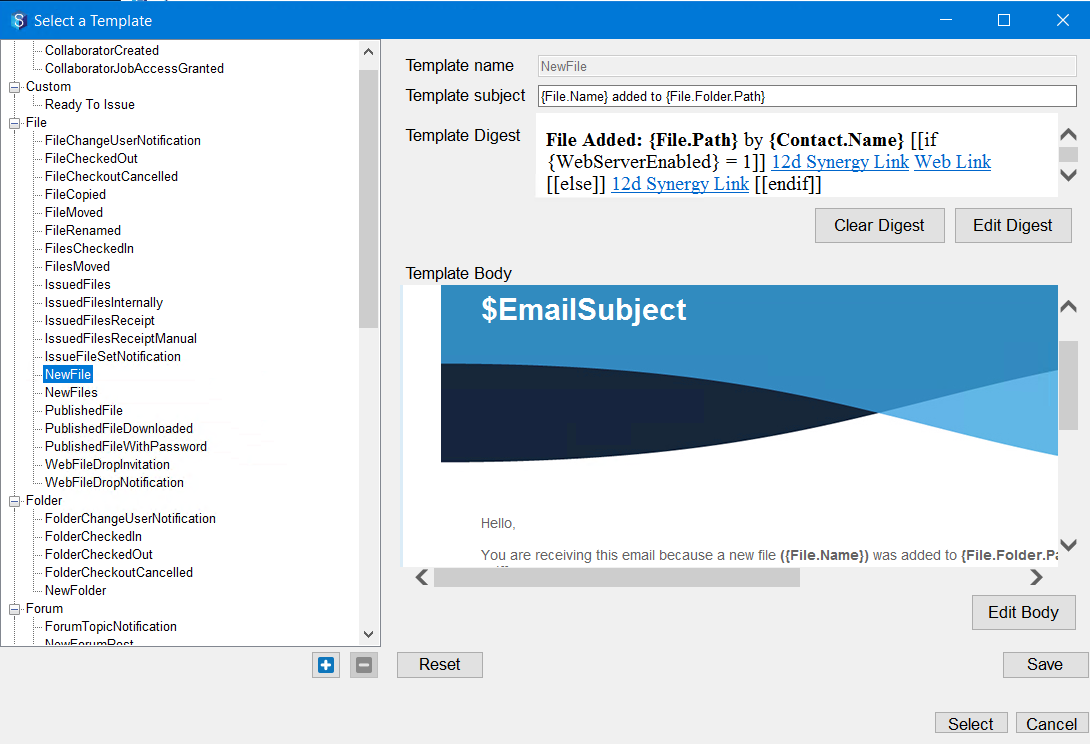
A list of existing templates is displayed on the left panel and the selected template’s contents and editing options are displayed on the right in the above window. You can either select a predefined template from the left, and use it as it is, or edit it as per your needs.Please refer to Outgoing Email Templates page for more details about creating and editing email templates.
For now, we will select the already created Ready to Issue custom template as shown below. The content of the email is edited with the available variables to suit our requirement.
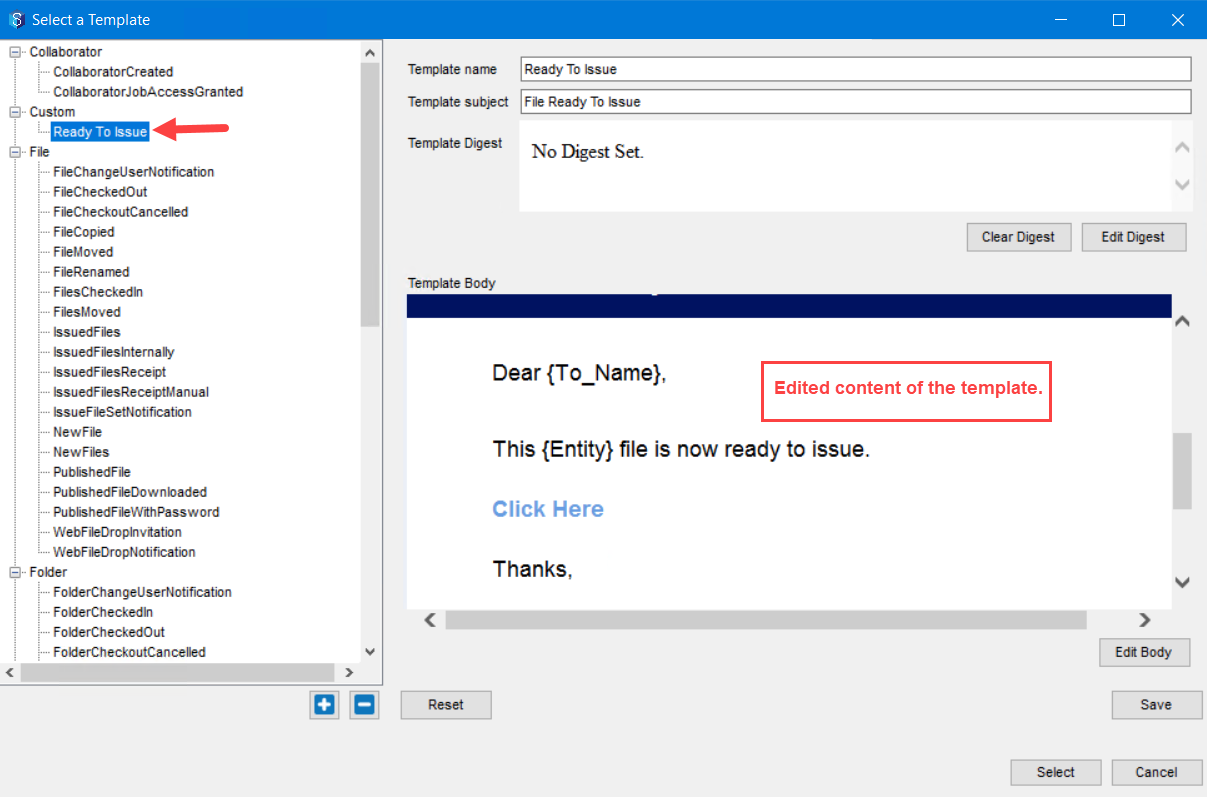
Click the Select button.
The value of Email Template Name input is set to Ready to Issue.If you want to attach any files with the email, click the Value column against the Files to attach input and give the variable expressions of the files to attach in the Set Task Input window. For instance, if you enter {Entity}, the current file that is ready for issue is attached. This is an optional input.
Similarly, you can choose to zip the attachments by selecting the Yes option displayed in the Value column against the input. This is also an optional input.
Click the Save button.
.png)
The Send an email to the PM activity is saved.
Now we have to define the last activity for this transition. We have to assign the workflow to the Project Manager as the file is now with him.
Click the
.png) button in the Activities tab, and assign the workflow to the Project Manager role using the General > Assign the workflow activity. For the Assign to input value, select the Role > Specific Role > Project Manager option from the prompts that are displayed chronologically. For the Send email input value select the No option as we have just defined a custom email to be sent.
button in the Activities tab, and assign the workflow to the Project Manager role using the General > Assign the workflow activity. For the Assign to input value, select the Role > Specific Role > Project Manager option from the prompts that are displayed chronologically. For the Send email input value select the No option as we have just defined a custom email to be sent.Remember to name your activities appropriately as it makes the activity definitions very clear.
Click the Save button.
The Assign the workflow activity is saved.
The transition of the workflow from In Review —> Ready to be Issued states is now complete.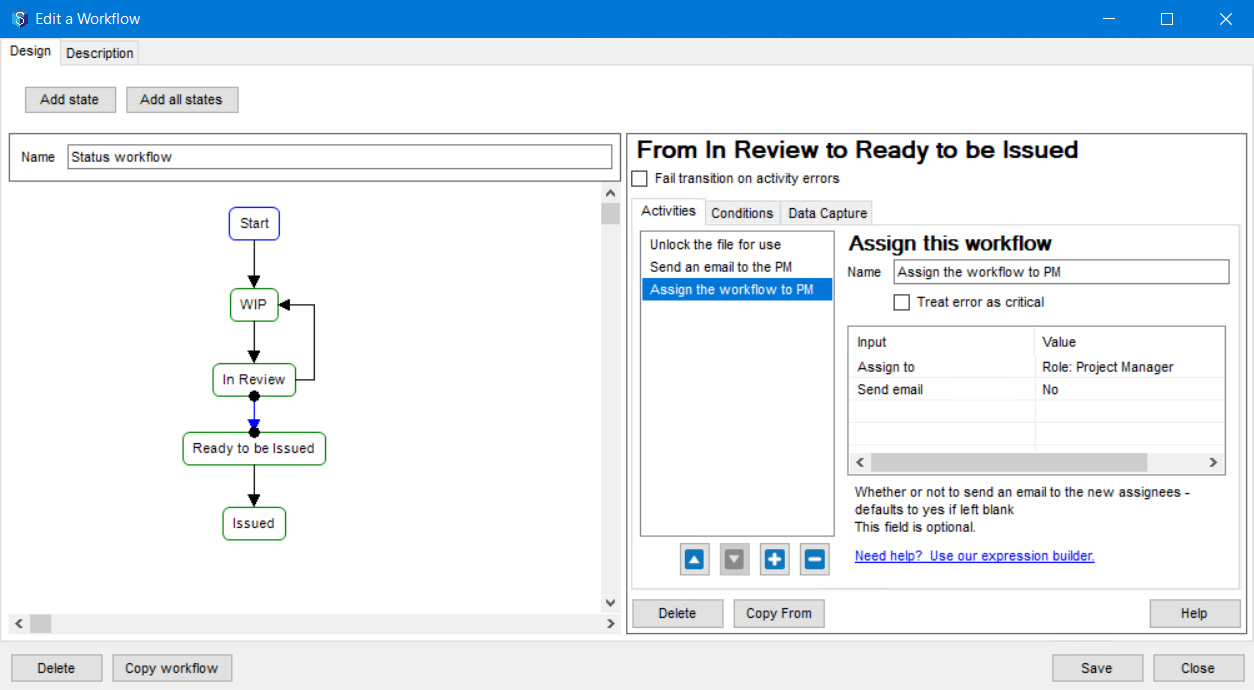
Let us now define the transition of the workflow from Ready to be Issued —> Issued states. The Activities involved in this transition are as follows.
Send an email to the Project Engineer (Client) issuing (publishing) the file.
Assign the workflow to the Project Engineer
Increment the revision number of the updated file
Since the Issued state is the final state of the workflow, select the Issued state in the workflow and select the Is workflow resolution? checkbox as shown below.
.png)
Let us now define the activities.
As mentioned in step 12b in the above procedure, click the
.png) button in the Activities tab and in the Add a New Transition Activity window, select the General category > Send an Email activity. Set the following inputs following the steps mentioned in 12b.
button in the Activities tab and in the Add a New Transition Activity window, select the General category > Send an Email activity. Set the following inputs following the steps mentioned in 12b.Input
Value
Comments
Send to
Role: Project Manager
CC to
Any specific contact, group or role you want to mark a CC to
Optional input
Email Template Name
PublishedFile
It is a predefined template that is provided by 12d Synergy. However, as mentioned in step 12b above, you can customise this email template.
File to attach
The variable expressions to the files that need to be attached along with the current file that is ready to be issued.
Optional input. You can use the expression builder to come up with these variable expressions.
Zip attachments
Yes / No based on whether or not you want to zip the attachments
Optional input
After clicking the Save button, the following is displayed.
.png)
The next activity is to assign the activity to the Project Engineer. Click the
.png) button in the Activities tab, and assign the workflow to the Project Engineer role using the General > Assign the workflow activity. For the Assign to input value, select the Role > Specific Role > Project Manager option from the prompts that are displayed chronologically. For the Send email input value select the No option as we have just selected an email template to be sent in another activity.
button in the Activities tab, and assign the workflow to the Project Engineer role using the General > Assign the workflow activity. For the Assign to input value, select the Role > Specific Role > Project Manager option from the prompts that are displayed chronologically. For the Send email input value select the No option as we have just selected an email template to be sent in another activity.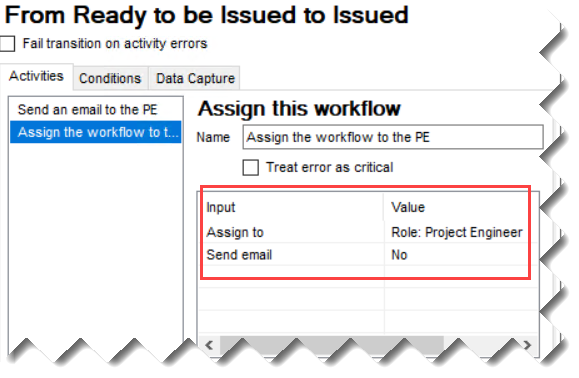
Now let us look at the activity of incrementing the revision number of the updated file. If you recall, in step 1 of this procedure, we created an integer attribute for versioning, named Revision Number, with an initial value of 1. We have to increment that attribute by 1.
Click the
.png) button in the Activities tab and in the Add a New Transition Activity window, double-click Attributes > Increment attribute activity.
button in the Activities tab and in the Add a New Transition Activity window, double-click Attributes > Increment attribute activity.
The New Increment attribute activity is added to the list of activities in the Activities tab.Rename the activity appropriately. Lets name it Increment revision attribute.
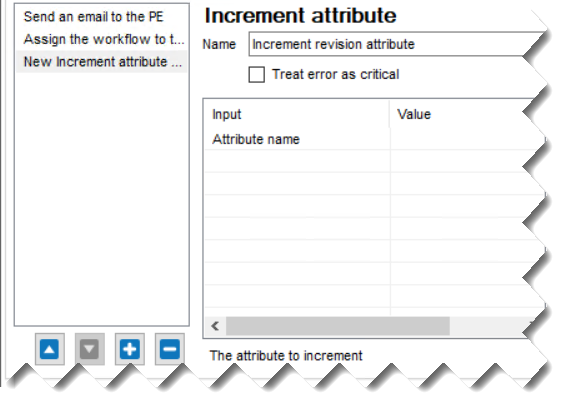
Click in the Value column against the Attribute name input.
The Edit Attributes Input window is displayed.
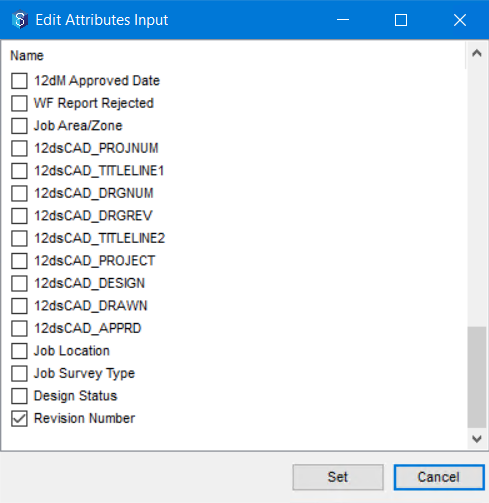
Select the check box displayed against the Revision Number attribute we created and click the Set button.
The activity is defined.
Thus, the transition from Ready to be Issued —> Issued states is completed.
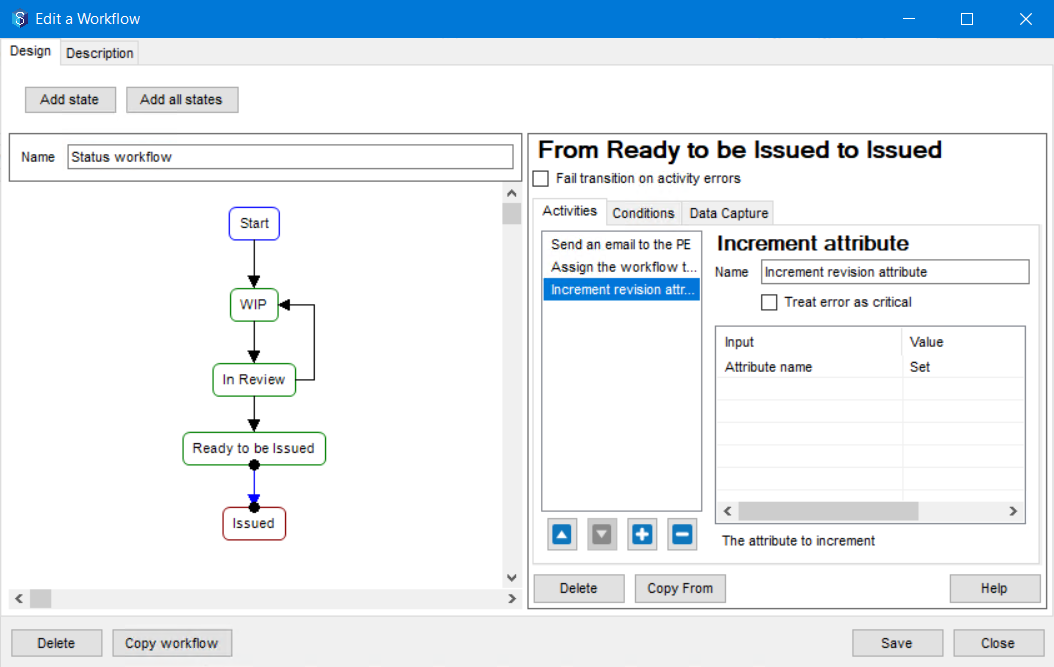
Click the Save button.
There is one more transition in the workflow that we have to define. After the Design Lead completes the review, if he has any review comments, he has to pass it on to the Designer for further updates. So the transition that we now have to define is from In Review —> WIP states. The activities included in this transition are as follows.
Assigning the workflow to the Designer
Lock the activity to the Designer
Send a customised email with the review comments attached. For this activity, we will capture the review comments in a PDF Markup file in the Data Capture tab.
Let us start defining this transition.
Select the arrow between the In Review —> WIP states.
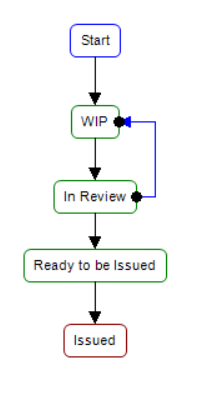
Like in all the previous transitions, we have to assign the workflow to the Designer as the file is with him for updates in the WIP state. Click the
.png) button in the Activities tab, and assign the workflow to the Project Engineer role using the General > Assign the workflow activity. For the Assign to input value, select the Role > Specific Role > Designer option from the prompts that are displayed chronologically. For the Send email input value select the No option as we will create a customised email in the steps that follow.
button in the Activities tab, and assign the workflow to the Project Engineer role using the General > Assign the workflow activity. For the Assign to input value, select the Role > Specific Role > Designer option from the prompts that are displayed chronologically. For the Send email input value select the No option as we will create a customised email in the steps that follow.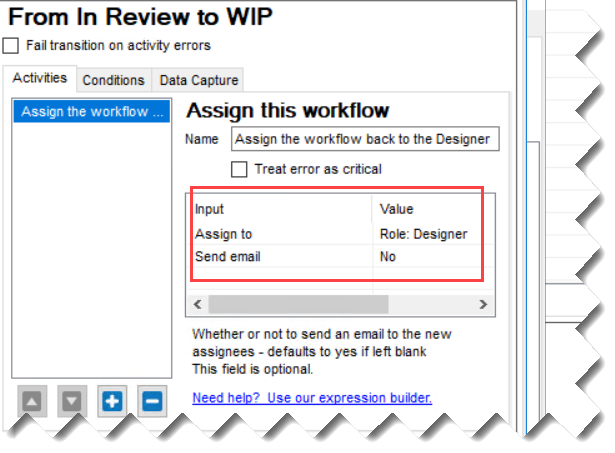
Since the Designer will be updating the file based on the review comments he receives, we have to lock the file to the Designer. Click the
.png) button in the Activities tab, and lock the current file for the designer using the Files category > Lock a file activity. For the File to lock input value, select the Enter manually > Use the current file option in the prompts displayed. And for the Lock for input value, select the Role > Specific Role > Designer option from the prompts that are displayed chronologically.
button in the Activities tab, and lock the current file for the designer using the Files category > Lock a file activity. For the File to lock input value, select the Enter manually > Use the current file option in the prompts displayed. And for the Lock for input value, select the Role > Specific Role > Designer option from the prompts that are displayed chronologically.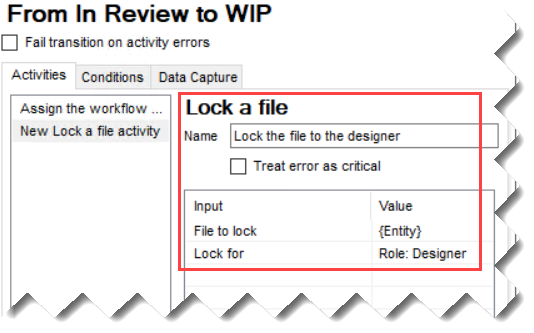
Let us first do a data capture now. We need to capture the review comments given by the Design Lead. Lets say, there are marked in a PDF file. Select the Data Capture tab.
Click the
.png) button.
button.The Add new data capture prompt is displayed.
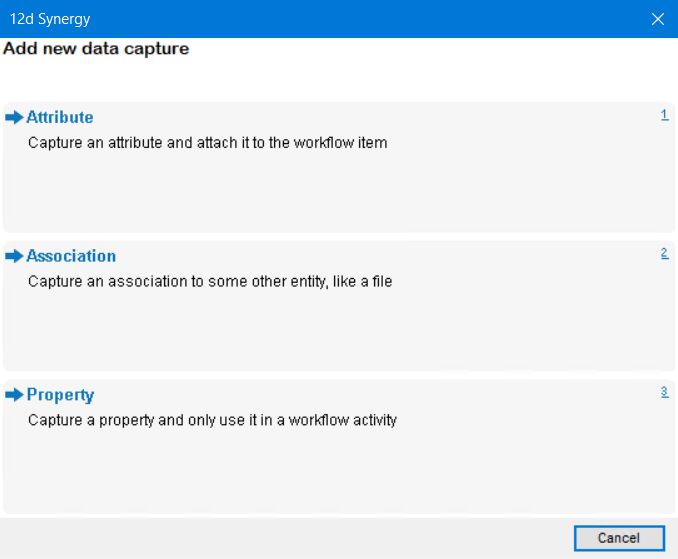
Since we want to capture a PDF file with review comments, select the Association option.
A new File association data capture is added to the Data Capture tab..png)
Let the File option be selected in the Association Type list.
In the Description box, enter a small description of the file you want to capture. Lets enter Review Comments PDF.
Since the review comments are mandatory for updating the file after a review, we will NOT select the Optional? check box.
Click the Save button.
The data capture is saved. Save this file in any location in 12d Synergy Client application. When the workflow runs, we will be prompted to select the file (association) from the 12d Synergy application.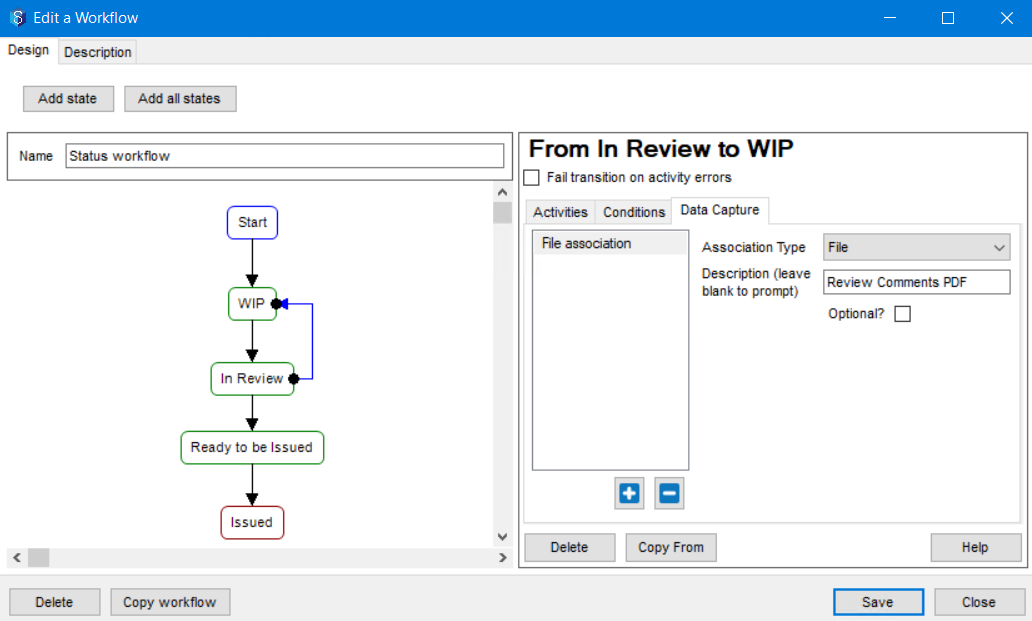
Now that we have captured the review comments, let us send an email to the Designer with the review comments file. As mentioned in step 12b in the above procedure, click the
.png) button in the Activities tab and in the Add a New Transition Activity window, select the General category > Send an Email activity. Set the following inputs following the steps mentioned in step 12b.
button in the Activities tab and in the Add a New Transition Activity window, select the General category > Send an Email activity. Set the following inputs following the steps mentioned in step 12b.Input
Value
Comments
Send to
Role: Designer
CC to
Any specific contact, group or role you want to mark a CC to
Optional input
Email Template Name
.png)
Lets create a customised template following the steps in step 12b of this procedure.
File to attach
The variable expressions to the any other files you want to attach with the email. Note that since the review comments file is added as a data capture, we will be selecting the file from where it is saved in the 12d Synergy Client application when the workflow runs.
Optional input. You can use the expression builder to come up with these variable expressions.
Zip attachments
Yes / No based on whether or not you want to zip the attachments
Optional input
Click the Save button and close the Edit a Workflow window.
The transition from In Review —> WIP is saved.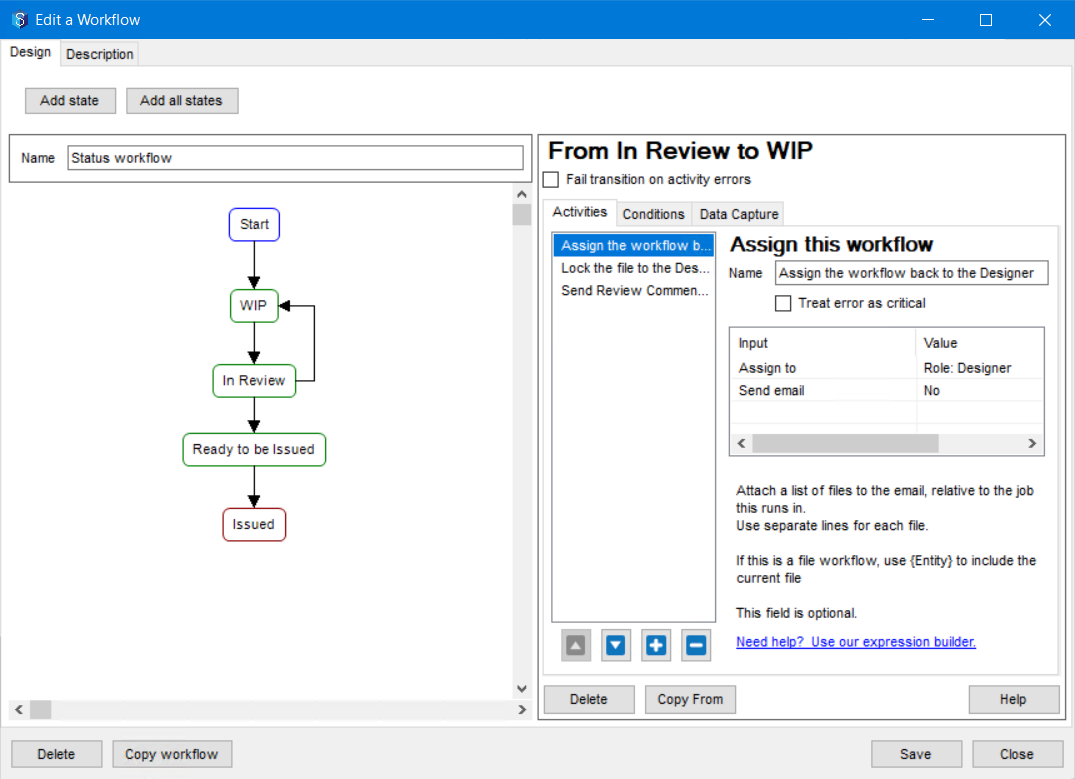
Click the Save button in the Create/Edit an Attribute window.
Click the Save button in the Edit a Folder:<folder name> window.
We have finally defined all the transitions in our sample workflow. Now let us see a video that shows what happens when we run the workflow.
When you add a file to the folder on which the workflow is defined, the file name is displayed in red font. This means that the file is locked for someone.