Admin Content
Groups are defined as collections of Users and are best used for assigning and controlling permissions. You can define different groups in your organisation based on the permissions you want to define for a particular set of users. For instance, all drafters can be in a group and can have bulk permissions set for their group. The 12d Synergy Administrator can create, define and delete groups.
1.1. How to Create a Group
In the 12d Synergy Administration application, select the Groups tab.
Click the
 button.
The Add a group window is displayed.

Enter the name of the group to be created in the Group name box.
Select the required group type from the Group type list. By default, it is set to Custom. However, if Active Directory is configured on your system, then the Active Directory group type option is also displayed in the Group type list.
Users can be grouped into a mix of Custom groups and Active Directory groups. However, you cannot use the 12d Synergy applications to edit (add/remove users) the Active Directory groups. Only your System Administrator can edit this type of group at the Active Directory level.
Click the Add button.
The group is created and is displayed in the Groups tab.Click the Save button in the Groups tab.
The newly created group is saved.
1.2. How to Edit a Group
By editing a group, you can do the following:
To edit the group, do the following:
In the 12d Synergy Administration application, select the Groups tab.
The list of groups is displayed..png)
Select the group to which you want to edit and click the
 button.
The Edit a group window > Members tab is displayed.
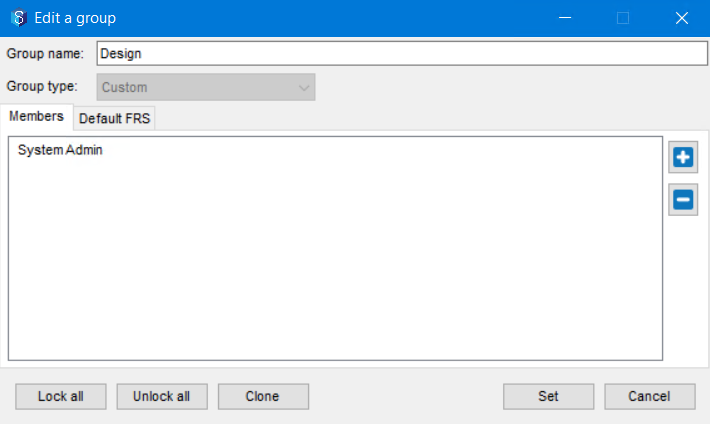
1.2.1. How to Assign Members to a Group
You can assign members to a group by either editing a group and adding users to it or by editing a user and adding the user to a group. Both these methods are done in the 12d Synergy Administration application.
1.2.1.1. From the Groups Tab
In the Edit a group window, click the
 button.
The Find a User window is displayed.
Search for a user using any or none of the following parameters:
Quick find – Start typing any search string from the User’s first or last name, and the matching results appear in a list below. Select the required user and click the Use button.
First name – first name of the user
Last name – last name of the user
Email – email address of the user
Other attributes – to search for a user based on the user’s attributes. You can add search attributes using the
 button.
Click the Find button.
The list of users matching the given search parameters is displayed.Select the required user and click the Use button.
The selected user is added to the group and is displayed in the Members tab.Click the Set button.
Click the Save button in the Groups tab.
You cannot use the 12d Synergy applications to edit (add/remove users) the Active Directory groups. Only your System Administrator can edit these types of groups at the Active Directory level.
1.2.1.2. From the Users tab
In the 12d Synergy Administration application, select the Users tab.
Click the Find tab.

You can search for a user using any or none of the following parameters:
Quick find – Start typing any search string from the User’s first or last name, and the matching results appear in a list below. Select the required user and click the Use button.
First name – first name of the user
Last name – last name of the user
Email – email address of the user
Standard Users option – to search among standard 12d Synergy users only
Collaborators option – to search among the Collaborators only
Other attributes – to search for a user based on the user’s attributes. You can add search attributes using the
 button.
Click the Find button.
The list of users matching the given search parameters is displayed.Select the required user and click the Edit button.
The Edit a User window is displayed.
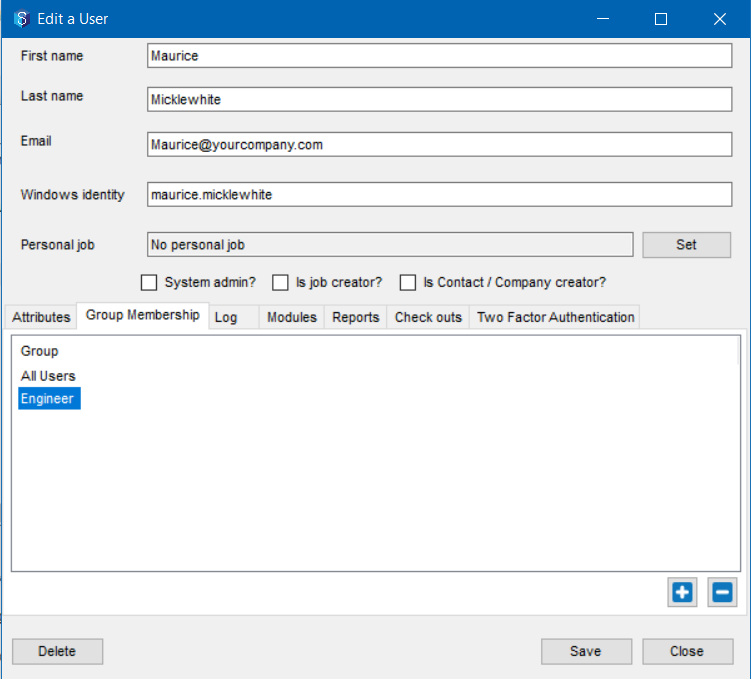
Click the Group Membership tab.
Click the
 button.
The Find a group window is displayed.Search for the required group or click the Find button to display all the groups in the system.
Select the required group to which you want to add the user and click the Select button.
The selected group is added to the user’s Group Membership tab.
Click the Save button.
The list of groups is displayed.You can also add a group while creating a user using the Users tab > Create tab > Standard tab > Group Membership tab.
You cannot use the 12d Synergy applications to edit (add/remove users) the Active Directory groups. Only your System Administrator can edit these types of groups at the Active Directory level.
1.2.2. How to Lock / Unlock a Group
In the Edit a group window, click the Lock all button.
The following message is displayed.
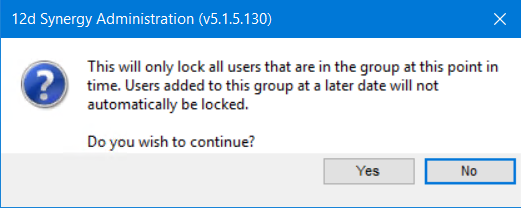
Click the Yes button.
The users in the group are locked, and a confirmation message is displayed.If you, the 12d Synergy Administrator, are part of the group you are locking, then you will NOT be locked despite locking the group. Remember that you cannot lock yourself at any time. However, if another user with system administration rights can block you, even if you are part of a group.
If you add a user to a locked group, the newly added user is not locked.
1.2.3. How to Clone a Group
You can clone a group to create a new group with the same properties as the originally selected group. The cloned group will have the same members and the settings displayed in the Default FRS tab in the Edit a group window.
In the Edit a group window, click the Clone button.
The Clone Group prompt is displayed.
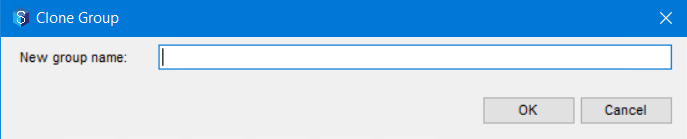
Enter a name for the new group that is being created in the New group name box.
Click OK.
The group is cloned, and a confirmation message is displayed.
1.3. How to Apply Permissions to a Group
Do one of the following:
To apply permissions from the 12d Synergy Client application, do the following:
Right-click the required job and then select the Edit option.
The Edit a Job: window is displayed.
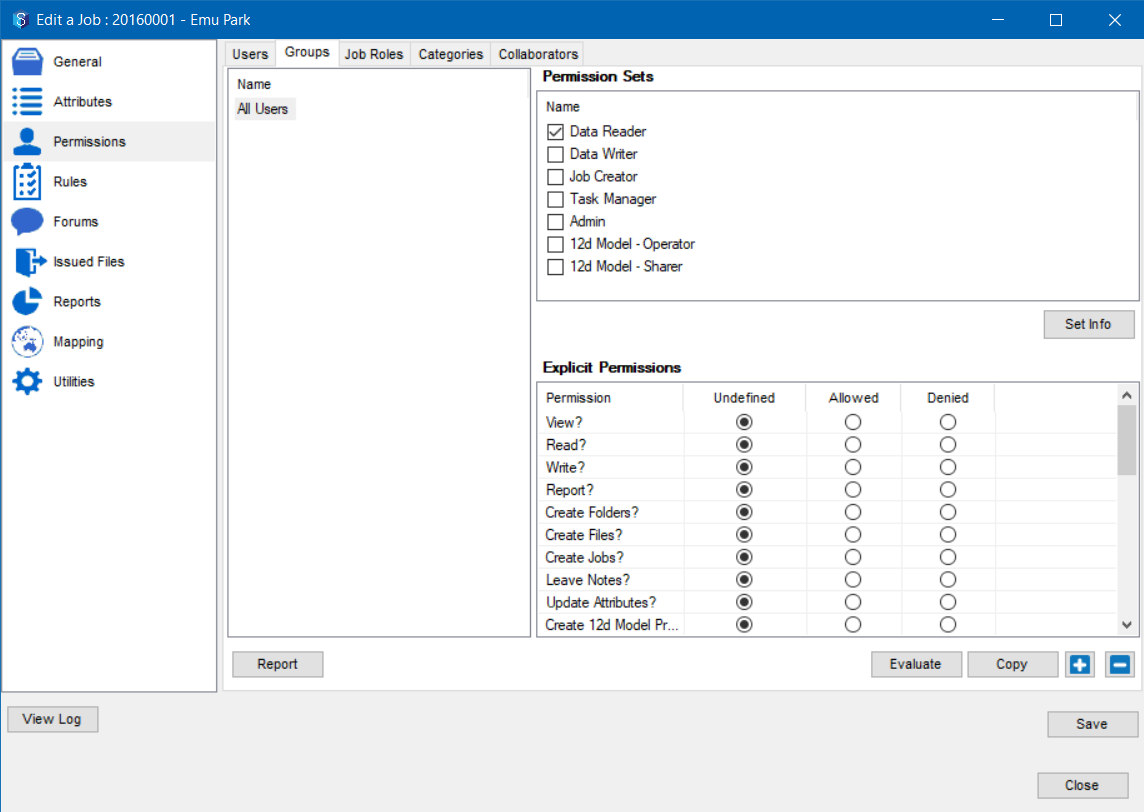
Select the Permissions tab > Groups tab.
To apply permissions from the 12d Synergy Administration application, do the following:
Select the Jobs tab > Find tab.
Enter the search parameters for the required job (optional) and click the Find button.
The list of matching jobs is displayed in the Edit Jobs window.

Select the required job and click the Edit button.
The Job tree window is displayed.
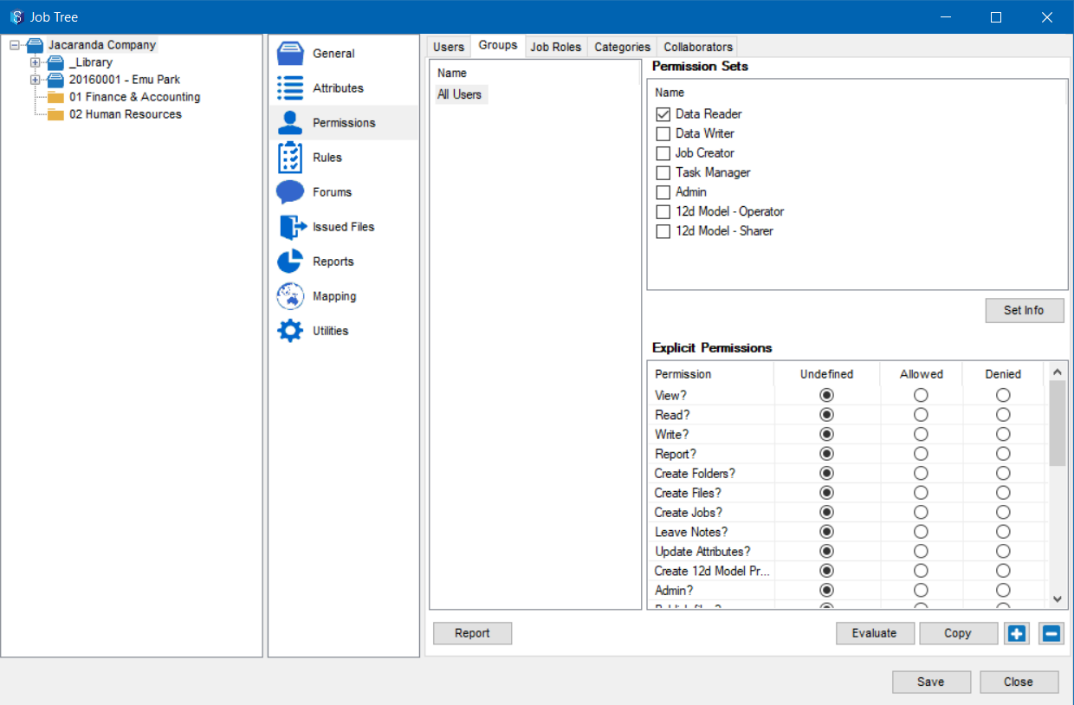
Select the Permissions tab > Groups tab.
Select the group to which you want to apply permissions from the Name panel.
From the Permissions Sets panel, select the permissions sets that you want to apply to the selected group.
To understand which permissions are part of the permission set, click the Set info button and view the permissions in the Permission Set info window.
To apply further specific permissions to the group, select one of the following options against each permission in the Explicit Permissions panel.
Undefined — Disabled if no inheritance is set. Otherwise, it will use the inherited setting from the parent
Allowed —Enabled permission
Denied— Disabled permission
Click the Save button.
The selected permissions and permission sets are applied to the selected group.
1.4. How to Delete a Group
In the 12d Synergy Administration application, select the Groups tab.
The list of groups is displayed.Select the group you want to delete.
Click the
 button.
The selected group is removed from the list of groups in the Group panel.Click the Save button in the Groups tab.
The group is deleted, and the action is saved.
1.5. How to Configure the Default File Server for a Group
In the 12d Synergy Administration application, select the Groups tab.
The list of groups is displayed.Select the group for which you want to configure the default file server and click the
 button.
The Edit a group window > Members tab is displayed.Select the Default FRS tab.

Click the search icon
 against the Default File Replication Server box.
The Select a file server dialog is displayed.Select the required server you want the group to use for its file transfers.
The details of the selected server are displayed in the Default FRS tab.Click the Set button.
The default server for the selected group is set.