Admin Content
A contact is a record of information about a person. It consists of details such as first name, last name, email address, company in which the contact works, phone number, etc. You can add additional attributes to the contacts from the 12d Synergy Administration > System Attributes > Contact Attributes window.
A contact does not have login access to the system unless they are also a User.
A contact list is a group of contacts that are bundled up together so that an email can be sent to them at one go. 12d Synergy gives you an option to create either a global list that applies to all jobs or a job-specific contact list that applies to one the job in which it is created.
1.1. How to Create Contacts
Your 12d Synergy Administrator can control who can create contacts. Below are mentioned the two settings that decide whether a user can create contacts or not.
The 12d Synergy Administration application > Users tab > Find tab or Create tab > Is contact or company creator check box while editing or creating a user respectively
The 12d Synergy Administration application > System Settings > Only System Admins and Contact/Company Creators can modify contacts and companies setting
If only the first setting alone is selected for a user, then that user can create and modify contacts.
If the first setting is selected for a user and the second setting is set to Yes, then that user can create and modify contacts.
If the first setting is not selected, and the second setting is set to Yes, then the user cannot create and modify contacts.
However, 12d Synergy Administrators can create and modify contacts anytime.
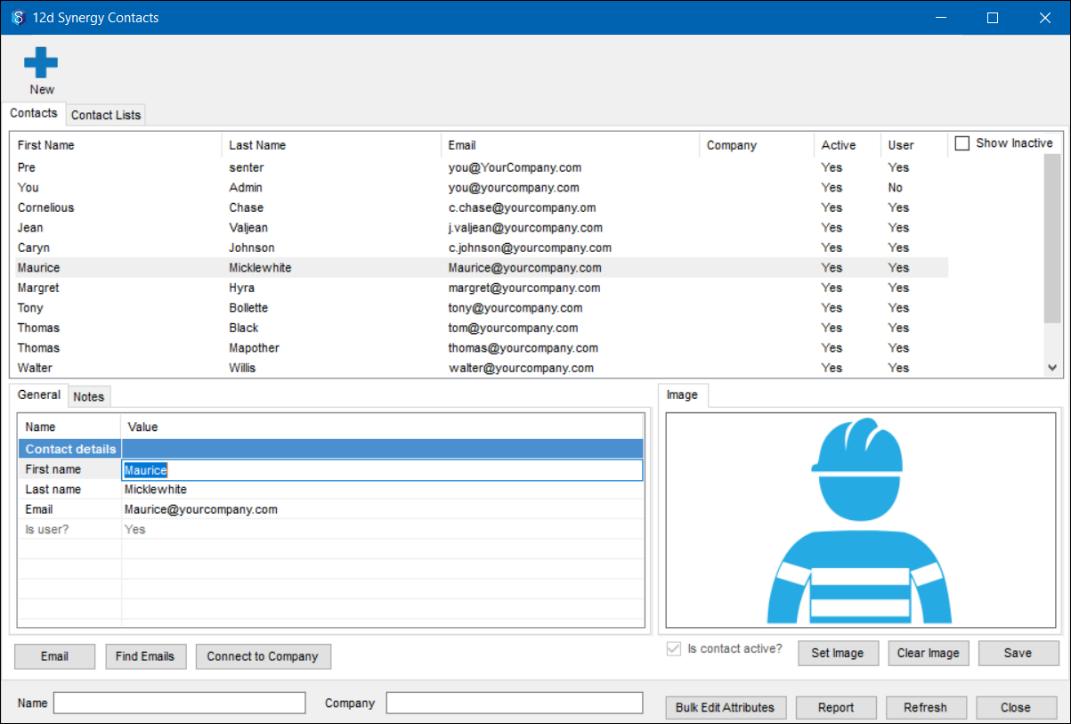
In the 12d Synergy Client application, from the Window menu option, select the Contacts option.
The 12d Synergy Contacts window is displayed.
Click the
 button that is displayed in the top-left corner of the window.
The Add a Contact window > General tab is displayed.

Click the corresponding value column of the following details to enter their value:
First name – First name of the contact. This is a mandatory field.
Last name – First name of the contact. This is a mandatory field.
Email – The email address of the contact
Is User?– This field is read-only, the value of which is based on whether or not a contact is a user. You can create a user from an existing contact using the 12d Synergy Administration > Users tab > Create tab > Create from existing contact check box.
Click the Connect to Company button to select a company and connect the created contact to that company.
Select the Is contact active check box to mark the contact as an active contact.
When searching for contacts, inactive contacts are not displayed in the search results, unless the Show inactive checkbox is selected.
Click the Set image button to set a profile image for the contact. This picture is also displayed in the 12d Synergy Client application > Windows menu > My Profile window.
Click the Save button.
The newly created contact is added to the list of contacts in the 12d Synergy Contacts window.Select a contact in the Contacts tab and click the Email
 button below the General tab, to send an email to the selected contact from your email application.
1.2. How to Edit Contacts
In the 12d Synergy Client application, from the Window menu option, select the Contacts option.
The 12d Synergy Contacts window is displayed..bmp "12dscontacts(2).bmp")
Do any of the following:
In the Name box, start typing the name of the required contact.
The list of all contacts is filtered based on the entered search string.In the Company box, start typing the name of the company to which the required contact is connected.
The list of companies is filtered based on the entered search string and the contacts of those companies are displayed.
Scroll, select, and double-click the required contact.
The details of the selected user are displayed below on the same screen.
You can make any of the following edits:
First name – Click the corresponding value column and make the edit.
Last name – Click the corresponding value column and make the edit.
Email – Click the corresponding value column and make the edit.
Contact attributes – Click the corresponding value column in the Contact Attributes section or click the Bulk Edit Attributes button to edit multiple attributes of multiple contacts from the same window. Please refer to Bulk Edit Contact Attributes procedure for more details.
Connect to Company – Click the Connect to Company button to add or edit the company to which the contact is associated.
Image – Click the Set Image button or Clear Image button to assign or clear the profile image of the selected contact.
Is Contact Active? – Select or clear this check box to activate or deactivate a contact. A contact cannot be deleted in the 12d Synergy environment. This is because the contact might have data or tasks associated with them that are still available in the recorded history. However, contacts can be disabled to prevent them from getting future assignments. Such contacts are called inactive contacts.
If the selected contact is a User, then the Is Contact Active checkbox is disabled.
Click the Save button.
The edits are saved and the updated details are displayed in the Contacts tab.
1.3. How to Define Contact Lists
Your 12d Synergy Administrator can control who can create contact lists. Below are the two settings that decide whether a user can create contact lists or not.
The 12d Synergy Administration application > Users tab > Find tab or Create tab > Is contact or company creator check box while editing or creating a user respectively
The 12d Synergy Administration application > System Settings > Only System Admins and Contact/Company Creators can modify contacts and companies setting
If only the first setting alone is selected for a user, then that user can create and modify contact lists.
If the first setting is selected for a user and the second setting is set to Yes, then that user can create and modify contact lists.
If the first setting is not selected, and the second setting is set to Yes, then the user cannot create and modify contact lists.
However, 12d Synergy Administrators can create and modify contact lists anytime.
In the 12d Synergy Client application, from the Window menu option, select the Contacts option.
The Contacts window is displayed.Select the Contact lists tab.
Click the
 button.
The Add contact list dialog is displayed.
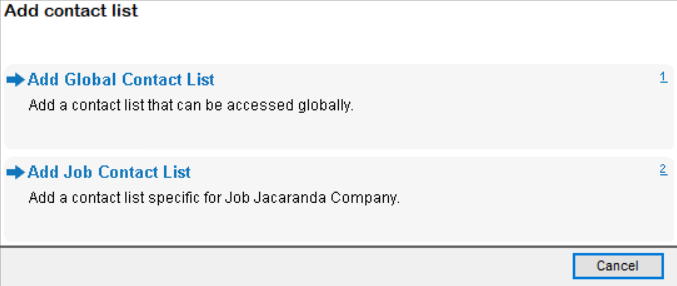
Do one of the following:
Select the Add Global Contact List option to create a contact list that applies to all the jobs.
The Add a Global Contact List dialog is displayed.

Select the Add Job Contact List option to create a contact list that applies to the job you are currently logged into.
The Add a Project Contact List dialog is displayed.

Enter the name of the group in the the Value column against the Name row.
Click the Save button.
The added list gets displayed in the Contact Lists tab, either in the Global section or the Job:<current job>.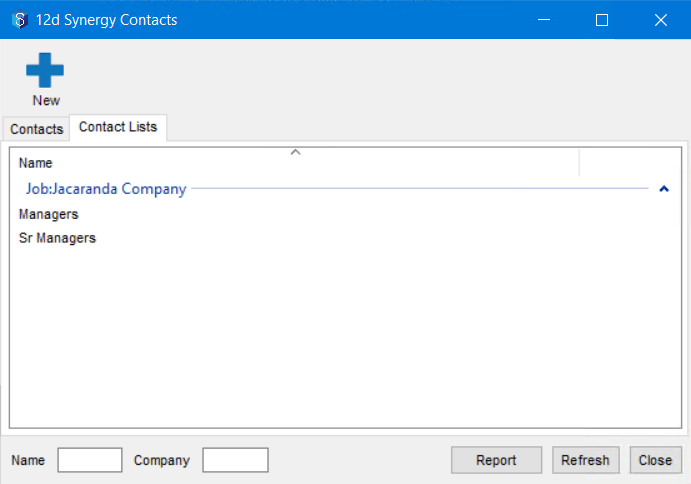
Select the list from the Contact Lists tab to add contacts to it.
Select the Contacts (<number of contacts>) tab from the lower panel of the Contact Lists tab. It is Contacts(0) in the above example as we have not added any contacts to this list.

Click the
 button.
The Find a Contact dialog is displayed.

Search for the required contacts and add them accordingly to the selected group.
The added contact gets displayed in the Contacts (<number of contacts in the group>) tab.Repeat steps 9 and 10 to add as many contacts as you want to the selected group.
Click the Save button.
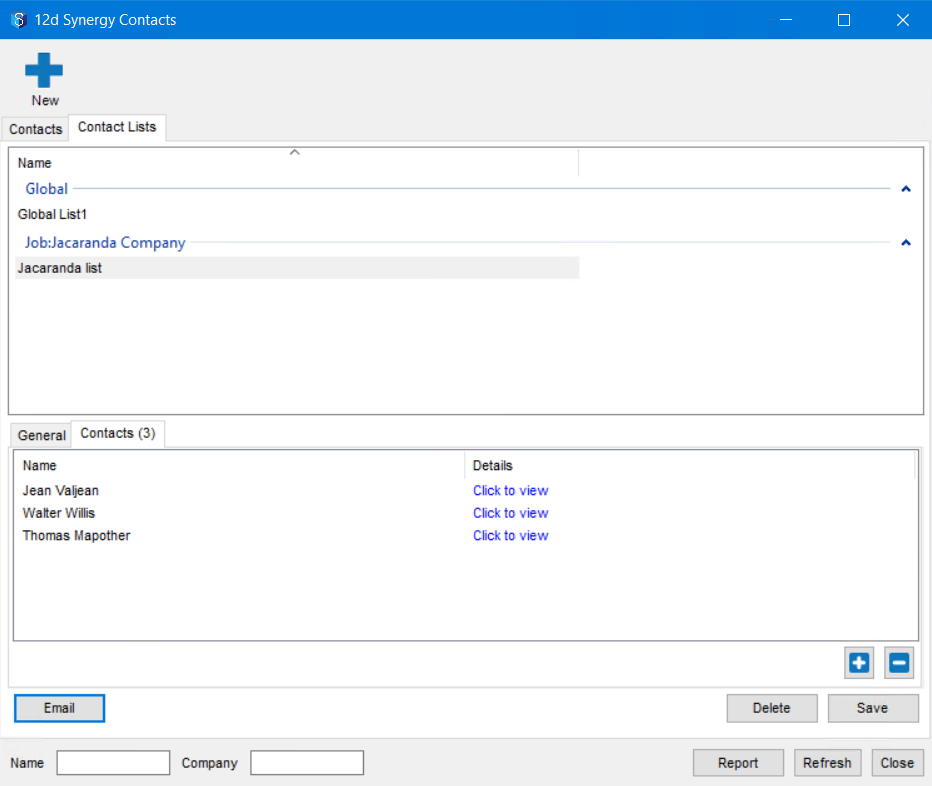
The contact list is created and all the members of the selected list are displayed in the Contacts (<number of contacts in the group>) tab.
Select a contact list in the Contact Lists tab and click the Email  button below the General tab in the lower left of the window to open your email application and send an email to the selected contact list.
1.4. How to Define Contact Attributes
In the 12d Synergy Administration application, click the System Attributes tab.
Click the Contact Attributes tab from the right panel.
Click the
 button.
To add an attribute, do one of the following:
To create a new Contact Attribute, do the following:
Click the New Attribute option.
The Create/Edit an Attribute window is displayed.
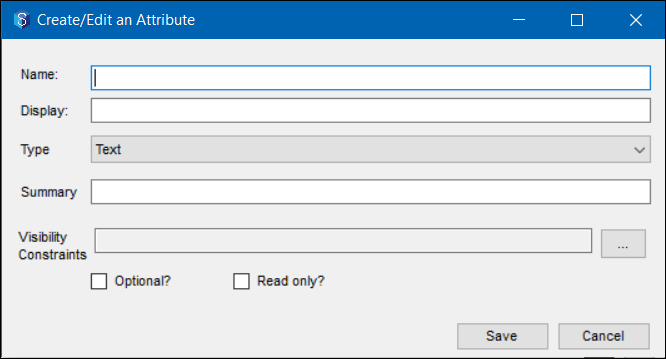
Enter the following details of the attribute:
Name – Name of the attribute
Display – Often this is the same as the name of the attribute unless you want to change it
Type – The type of value that this attribute holds. For example - text, integer, date/time, contact, user, list, etc.
Summary – A brief description of what this attribute is meant for
Visibility Constraints – You can define constraints on attributes to be able to control their display based on certain conditions.
Optional check box – You can mark an attribute as optional or mandatory while defining it.
Read-only check box – You can mark an attribute as a read-only attribute or an editable attribute.
Click the Save button.
To use an existing Contact Attribute, do the following:
Click the Existing Attribute option.
The Find an Attribute window is displayed.
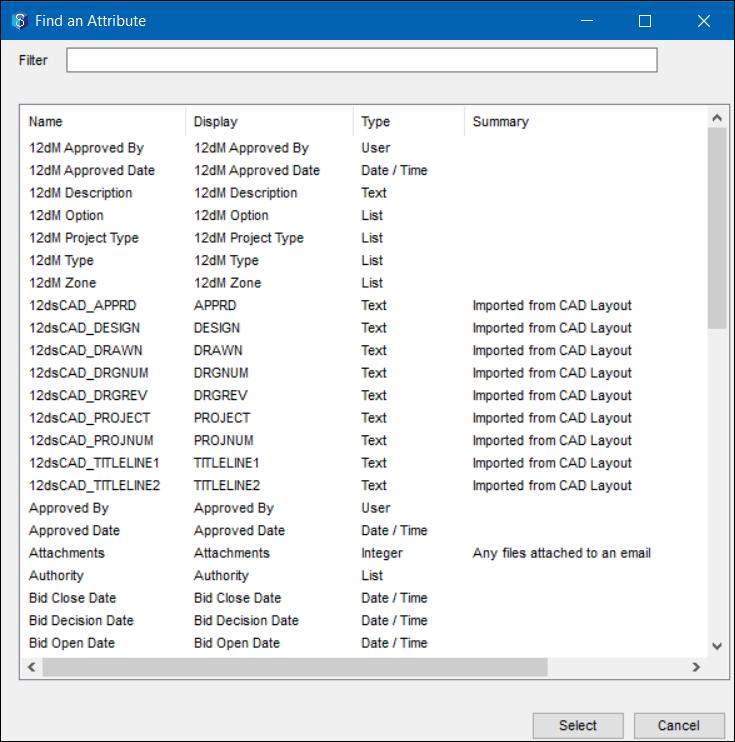
Do one of the following:
In the Filter box, start typing the name of the Contact Attribute that you want to use.
The contact attribute(s) that match the entered content in the Filter box is/are displayed in the box below.Select the required attribute.
Click the Select button.
The name of the selected attribute is displayed in the Name column of the Contact Attributes tab.
Click in the corresponding Value column of the selected attribute.
Enter/select the value for the Contact Attribute.
Click the Save button.
The contact attribute is saved.The contact attributes are displayed in the 12d Synergy Client application > Window menu option > Contacts > 12d Synergy Contacts window > General tab (when a contact is selected).
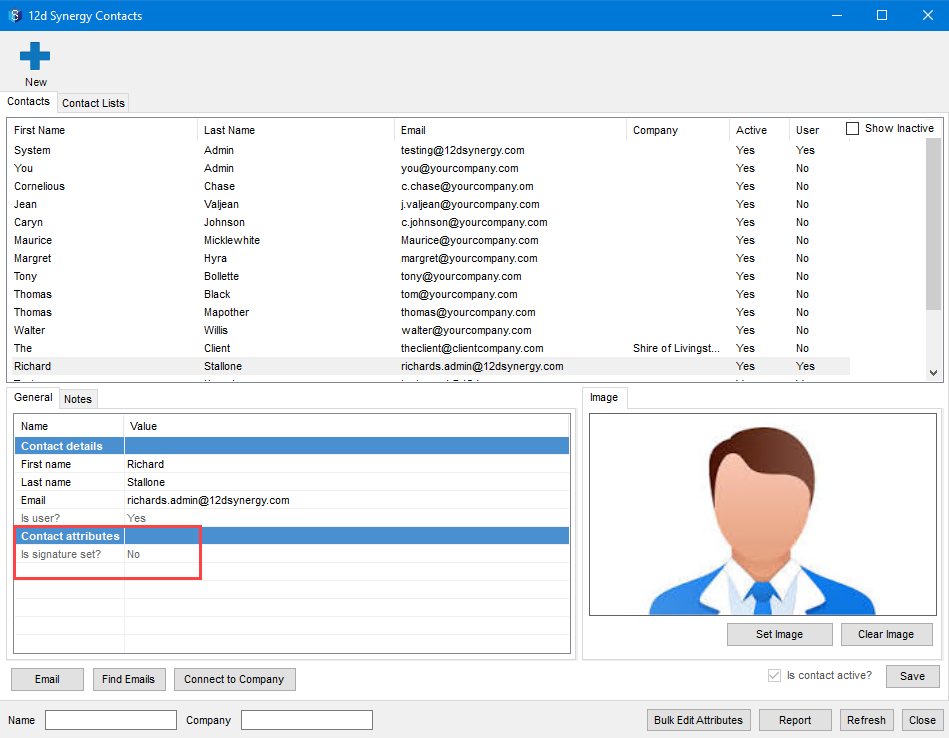
They are also displayed in the 12d Synergy Client application > Window menu option > My Profile option > My Profile window.
.png)
You cannot delete a contact. You can only deactivate a contact.
1.5. How to Delete Contact Attributes
In the 12d Synergy Administration application, click the System Attributes tab.
Click the Contact Attributes tab from the right panel.
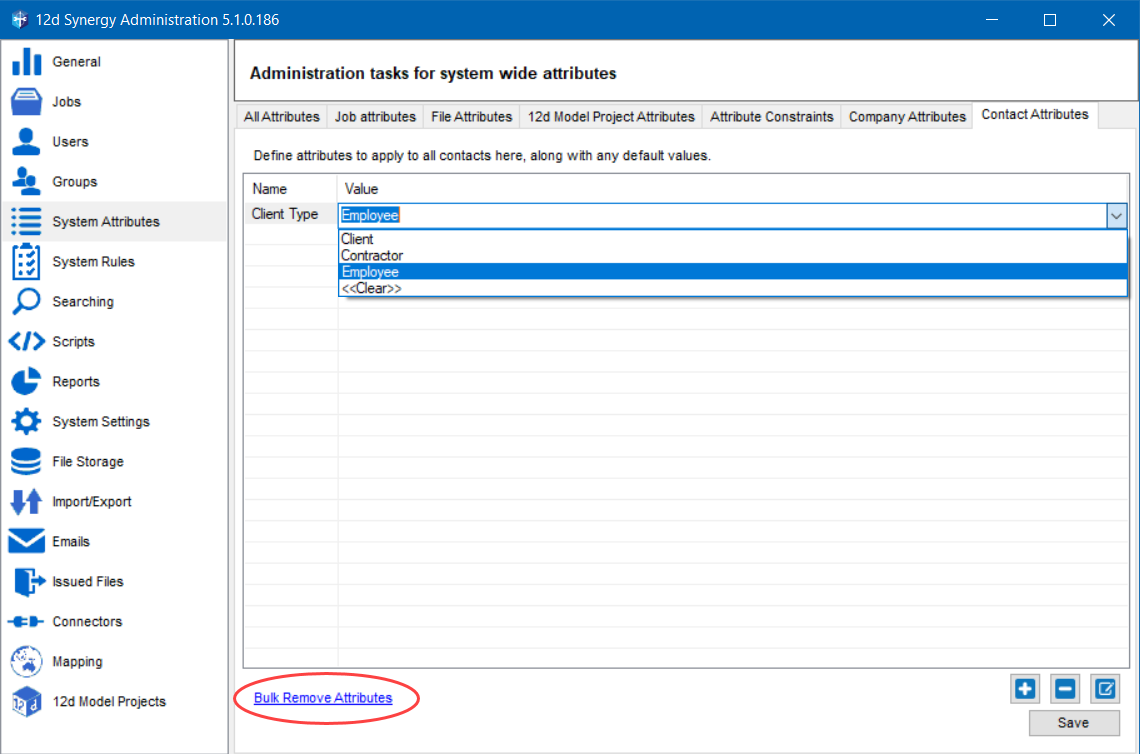
The list of contact attributes that apply to all contacts in the system is displayed in this tab.Click the "Bulk Remove Attributes" link displayed below the table (to the left) in this tab.
The Bulk Remove Contact Attributes window is displayed. You can see all the contact attributes that are in the system. These attributes might apply to all contacts or some contacts only. You can also see how many contacts are tagged with an attribute.

Select the contact attribute(s) that you want to delete.
Click the Bulk Remove Selected Attribute button.
The following prompt is displayed.

Click the Yes button to delete the contact attribute from the system permanently.
The selected contact attribute is deleted permanently from the system.
1.6. How to Bulk Edit Contact Attributes
You can edit contact attributes in bulk.
In the 12d Synergy Client application, from the Window menu option, select the Contacts option.
The 12d Synergy Contacts window is displayed.To select multiple contacts from the contact list, press the Ctrl key and simultaneously select the required contacts.
Click the Bulk Edit Attributes button.
The Bulk Contact Attribute Editor is displayed.
You can make any of the following edits.
MS Excel like Editor – You can edit the cells and rows in this window as you do in an MS Excel spreadsheet. Copying the value(s) of a cell(s) by dragging it to the other cells/rows, using the Ctrl+C and Ctrl+V keys for copying and pasting the matrix to an excel sheet, and repeating a pattern of cells by selecting the cells and dragging it to the other rows/cells can be done in this window. Note that the names of the contacts and the header row cannot be copied from this window.
Increment Values – You can select a single cell, a row, multiple cells, or multiple rows and click the Increment button to increment the contact attributes to the next letter, number, or next value in the list. Note that this function applies to only single string values like a single number or a single letter and to list attributes with a defined set of values.
Export the table – You can click the Export button to export the entire table of contact attributes to a new MS Excel spreadsheet with a filename of your choice.
Copy the entire table – You can click the Copy All button to copy the entire table along with the names of the contacts and header row and paste it into any MS Excel spreadsheet.
You can use the
 button to add contact attributes to the selected contacts in this window.
Use the left and right arrow buttons to move and shift the focus onto the required cells.
Click the Update button.
If any values are incremented, or any contact attributes are added, the table is saved.