Admin Content
12d Synergy now provides you with an option to provide third-party users read-only access to selected jobs or folders. For example, you might want to share the drawings with your field engineers, or you are working on a joint venture with users from another company. In such cases, you can provide the field engineers or third-party users with access to the 12d Synergy Web App. These users are called Collaborators. Collaborators can only view and download the data. They cannot make any changes to the data.
To create a Collaborator, the following settings must be configured in 12d Synergy Administration application > System Settings tab > Web Access tab > Advanced tab:
Select the Allow 12d Synergy Web App checkbox.
Select who can create a Collaborator from the Collaborators can be created by list.
To see information in 12d Synergy, a user (including a Collaborator) needs to have permissions to see the Job. Please be aware that having permissions for a job will grant access to the Information displayed on that job. This includes information on the job dashboard, the job attributes and any notes added at the job level. Additionally, if your job/folder structure is set to inherit permissions from the job level, granting access to a job to a Collaborator will provide them with broad access to each entity in that job that inherits permissions from above.
When a collaborator is given access to an entity, they also have access to the history of that entity. This means that the collaborator can view any of the previous versions of the entity, if they choose to.
A Collaborator cannot create a personal access token.
A Collaborator doesn’t have access to view, create or edit any issues.
You must have a Collaborators license to be able to work with this new feature. The number of Collaborators who can access the Web App with a license is mentioned to the right of the 12d Administration application > General tab > License tab > Current License > Available Modules section.
.png "image(45).png")
Please contact the 12d Synergy Support Staff for more details about this license.
1.1. How to Set up Collaborators
1.1.1. Prerequisite for Adding Collaborators
In the 12d Synergy Administration application > System Settings tab > Web Access tab, select the following checkboxes.
Enable 12d Synergy Web Server
Allow 12d Synergy Website

1.1.2. Collaborator-related System Settings
In the 12d Synergy Administration application > System Settings tab, the following settings can be configured for Collaborators.
Setting | Value | Usage |
|---|---|---|
Collaborators must always notify someone when adding a note | Yes | The Collaborator is required to add a recipient while creating or replying to a note. |
No | The Collaborator can choose to add a recipient while creating or replying to a note. | |
Hide company logo on the Collaborator onboarding page | Yes | Your company's logo is not displayed on the onboarding page of the 12d Synergy Web App for collaborators. |
No | Your company's logo is displayed on the onboarding page of the 12d Synergy Web App for collaborators. The image of the company logo has to be saved in any location in the 12d Synergy Client application and this location must be selected as a value for the "Company logo" system setting. |
1.2. How to Create and Invite a Collaborator to Access Data
You can create a Collaborator from both, the 12d Synergy Client Application and the 12d Synergy Administration application.
1.2.1. From the 12d Synergy Client Application
If you are a Job Administrator and wish to create collaborator users, your System Administrator will need to change the setting at 12d Synergy Administration application > System Settings tab > Web Access tab > Advanced tab > Collaborators can be created by list to System Administrator or Job Administrator option. Only then can you perform the following procedure. However, if you are a System Administrator, you can perform the following procedure by default.
When you create a Collaborator from the 12d Synergy Client application, you first have to select the job or folder that you want to share with your Collaborators. You can then create a Collaborator or choose an existing user and give them access to the selected entity.
Do one of the following:
Right-click the folder for which you want to create Collaborators and select the Edit folder option.
The Edit Folder window is displayed.Right-click the job for which you want to create Collaborators and select the Edit option.
The Edit job window is displayed.
Click the Permissions tab > Collaborators tab.

Click the
 button.
 Select the New user option.
The Create a Collaborator window is displayed.Follow the steps for creating a Collaborator.
1.2.2. From the 12d Synergy Administration Application
You must be a 12d Synergy Administrator to be able to perform the following procedure.
When you create a Collaborator from the 12d Synergy Administration application, you have to create a collaborator user first and then select the required job or folder to give access to the newly created collaborator.
Click the Users tab > Create tab > Collaborators tab.

Follow the steps for creating a Collaborator.
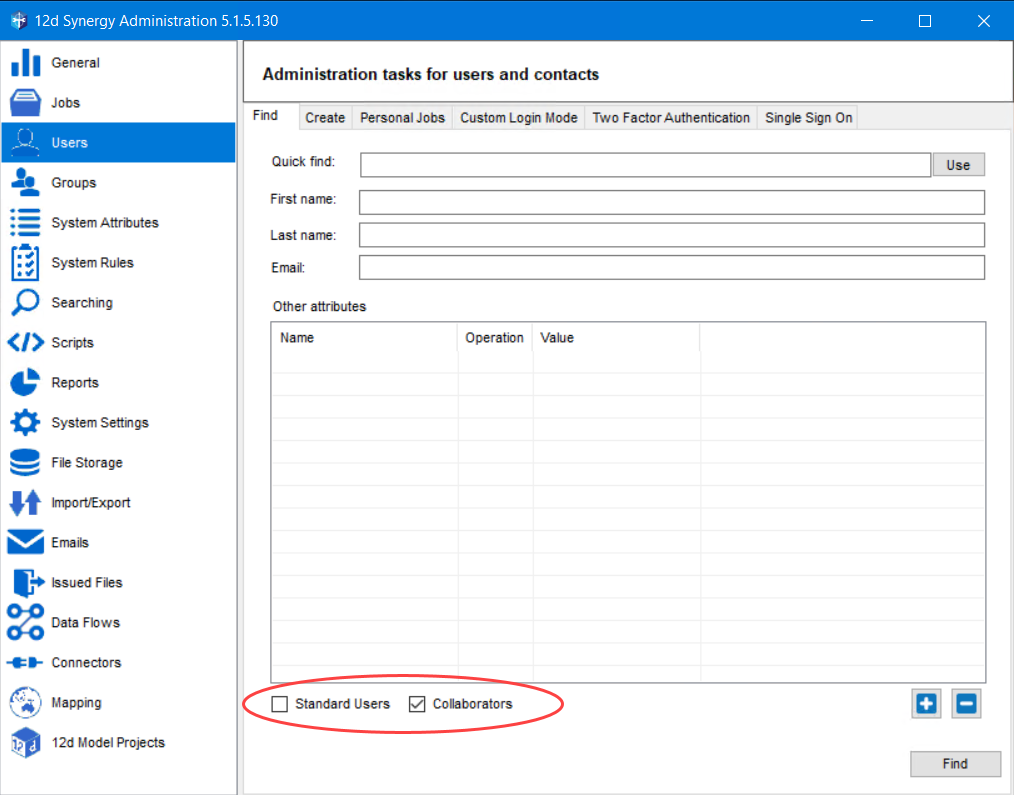
Click the Users tab > Find tab.
Select the Collaborators checkbox and ensure that the Standard Users checkbox is cleared.
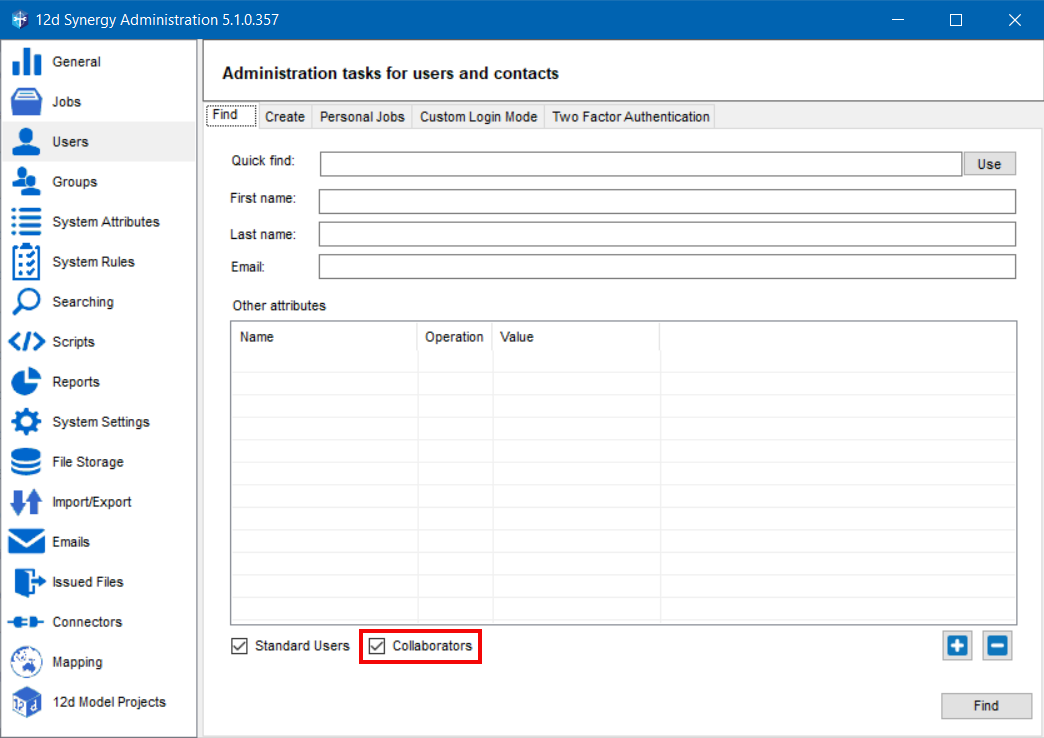
Enter the search parameters for the created user and click the Find button.
The Edit Users window is displayed.Select the required Collaborator and click the Edit button.
The Edit a User window is displayed.Click the Entity Access tab.
Click the
 button.
The 12d Synergy window is displayed.
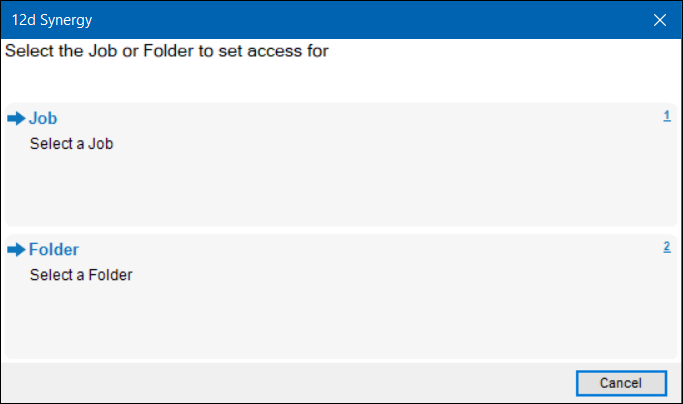
Collaborators can be given access at a job or folder level.
Granting a collaborator access at a folder level will allow them to access data only at that folder level or below, as per normal 12d Synergy permissions. This applies even if you do not give them explicit job access.
Granting a collaborator access at the job (if permissions are inherited) level may provide them with broad access to the whole job and should be approached with care.
Do one of the following:
To provide access to a job, do the following:
Click the Select a Job option.
The Find a Job window is displayed.
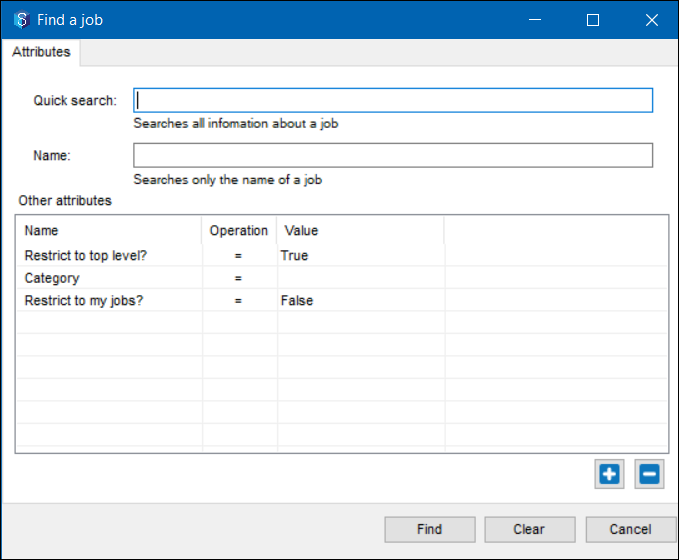
Search for the required job and click the Find button.
Select the required job and click the Open button.
The selected job is displayed in the Edit a User window > Entity Access tab > Job section.
To provide access to a folder, do the following:
Click the Select a Folder option.
The Find a Job window is displayed.Search for the required job and click the Find button.
Select the required job and click the Open button.
The Select a Folder window is displayed.

Browse for the required folder in the job tree structure and click the Select button.
The selected folder is displayed in the Edit a User window > Entity Access tab > Folder section.When you grant a collaborator access to a folder, they can only access data in that folder and its subfolders (if permissions are inherited). This applies even if you do not give them explicit job access.
If a Collaborator is given access to a folder without giving access to its parent job, then the collaborator will receive an invitation email stating that he/she has been granted access to the job. However, on accessing that job using the link in the invite email, only the folder(s) for which the collaborator has been given access is/are accessible.
If a Collaborator is given access to a subfolder without giving access to its parent folder, then the following message is displayed in the 12d Synergy Administration application.

Click the Yes button to give access to the parent folder so that the collaborator can view the subfolder.If a collaborator is denied access to a folder, then its subfolders are also denied access. Similarly, if a collaborator is denied access to a job, then their folders (and subfolders) are also denied access.
It is a very good practice to evaluate the permissions applied to the collaborator (or any user) to ensure that you have applied permissions as per your requirement. However, please be aware that a collaborator can only have read access to the data.
Click the Save button.
An alternate way to create a new user in the 12d Synergy Administration application is to first select a job that has to be shared with Collaborators, and then create a Collaborator to whom read-only access is provided. You can do this by following the steps outlined below.
Click the Jobs tab > Find tab.
Search for the required job and click the Find button.
The Edit Jobs window is displayed.Click the Edit button.
The Job Tree window is displayed.Click the Permissions tab > Collaborators tab.
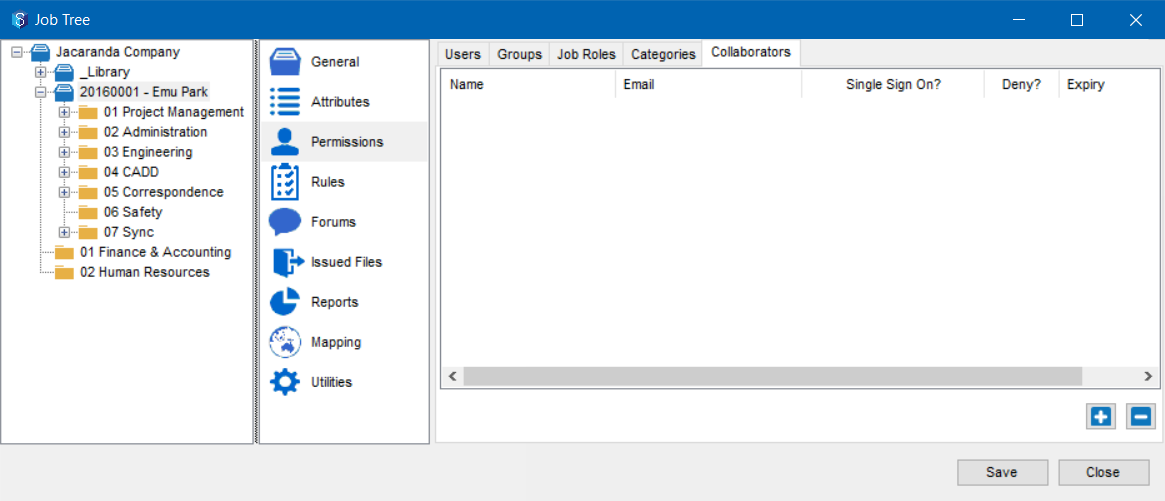
Click the
 button.
Select the New user option.
The Create a Collaborator window is displayed.
Follow the steps for creating a Collaborator.
1.2.3. Steps for Creating a Collaborator
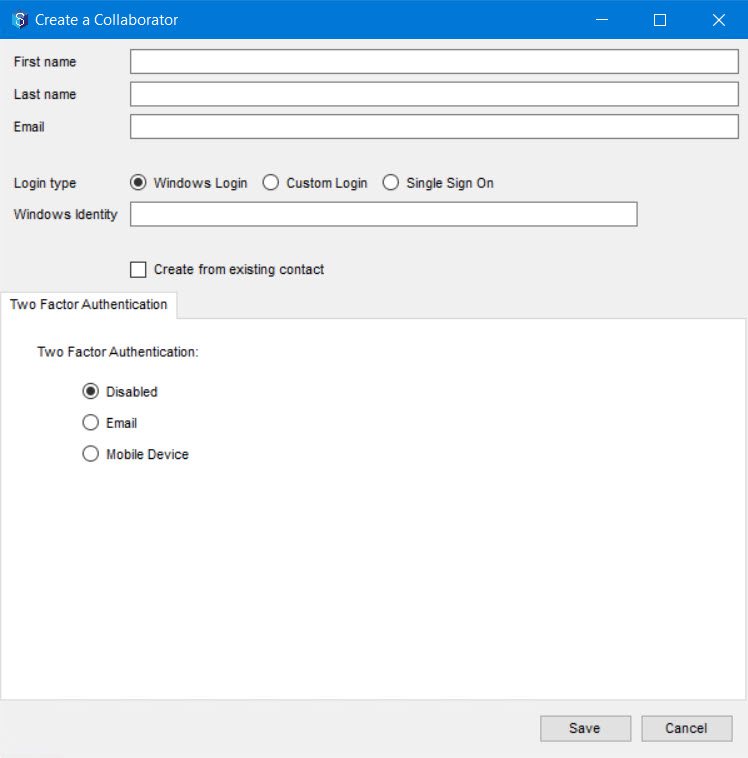
While creating a collaborator, enter the following details:
First Name – First name of the Collaborator
Last Name – Last name of the Collaborator
E-mail – Email address of the Collaborator
Do one of the following to create the login credentials for the Collaborator:
To apply Windows authentication for the user, do the following:
Select the Use Window Login option.
Enter the user identification number used to access Windows in the Windows identity box.
To apply Custom authentication for the user, do the following:
Select the Custom Login option.
Enter the custom login credentials in the Login box.
To apply Single Sign-On authentication for the user, do the following:
Select the Single Sign On option.
If you select the Single Sign On option, all two-factor authentication details are disabled.
Enter your single sign-on login email address in the SSO Identity box.
Select your SSO Provider from the SSO Provider list.
To create a Collaborator from an existing contact, select the Create from existing contact checkbox and find the required contact from the Find a Contact window.
You can update the contact attributes that apply to all users in the Attributes tab.
If you want to enforce two-factor authentication on the Collaborator login, you can select the required mode of authentication from the Two Factor Authentication tab.
Click the Save button.
1.3. How to Evaluate a Collaborator's Access Rights
Do one of the following:
In the 12d Synergy Administration application, select the Jobs tab > Find tab to find the job in which you want to apply permissions, and then click the Edit button in the Edit Jobs window.
The Job Tree window is displayed.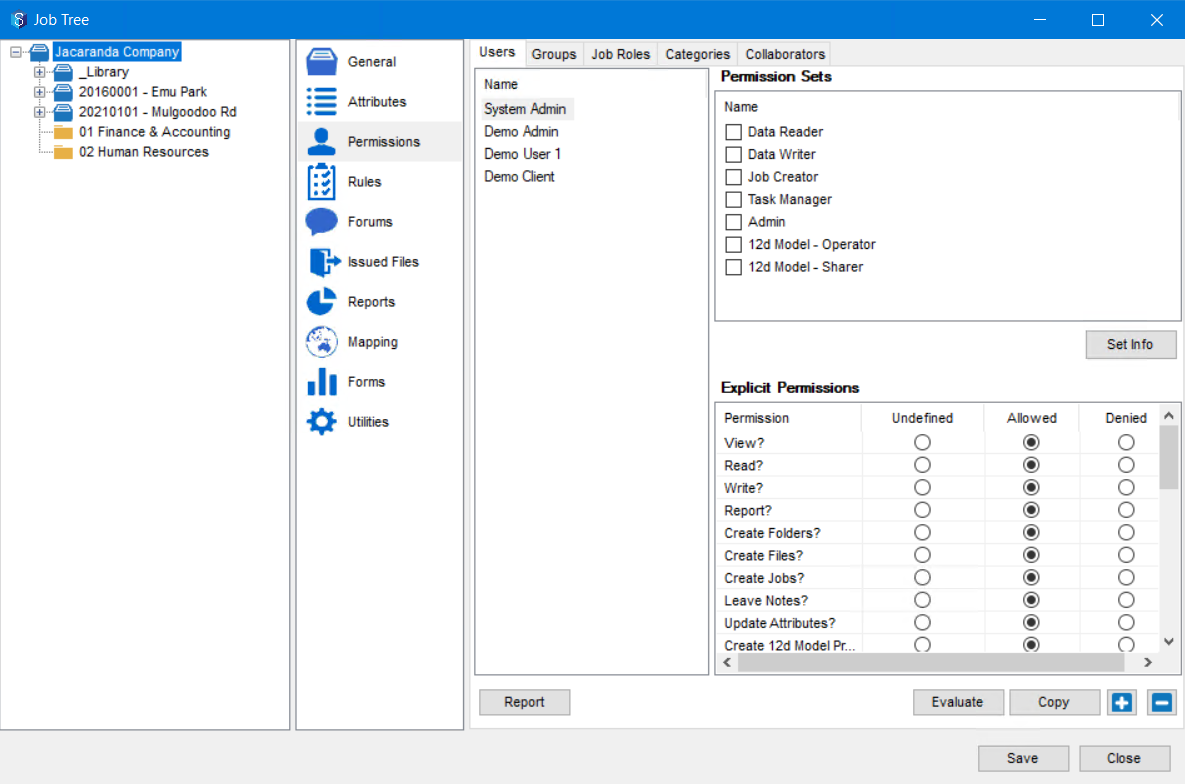
In the 12d Synergy Client application, right-click the required job/folder and select the Edit option.
The Edit a Job: <job name> or Edit a folder:<folder name> window is displayed.
Select the Collaborators tab.

Click the
 button.
The following two options are displayed.New user - You can create a new collaborator.
Existing user - You can search for an existing collaborator.
Select one of the above two options and add the new or existing collaborator to the Collaborators tab in the Job Tree window.
Click the Save button.
Select the Permissions tab.
Click the Evaluate button.
The Find a User window is displayed.

Select the Collaborators checkbox.
Click the Find button.
Collaborators, if any, are displayed in the Search Results window.Select the required collaborator and click the Select button.
The Evaluate Permissions window is displayed.
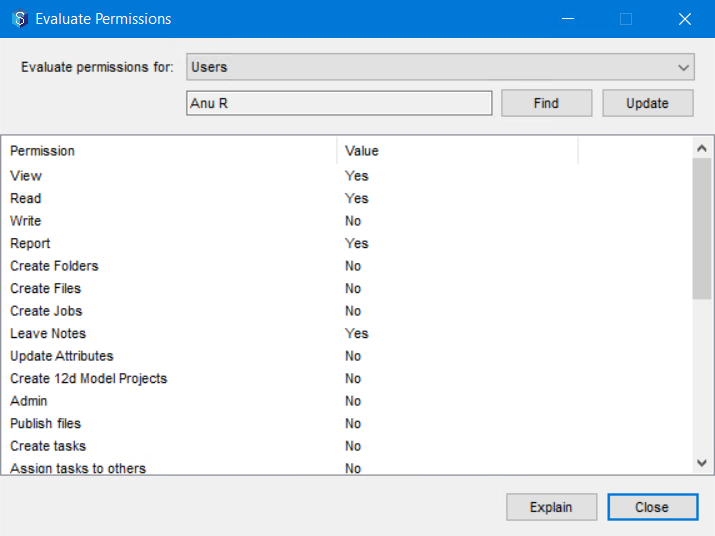
All the default permissions given to a Collaborator are displayed. You can click the Explain button if you wish to see an explanation of all the listed permissions.
1.4. How to Complete Collaborator Registration
Once the Collaborator is created, the following onboarding email is sent to the Collaborator.
.png "image(48).png")
Your Administrator can customise this email from the 12d Synergy Administration application > Emails tab > Outgoing Templates tab.
As a collaborator, click the GET STARTED link in the email.
The following window is displayed.

Enter the email address from the email in the Confirm email field.
Create a password and enter it in the Enter password and Confirm password fields.
If you have opted for the Single Sign On authentication mode to log in to 12d Synergy, the password fields are not displayed in the above window.
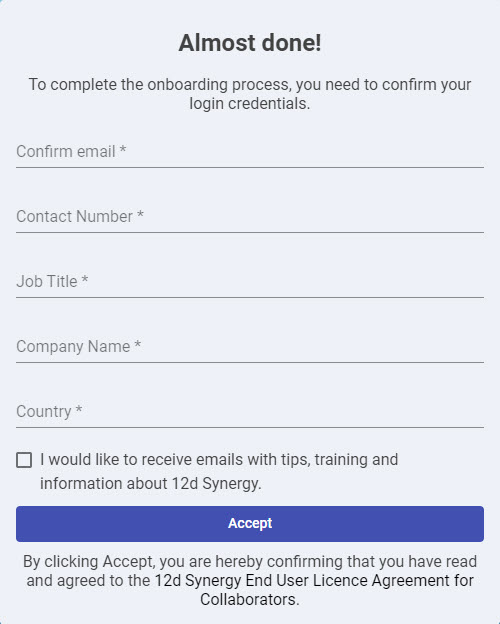
Enter the other details in this form in their respective boxes.
Select the I would like to … checkbox to opt to receive emails from 12d Synergy about their trainings and other updates.
Click the Accept button.
The Onboarding successful message is displayed.
1.5. How to Log in as a Collaborator
When a Collaborator is provided access to a job, the following email is sent.
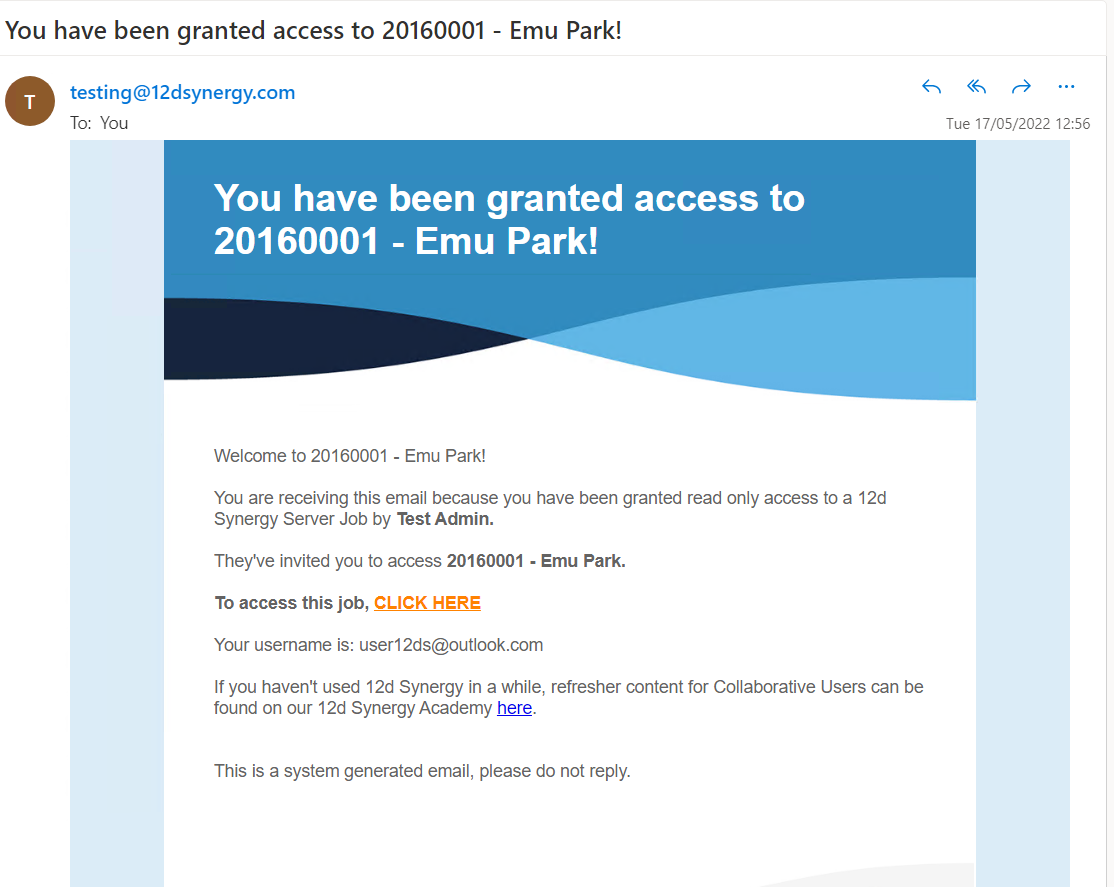
Your Administrator can customise this email from the 12d Synergy Administration application > Emails tab > Outgoing Templates tab.
As a collaborator, click the CLICK HERE link in the email.
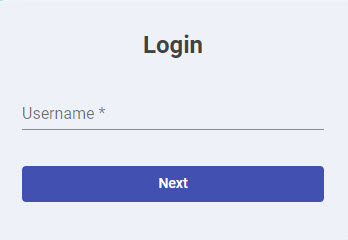
The 12d Synergy Web App login page is displayed.
Do one of the following (step a or step b):
If you have opted for the Windows login or Custom login authentication mode to log in to 12d Synergy, then enter your username mentioned in the onboarding email in the Username field, the password created at the time of onboarding the Collaborator in the Password field and click the Sign in button.
You can change your username to a login ID in the Create a Collaborator window.
Windows and Custom authentication users may have a second level of authentication in the login process.
Your 12d Synergy Administrator configures this authentication that happens either via email or a secondary device. You can read more about two-factor authentication here.
The username and password are verified, and you are logged in to the 12d Synergy Web App.
If you have opted for the Single Sign On authentication mode to log in to the 12d Synergy Mobile app, enter your Single Sign On email address in the Username field and click the Next button in the following window.
Please refer to the Login procedure mentioned here.
The Web App home page is displayed. You can view only the job for which you have been given permissions to access.When you provide a Collaborator with read-only access to a job, you should review their permissions at every level of the job to ensure they are given access only to the required folders. It is recommended that you evaluate the Collaborator's permissions to review their access rights to all entities.
1.6. How to Revoke the Access of a Collaborator
You can revoke a Collaborator’s access instantly or at a future date and time. You can do it from both the 12d Synergy Administration application and the 12d Synergy Client application.
1.6.1. From the 12d Synergy Administration Application
1.6.1.1. How to Revoke the Entire Access of a Collaborator at a Job level
Click the Jobs tab > Find tab.
Search for the required job and click the Find button.
The Edit Jobs window is displayed.Click the Edit button.
The Job Tree window is displayed.Click the Permissions tab > Collaborators tab.
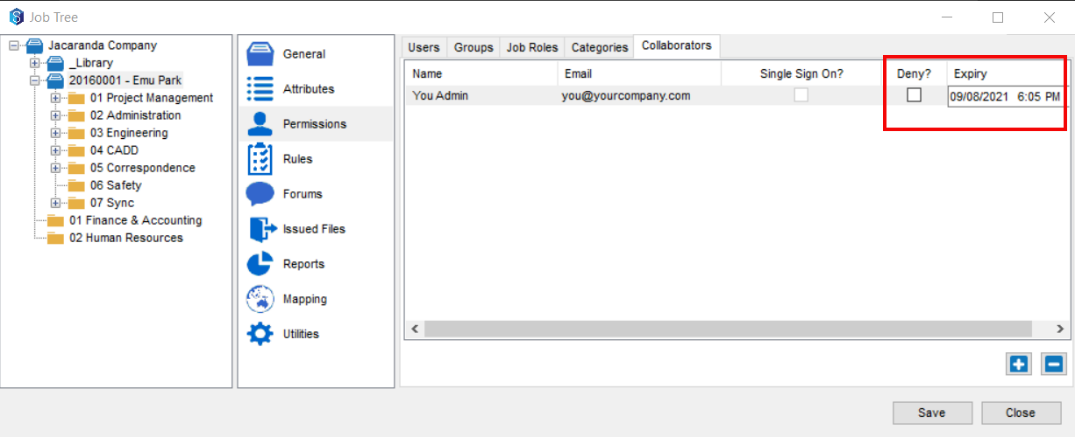
In the required user’s row, do one of the following:
Select the Deny? checkbox to revoke access instantly.
Select a date and time in the Expiry column to revoke access on that date at the selected time.
The Collaborator’s access is accordingly revoked.
1.6.1.2. How to Revoke Collaborator's Access to Specific Folders or Jobs
Click the Users tab > Find tab.
Search for the required user (Collaborator) and click the Find button.
The Edit Users window is displayed.Select the required user (Collaborator) and click the Edit button.
The Edit a User window is displayed.Select the Entity Access tab.
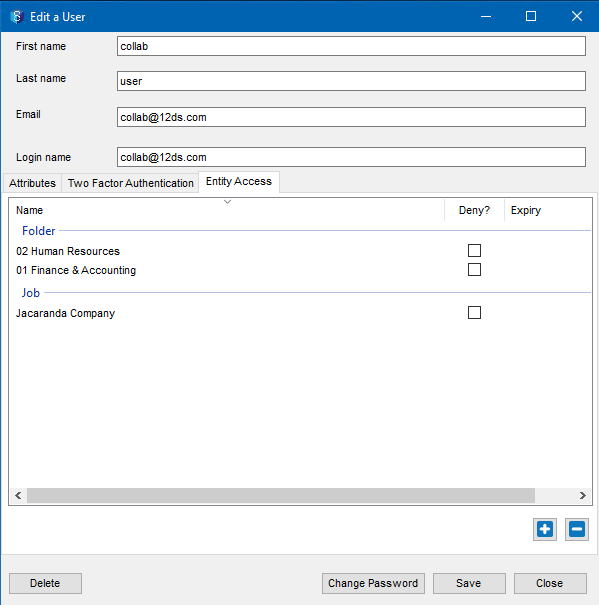
All the jobs and folders for which the selected user (Collaborator) has access are displayed in this tab.If a folder or job has inherited permissions from its parent entity, then they are not displayed in the Entity Access tab.
In the required user’s row, do one of the following:
Select the Deny? checkbox to revoke access instantly.
Click the Expiry column and select a date and time to revoke access on that date at the selected time.
The Collaborator’s access to the selected job(s) is accordingly revoked.
1.6.2. From the 12d Synergy Client Application
Do one of the following:
Right-click the folder for which you want to create Collaborators and select the Edit folder option.
The Edit Folder window is displayed.Right-click the job for which you want to create Collaborators and select the Edit option.
The Edit job window is displayed.
Click the Permissions tab > Collaborators tab.

In the required user’s row, do one of the following:
Select the Deny? checkbox to revoke access instantly.
Click the Expiry column and select a date and time to revoke access on the selected date at the selected time.
The Collaborator’s access is accordingly revoked.
1.7. How to Lock / Unlock a Collaborator
Sometimes you might want to temporarily lock a collaborator for a brief period and unlock them later. This means that when locked, the collaborator will not have access to any of the 12d Synergy applications.
If a collaborator enters the wrong password three times while trying to log in, then the collaborator's account is automatically locked. You, the System Administrator, will have to unlock the account using this procedure.
In the 12d Synergy Administration application, click the Users tab > Find tab.
Select the Collaborators checkbox and ensure that the Standard Users checkbox is cleared.
Enter the search parameters for the created user and click the Find button.
The Edit Users window is displayed.Select the required Collaborator and click the Edit button.
The Edit a User window is displayed.

Click the Lock button.
The following message is displayed.

The Lock button is a toggle button and when a user is locked, it is displayed as the Unlock button. So to unlock a user, click the Unlock button.
Click the Yes button.
The collaborator is locked and a confirmation message is displayed. The status of the user is displayed as below.
