Client Content
In some versions of MS Word and MS Excel, particularly when scaling has been used across multiple monitors, some windows may not render correctly. In this instance, these applications may need to be switched to Optimize for Compatibility mode in MS Word (or MS Excel) > File > Options > General tab. It is recommended to do so to ensure that the 12d Synergy plug-in options are correctly displayed.
Emails, like files, can also be managed by the 12d Synergy Client application. This means that all your emails can be uploaded and tracked in a central location, and on demand, these files can be searched for, opened with your MS Outlook, replied to or forwarded. The interface to managing emails is via Microsoft Outlook version 2010 or later.
When you receive an email in your Outlook and you read it, 12d Synergy can modify the subject of that email by adding a stamp, based on your configuration. The stamp is an identifier that is configured by your 12d Synergy Administrator. It is a combination of attributes and can include user-defined text. The stamp is always prefixed by a # key. With the help of stamps, 12d Synergy locates the jobs or folders into which the email must be uploaded. If an email does not have a stamp or 12d Synergy is unable to locate the job or folder that matches the stamp, it will prompt the user for the location of the job or folder.
If you are using the Microsoft Office Plugin, you must use the Classic version of Microsoft Outlook.
The 12d Synergy Outlook Plugin may not work as expected when used with Outlook cache mode. When cached mode in Outlook is enabled, emails will not be correctly synced between the Outlook Client and the MS Exchange Server. This will result in synchronization issue messages being generated within the Outlook Client.
You can refer to this page for instructions on how to turn off the Outlook cache mode.
1.1. The 12d Synergy Plugin for Microsoft Outlook

User Interface Element | Menu Option | Description |
|---|---|---|
| Upload | Allows you to manually save an email from Outlook to 12d Synergy |
| Change | Allows you to change the 12d Synergy job to which you are connected |
| Change Folder | Allows you to change the folder within the job to which you are connected |
| Current Connection | Displays the location of the 12d Synergy job and a folder within that job to which you have uploaded the latest email. This is called your current connection. |
| Open in 12d Synergy | Opens the folder specified in the Current Connection |
| Settings | Displays the 12d Synergy Setup window |
| Allows you to save the most accessed folders as a favourite location for easy access from the Manage Favourites window | |
| Search | Allows you to search for specific emails from the Find Emails window |
| Save Attachments | Allows you to save attachments separately from the read and sent emails, with the default name or a new name |
| New Email from Template | Allows you to create a new email from a pre-configured template. |
| Migration Wizard | Allows you to upload a folder of emails to a 12d Synergy folder from the Migration Wizard window |
| Show drop zone | Displays the favourite jobs or folders in 12d Synergy that have been added using the Favourites button in the 12d Synergy Outlook plugin. You can drag and drop emails into these folders. For more details, refer to section 2.1.2. |
| Manual Sync | Uploads all the emails that were dropped in the jobs or folders in the 12d Synergy Offline Mail Filing section into their counterpart folders in 12d Synergy. This button is enabled only when there are emails in the folder that holds the emails to be uploaded onto 12d Synergy when online. |
| Disable 12d Synergy Plugin | Disables the 12d Synergy Plugin from the Outlook ribbon |


2. Working Modes with Outlook and 12d Synergy
You can work with MS Outlook and 12d Synergy in the following three modes.
Online - when MS Outlook is connected to 12d Synergy
Offline - when MS Outlook is not connected to 12d Synergy
Mobile - when MS Outlook is on your mobile device and 12d Synergy is on your desktop
2.1. Work Online
When in this mode, MS Outlook is connected to the 12d Synergy application. You can directly upload emails to the 12d Synergy application. You can also configure to automatically delete these uploaded emails from your Outlook Inbox. However, to do this, you need to first configure the settings in Outlook.
2.1.1. How to Configure the Settings for Online Upload of Emails to the 12d Synergy Application
On the 12d Synergy Outlook plugin, click the Settings icon.
The 12d Synergy Setup window is displayed.
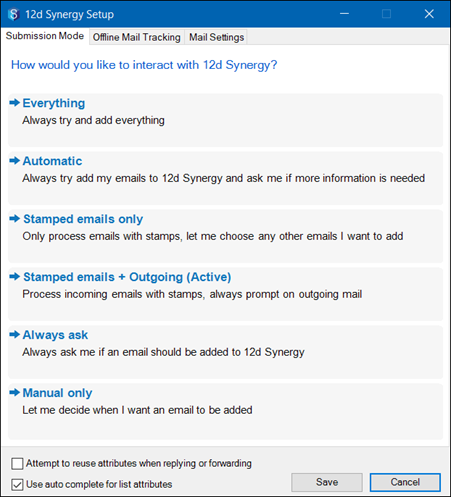
In the Submission Mode tab, select one of the following modes in which Outlook will interact with 12d Synergy when online.
Option
Description
Everything
Uploads all emails read or sent to 12d Synergy based on their stamp. If the stamp is not available, the user is prompted to select a location. In this mode, all read or sent emails will be uploaded.
Automatic
Uploads emails that are read or sent to 12d Synergy based on their stamp. If no stamp is available, the user is prompted whether the email needs to be uploaded. If yes, then the user is prompted to select a location for the upload.
Stamped emails only
Uploads only the stamped emails in the inbox after they are read.
Stamped emails + Outgoing
Uploads all stamped emails and prompts the user whether outgoing emails without stamps need to be uploaded.
Always ask
Prompts the user every time an email is read or sent, whether the email needs to be uploaded.
Manual only
Does not upload or prompt for an upload whenever an email is read or sent. The user must manually select the emails that need to be uploaded and then click the Upload button on the 12d Synergy Outlook Plugin or drag and drop the emails into the folder in their Drop Zone.
The word (Active) is displayed against the selected option.
Your 12d Synergy Administrator can choose a submission mode that will apply to all users from the 12d Synergy Administration application or let the individual users select as per their requirement.
If you are using additional attributes beyond the standard pre-configured attributes for emails, you may select the Attempt to reuse attributes when replying or forwarding checkbox to preserve existing attribute values and avoid re-entry.
In some cases, 12d Synergy can provide an auto-complete drop-down for attribute selection. Some users have experienced incompatibility between Outlook and the Windows AutoComplete List control. You can toggle on or off the usage of the autocomplete list with the Use auto complete for list attributes checkbox.
Click the Save button.
The read and sent emails are uploaded based on their stamps and the settings made in the Submission Mode tab.
2.1.2. How to Upload Emails to the 12d Synergy Application When Online
After reading a new email, the Outlook plugin will act based on the settings selected in the Submission Mode tab. Depending on the mode, the email may be automatically uploaded, you may be prompted for additional information, or the plugin may choose to ignore the email.
Alternatively, you can do one of the following:
Select the email(s) in the inbox and click the Upload button on the 12d Synergy plugin in Outlook.
Drag and drop the email(s) to the required favourite folder(s) displayed in the drop zone. Ensure to select the Show Drop Zone check box on the 12d Synergy Outlook plugin.
The selected email(s) get uploaded to their counterpart folder(s) in 12d Synergy.
If the counterpart folders in 12d Synergy into which you are trying to upload the emails have naming rules set on them, then the emails do NOT get uploaded by using the Upload button and Show Drop Zone checkbox. However, you can still upload them by manually dragging and dropping the required emails into the counterpart 12d Synergy folders displayed in MS Outlook.
If the folder into which emails are getting uploaded has any file attributes set up, then you will be prompted to enter the values of those attributes when the emails get uploaded.
When you upload an email, any attachments in the email remain in the email file. If required, these emails can be opened from the 12d Synergy Client application and the attachments can be accessed. However, you may wish to save the attachments separately by clicking the Save Attachments
 icon on the 12d Synergy Outlook plugin. You can also rename the attachments, or replace an existing file, if required.
2.1.3. How to Configure Automatic Deletion of Uploaded Emails from Outlook Inbox When Online
You can configure Outlook to automatically delete uploaded emails when you are working online with 12d Synergy. An email that is uploaded manually or dragged and dropped to the Favourites folder in the drop zone is automatically deleted after it is read.
On the 12d Synergy Outlook plugin, click the Settings icon.
The 12d Synergy Setup window is displayed.Click the Mail Settings tab.
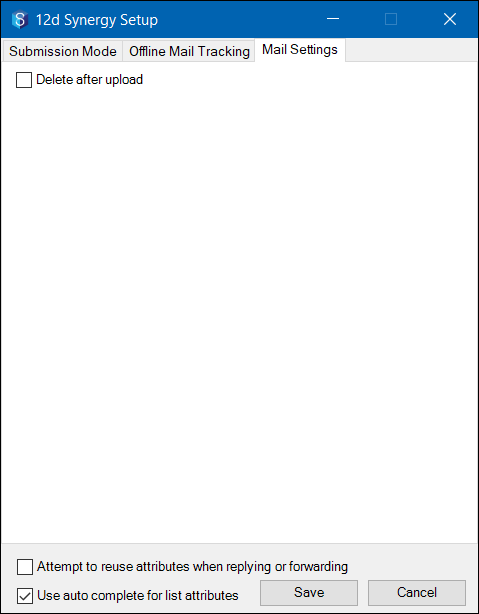
Select the Delete after upload check box.
Click the Save button.
The uploaded emails are automatically deleted from your Outlook Inbox.
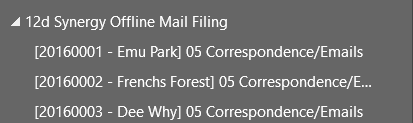
2.2. Working Offline
When MS Outlook is not connected to 12d Synergy, it is said to be working in offline mode. Say for instance, you are working onsite in a location that doesn't have any internet connection. Since you are not connected to the 12d Synergy Server, you have the option of filing emails in offline folders which will get uploaded to 12d Synergy when the connection between MS Outlook and 12d Synergy is restored (when you are online). This works by creating folders in the 12d Synergy Offline Mail Filing section under your email account in MS Outlook, which can move emails to 12d Synergy when online. These folders will be created based on your 12d Synergy Outlook Favourites. You can add more folders as your favourites and the same can get added to the 12d Synergy Offline Mail Filing section.
This mode is not suitable for POP mailboxes. It will only work with IMAP or Exchange / Office 365.
2.2.1. How to Configure the Offline Filing Structure for Emails
On the 12d Synergy Outlook plugin, click the Settings icon.
The 12d Synergy Setup window is displayed.Click the Offline Mail Tracking tab.

Do the following:
Select the Enable Offline Mail Tracking check box to track the emails when offline.
In the Settings section, do the following:
From the Enable automatic upload list, select one of the following options:
Manual Only for uploading the emails manually to 12d Synergy
Automatic and Manual for periodically uploading the emails and for optional manual uploads to 12d Synergy.
If the folders in 12d Synergy into which you are trying to upload the emails have naming rules set on them, then the emails do NOT get uploaded by using the Manual only and Automatic and Manual options. However, you can still upload them by manually dragging and dropping the required emails into the counterpart 12d Synergy folders displayed in MS Outlook.
If the folders into which you are trying to upload the emails have file attributes set up on them, and you select the Automatic & Manual option from the Enable automatic upload list, then the emails are NOT uploaded automatically to their counterpart folders in 12d Synergy.
Click the Update mail folders button in the Manage Favourites window to create a 12d Synergy Offline Mail Filing folder for all favourite folders based on your offline mail filing configuration settings. These folders are displayed under the 12d Synergy Offline Mail Filing section in your Outlook window.
Click the Manual Sync button to update the 12d Synergy Offline Mail Filing folders as well as upload any emails in these folders to their counterpart folders in 12d Synergy.
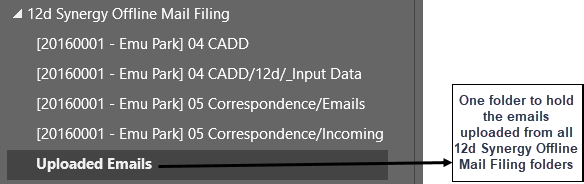
From the Handle uploaded email files list, select one of the following options:
Move to New Folder to move all the emails uploaded from all 12d Synergy Offline Mail Filing folders into a single new folder
Move to Sub Folder to move the emails uploaded from each 12d Synergy Offline Mail Filing folder into their respective individual subfolders
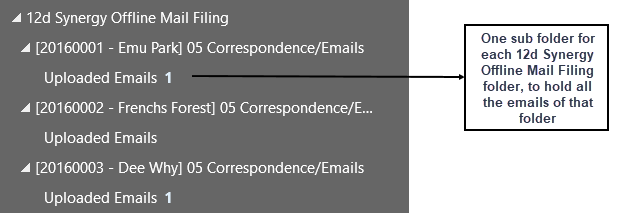
Enter the name of the folder into which all the uploaded emails should be moved based on the above selection, in the Uploaded file folder name box.
Folder(s) based on the selections in step ii is(are) created for saving all the uploaded emails. In the example above, the folder(s) is(are) named Uploaded Emails.User intervention is required in the following two instances only:
When an email is already added to 12d Synergy and you are attempting to add a copy of the same email again.
When Automatic & Manual option from the Enable automatic upload list is selected and you attempt to upload the emails to a 12d Synergy folder that has file attributes set on it.
In the Require user intervention when handling already added emails list, do one of the following:Select Yes if you want to manually drag and drop emails to their counterpart folders in 12d Synergy.
Select No if you want the rejected emails to be moved to the Uploaded emails folder.
12d Synergy can detect when an email sent to several people in the organisation is being uploaded by more than one recipient. However, a user can still upload a duplicate email manually, but 12d Synergy will notify the user that there is an existing copy already uploaded.
v. Click the Save button.
Whenever the connection with 12d Synergy is restored, the emails from all the 12d Synergy Offline Mail Filing folders are uploaded to 12d Synergy based on the settings made.
If the folder into which emails are getting uploaded has any file attributes set up, then you will have to manually upload the emails by clicking the Manual Sync
 button on the 12d Synergy Outlook plugin when you are online (connected to the 12dSynergy Server). You will then be prompted to enter the values for those attributes.
Note that the Manual Sync button is displayed on the 12d Synergy Outlook plugin only when there are emails in the 12d Synergy Offline Mail Filing folders, waiting to be uploaded onto 12d Synergy.
2.2.2. How to Upload Emails to the 12d Synergy Application When Offline
From your Outlook Inbox, drag and drop the emails to be uploaded to their respective folders in the 12d Synergy Offline Mail Filing section.
When the connection with 12d Synergy is restored and Automatic is selected as a Submission Mode, the emails will be updated automatically.
Alternatively, click the Manual Sync button on the 12d Synergy Outlook plugin for manually uploading the emails.
All the emails that were dropped in the folders in the 12d Synergy Offline Mail Filing section are now uploaded into their counterpart folders in 12d Synergy.
2.3. Working with a Mobile Device
In this mode, MS Outlook is installed on your mobile device and the 12d Synergy Application is on your desktop. The Microsoft Outlook app for mobile devices does not have a plugin but uses pre-configured folders to organise emails to be uploaded later. Similar to working in the offline mode, you can file emails in offline folders which will get uploaded to 12d Synergy when the connection between Outlook and 12d Synergy is restored. However, you need to configure Outlook for uploading emails when in offline mode.
This mode is not suitable for POP mailboxes. It will only work with IMAP or Exchange / Office 365.
2.3.1. How to Upload Emails When Working From a Mobile Device
In the Outlook application on the mobile device, drag and drop the emails into their respective jobs or folders in the 12d Synergy Offline Mail Filing section.
When the connection with 12d Synergy is established, click the Manual Sync  button on the 12d Synergy Outlook plugin in the MS Outlook on your desktop.
All the emails that were dragged to the 12d Synergy Offline Mail Filing folders in the mobile device are uploaded to their counterpart folders in 12d Synergy.
3. Favourites
The most frequently saved to 12d Synergy job or folders can be set up as your favourites for easy and fast access.
3.1. How to Set a New Folder as Your Favourite
3.1.1. Using the Change Folder icon
Click the Change Folder
 icon on the 12d Synergy Outlook plugin.
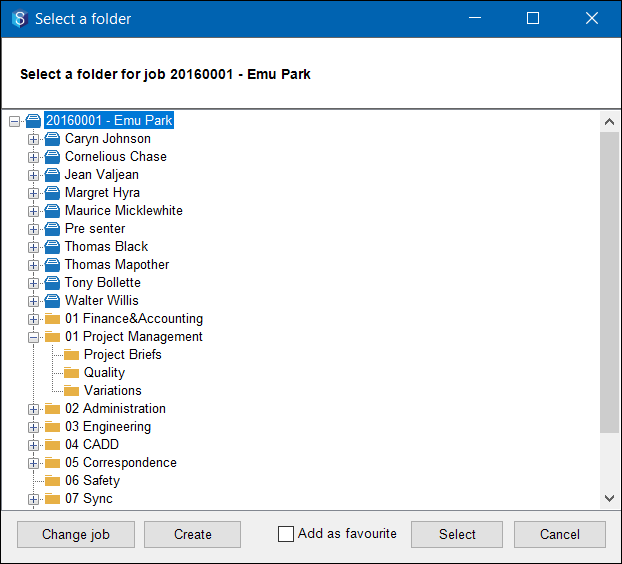
The Select a folder window is displayed.

If you want to select a folder from a different job, click the Change job button and choose a different job. You can then select a folder from that job as your favourite.
Navigate to the required folder from the tree structure in the Select a folder window.
Select the Add as favourite check box.
Click the Select button.
The selected folder is added as a favourite and is displayed when you click the Favourites icon on the 12d Synergy Outlook plugin in the Manage Favourites window.
3.1.2. Using the Favourites icon
Click the Favourites icon on the 12d Synergy Outlook plugin.
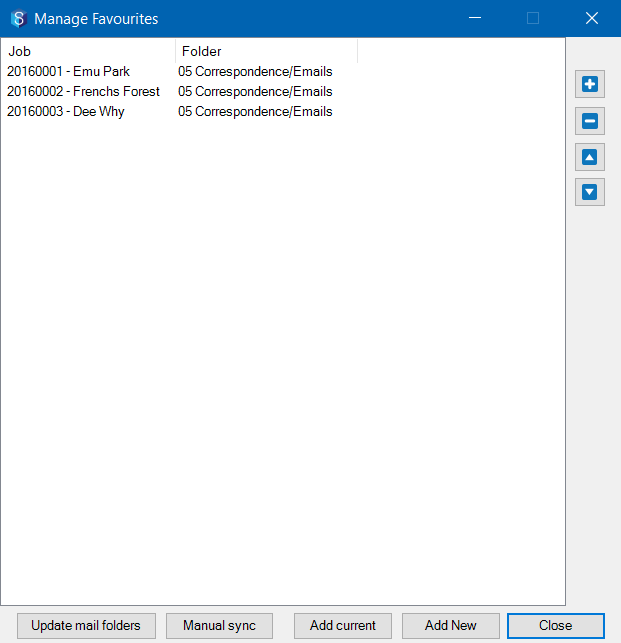
The Manage Favourites window with the list of existing favourite folders is displayed.

You can delete an existing favourite folder by selecting it and clicking the
 button.
You can rearrange the order of the folders using the up and down arrow buttons.
Do one of the following:
Click the Add New button on the Manage Favourites window.
Click the
 button and select the New option.
The Find a Job window is displayed.
Search for the required job and click the Find button.
The Select a Job window is displayed..png)
Browse and select the required job.
Click the Open button.
The Select a Folder window is displayed.
Navigate to the required folder from the tree structure and click the Select button.
The selected folder is added to the Manage Favourites window. The folders listed in this window are your favourite folders.
3.2. How to Set your Current Folder as Your Favourite
Click the Favourites
 icon on the 12d Synergy plugin.
The Manage Favourites window with the list of existing favourite folders is displayed.
Do one of the following:
Click the Add Current button on the Manage Favourites window.
Click the
 button and select the Current option.
The folder displayed in the Current Connection field in the 12d Synergy Outlook plugin is added to the Manage Favourites window. The folders listed in this window are your favourite folders.