In this quick sheet, you’ll learn our recommended best practices for managing Trimble Business Centre files inside 12d Synergy.
Is this quick sheet for you?
In this quick sheet, we are specifically looking at the Trimble Business Centre office-based use. If your organisation uses other Trimble software, such as Trimble Connect or Trimble Works Manager with TBC Sync, to transfer data to remote locations, we are not in any way discouraging you from using these options. This quick sheet is intended only to assist organisations in managing and storing Trimble Business Centre files in 12d Synergy.
1.1. Recommended TBC File Structure in 12d Synergy
One of the unique features of 12d Synergy is its ability to track changes to a folder of files rather than individual files themselves. This happens in a Managed Folder. This means that you can check out the managed folder, add, delete or update files in it, and 12d Synergy can manage these changes at check-in, uploading all the changes to the server. If a folder is managed, it means that you cannot check out files individually; you must work with the whole folder at one time. A managed folder is displayed as a blue folder ![]() .
.
When using Trimble Business Centre within 12d Synergy, the VCE project file, project folder and any data/subfolders need to be checked out together. This structure is best housed in a managed folder, as seen in the image below:
.png "image(43).png")
1.2. Creating Managed Folders
In the 12d Synergy Client application, right-click the required job or folder from the tree structure under which you want to create a new managed folder, and select the New > Folder option or click the New Folder
 icon from the top ribbon.
The Create a Folder window is displayed.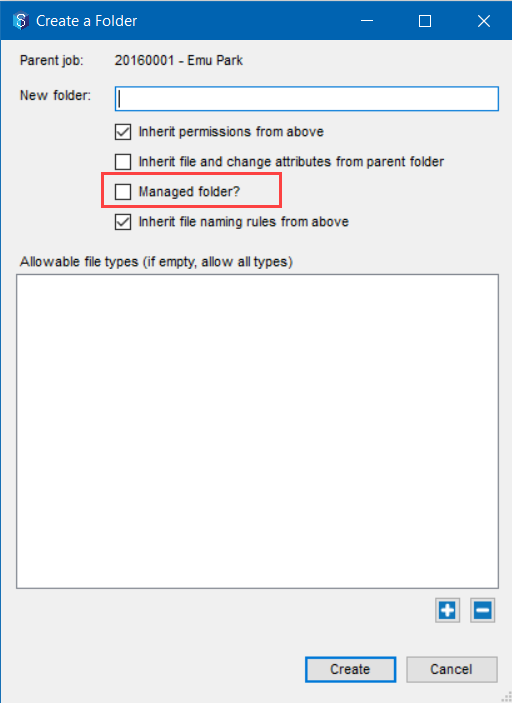
Enter a name for the new folder in the New folder box.
Select the Managed Folder? checkbox.
Click the Create button.
A new managed folder is created.
1.3. Working with Managed Folders
In the 12d Synergy Client application, select the managed folder that holds the files or subfolders you want to work on.
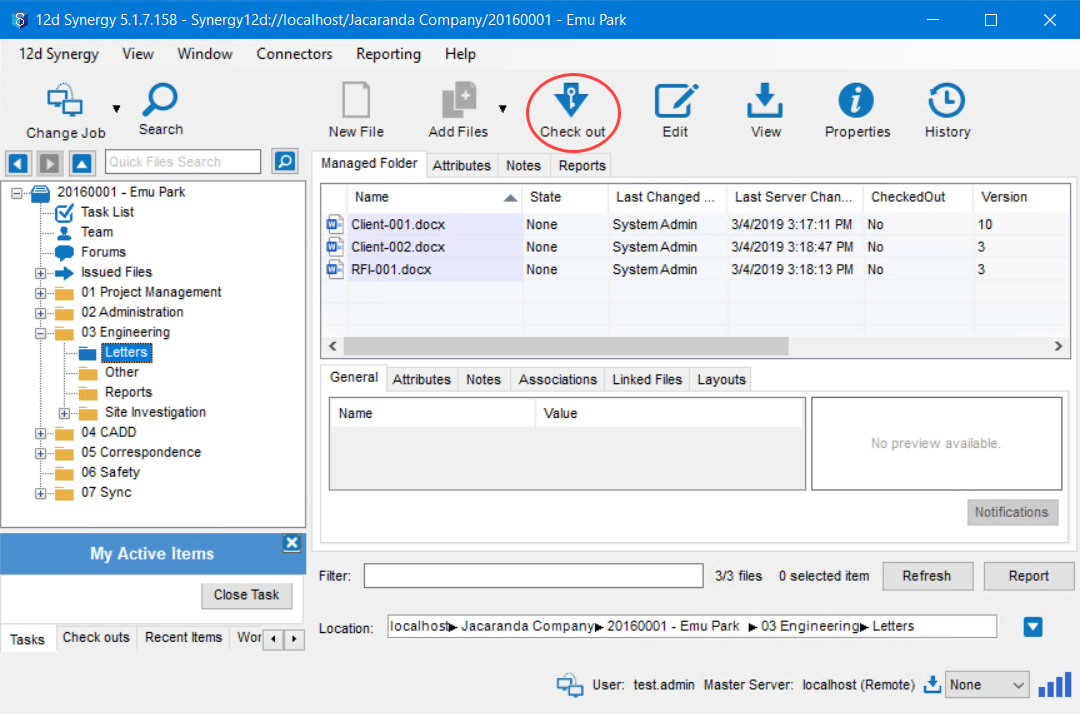
Click the Check Out
 icon in the quick access toolbar.
All the files or subfolders in the managed folder are checked out. You can now open an individual file from the managed folder and update it.Now, right-click the same managed folder from the tree structure and select the Explore option.
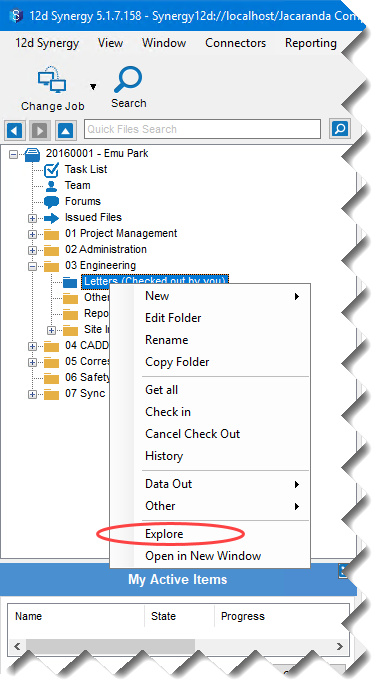
The selected managed folder is opened in Windows Explorer.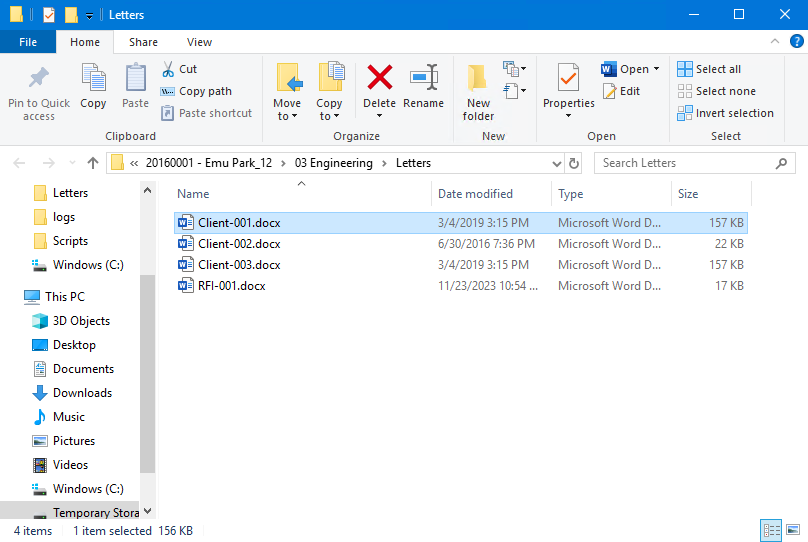
Make the required changes to the files (update, add or delete files).
Close the Windows Explorer.
In the 12d Synergy Client application, select the updated managed folder in the tree structure.
.jpg)
Right-click the folder and select the Check-in option, or click the Check In
 icon on the quick access ribbon, as shown in the above image.
You will then be prompted for a change description, which will form the history of your managed folder.
During the process of checking out files, data is cached to your workspace. This workspace is installed on a local drive, such as the C:\ or D:\ drive, whichever is utilised during the initial installation of the program.
Commonly, large point cloud datasets are not stored within the 12d Synergy environment. Rather, the extracted points, lines and polygons, with the raw point cloud data being referenced from an external drive.
If data retention is required, the raw point cloud data can be stored within the 12d Synergy environment.
For example, point clouds related to monitoring may be kept for traceability and to safeguard against data loss. On the other hand, point clouds used for capturing one-off datasets, such as pre-design ground information (Greenfield Estates), may be kept in their raw form in an external location while the extracted features can be stored within the 12d Synergy environment.If the dataset is too large to store on your local drive, it can be offlined to a separate location.
For more details about Offlining folders, please refer to the 12d Synergy knowledge base.
1.4. Library/Template files
TBC Library or template files also have their place in 12d Synergy. We recommend housing them as folders in a library job, central to your system. Ensure that all applicable users have view/read permissions, as a minimum. Once the files are centrally located, one of the following approaches may be used to ensure that the current information is available to the user.
To house library information in 12d Synergy, it is vital that all users have their workspace installed on the same local drive. (C:\ or D:\ etc.)
1.4.1. ‘Get All’ and Notifications
All users who require the TBC library information can perform a Get All function on the library folders to have a copy of the library in their local workspace. The path to the version on the local workspace can then be used for the pathing in TBC.
A Get All can be performed at the folder level by using the Get All right-click option on the folder in the 12d Synergy job tree.
This process enables customisation to work with TBC, while maintaining it in one location on 12d Synergy for easy updating. Also, we recommend adding a notification to the folder. It’s a great way to ensure all staff are aware of any updates to the TBC library folder.
For more details about Notifications, please access the 12d Synergy Knowledge Base.
1.4.2. Download Dependency Rule
A download dependency rule is a way to automate performing a Get All in 12d Synergy. This makes working with files easier by getting any of the necessary peripheral information automatically during the process of opening the file. It can be set up for any folder within your project.
To set up a Download Dependency rule on your system, you require administrative access.
A simplified process for setting up a download dependency rule is mentioned below:
Right-click the Managed Folder and select the Edit Folder option.
In the Edit a Folder window, select the Rules panel on the left.
Then select the Download Dependency Rules tab at the top.
Click the
.png "plus(15).png") button in the upper right to bring up the Add Download Dependency Rule window.
button in the upper right to bring up the Add Download Dependency Rule window.Name the rule and select the Download Dependencies from a specific folder option as the Mode.
Click the ellipsis
.png "ellipsis(2).png") button, navigate to and select the TBC Library folder as the Specific Folder Path.
button, navigate to and select the TBC Library folder as the Specific Folder Path. Click Add and then click Save on the Edit a Folder window.
Tip
Creating a managed folder and download dependency rule in your template will ensure it is rolled out across all your Jobs, with no additional input required.
For more details about Download Dependencies, please access the 12d Synergy Knowledge Base.