Client Content
A job is the highest level of grouping within 12d Synergy and represents all the information for a piece of work or set of data. Whenever you are working with any data in 12d Synergy in the typical view, you will connect directly to a job.
Access to jobs is defined by your 12d Synergy Administrator. Activities such as creating jobs and sub-jobs, editing jobs to update attributes, permissions, job rules, etc., can be done only by your 12d Synergy Administrator or by a user who is assigned the necessary Administrator rights for the selected job.
You can have more than one instance of the 12d Synergy Client application open at the same time.
1.1. The Job Dashboard
.png)
Panel | Description |
|---|---|
A | This panel displays the Job tree. You can expand the tree to see the folders and files. Based on your selection in this panel, the items displayed in Panel D will differ. |
B | This panel displays the My Active Items which lists the entities that you are currently working on (files or folders that are checked-out). For more details on this panel, please see My Active Items. This panel is displayed only when the My Active Items option is selected from the Windows menu option. A tick mark is displayed against the option when it is selected. |
C | Panel C displays the My Checked Out Items section which is displayed only when the Active Checkouts Pane option is selected from the Windows menu option. A tick mark is displayed against the option when it is selected. You can also check in files from this panel or cancel an active check out. |
D | The first tab of Panel D is the Dashboard, which is what you see first when you log in to the 12d Synergy Client application. You can design the dashboard using the 12d Synergy Administration application > Jobs tab > Job Dashboard tab > Edit button > Dashboard Editor to display information as gadgets. Other tabs displayed in this panel are mentioned below.
|
1.2. How to Add Gadgets
Admin Content
In the 12d Synergy Administration application, select the Jobs tab > Job Dashboard tab.

Click the Edit button.

The Dashboard Editor window is displayed. The currently defined gadgets (Job attributes, Task Progress, Recent Check-Ins, File Changes Graph in the above image) and the title of the Job Dashboard ({Job Name} in the above image) are displayed in the Dashboard Editor. 12d Synergy offers a wide range of gadgets to add to the Job Dashboard.
You can add more variables to the Job dashboard name by double-clicking the required variables from the Variables panel on the right side of the Dashboard Editor window. You can also add special characters, such as an underscore or hyphen, to differentiate between variables. An example of a Job Dashboard name is given below.

To add another gadget, do the following:
Click the Add gadgets
 button in the toolbar or click the Add Gadget
  button displayed below all gadgets in the Dashboard Editor window.
The Add a New Gadget window is displayed.

The different categories in which you can create a gadget and the available gadgets in that category are displayed in this window.Select the required category in the left panel of the window.
The gadgets available in that category are displayed to the right side of the panel.Select the required gadget and click the Add button or double-click the required gadget.
The Edit Gadget Settings window is displayed.
The name of the gadget is displayed in the Gadget Title box. You can update the name, if needed.
The input parameters displayed in the gadget are listed in the table below the Gadget Title box. Enter the value for each input in the corresponding cell in the Value column.
Click the Set button.
The gadget is added to the Job Dashboard.

You can edit the position of the added gadgets by using the Move Up and Move Down
.png "image(13).png") buttons displayed in the gadget placeholder.
buttons displayed in the gadget placeholder.If you want to delete an added gadget from the dashboard, click the Delete button displayed in the gadget placeholder.
1.3. How to View Recent Jobs
In the 12d Synergy Client application, select the 12d Synergy menu option.
Hover the mouse over the Recent Jobs option.
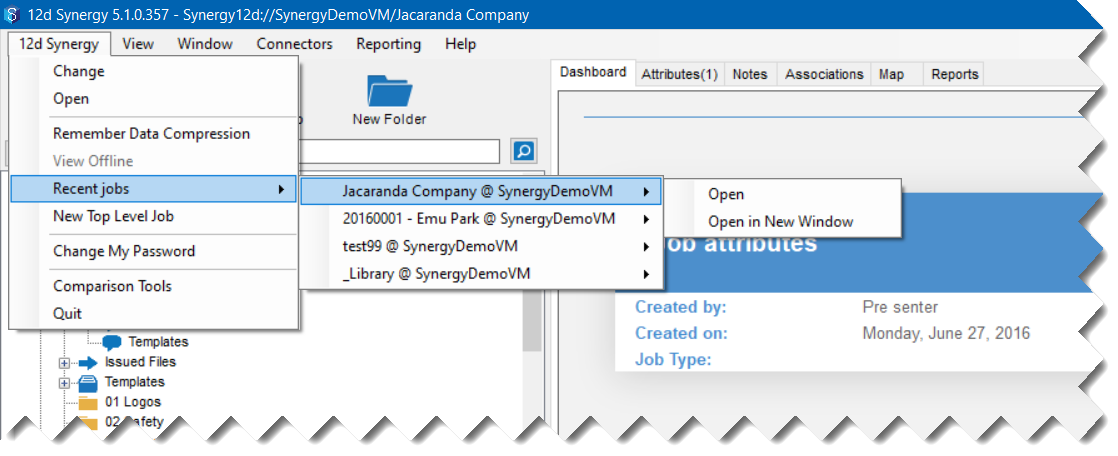
All the recently worked-on jobs are displayed as options in the next level menu.You can select one of the jobs to open it.
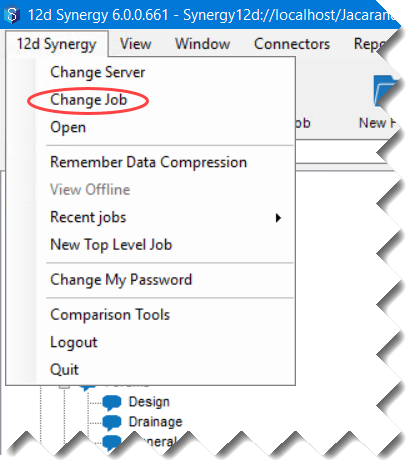
1.4. How to Change Jobs
In the 12d Synergy Client application, do any of the following.
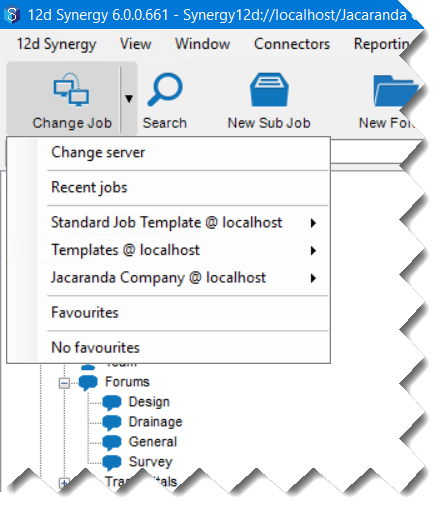
Click the Change Job
 icon on the 12d Synergy quick access toolbar to find the required job from Find a job window.
 Click the tiny arrow to the right of the Change Job
icon on the 12d Synergy quick access toolbar, and select any of the following options. Select the Change Server option to select a different server, connect to it and work on jobs on that server.
Select the Recent Jobs option to view a list of jobs that you have accessed recently, and select one job from it.
Alternatively, a list of recently accessed jobs is displayed as options. You can directly select which job you want to access.
If you have previously marked any jobs as Favourites, you can select the Favourites option and select a job from the Manage Favourites window.
In the 12d Synergy menu option, select the Change Job option to find the required job from Find a job window.
1.5. How to Mark a Job as a Favourite
In the 12d Synergy Client application, open the job that you want to mark as your favourite.
Click the tiny arrow on the Change Job
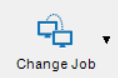 icon on the 12d Synergy quick access toolbar.
Click the Favourites option.
The Manage Favourites window is displayed.
Click the Add Current button.
The job you are working on is added to the Manage Favourites window. The name of the job and the server it is connected to is displayed.Click the Save button.
The job you have added is saved as your favourite, and you can view it as a Favourite from any other job you access.