1.1. How to Create a New File
You can create a new file from a library template or an existing file in the 12d Synergy application. You also have the option of creating a new MS Word document or an MS Excel worksheet.
1.1.1. Create from a Blank or Existing File
When the File Template Library is NOT SET in the 12d Synergy Administration application > Job Settings tab > File Template Job setting, you have the option to do the following:
Create a new MS Word document
Create a new MS Excel Worksheet
Create a file from an existing file in the 12d Synergy Client application
Click the
 icon in the quick access toolbar.
The Create a New File window is displayed.
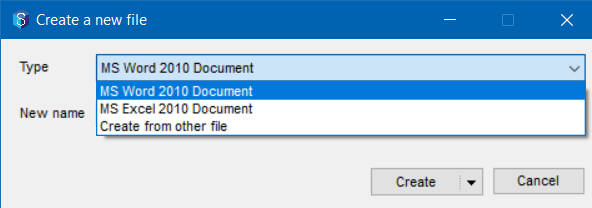
From the Type list, select one of the following options:
To create a new MS Word document, select the MS Word 2010 Document option.
To create a new MS Excel Worksheet, select the MS Excel 2010 Worksheet option.
To create a file from an existing file in the 12d Synergy Client application, select the Create from other file option, select the required file from the Browse for a file - <job name> window, and click the Select button.
Do one of the following:
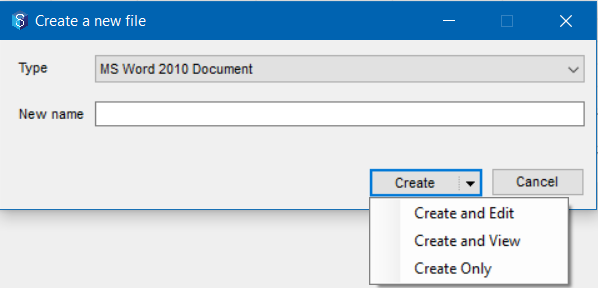
Click the Create button to just create the file.
Click the
 icon in the Create button to select the Create and Edit option to create and open the file for editing.
Click the
 icon in the Create button to select the Create and View option to create and open the file for viewing (read-only mode).
Click the
 icon in the Create button to select the Create Only option to just create the file.
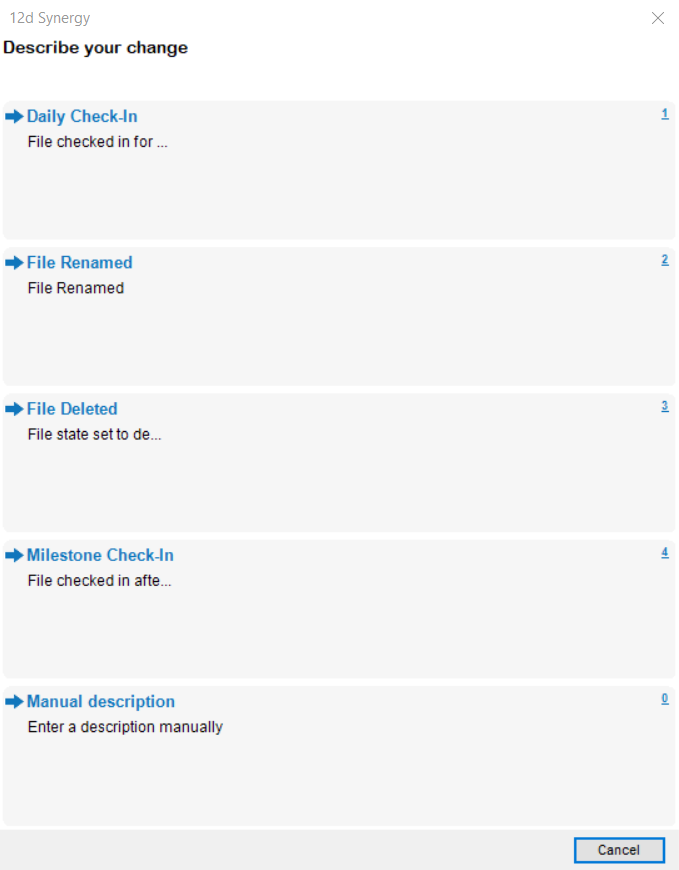
The Describe your change prompt is displayed.
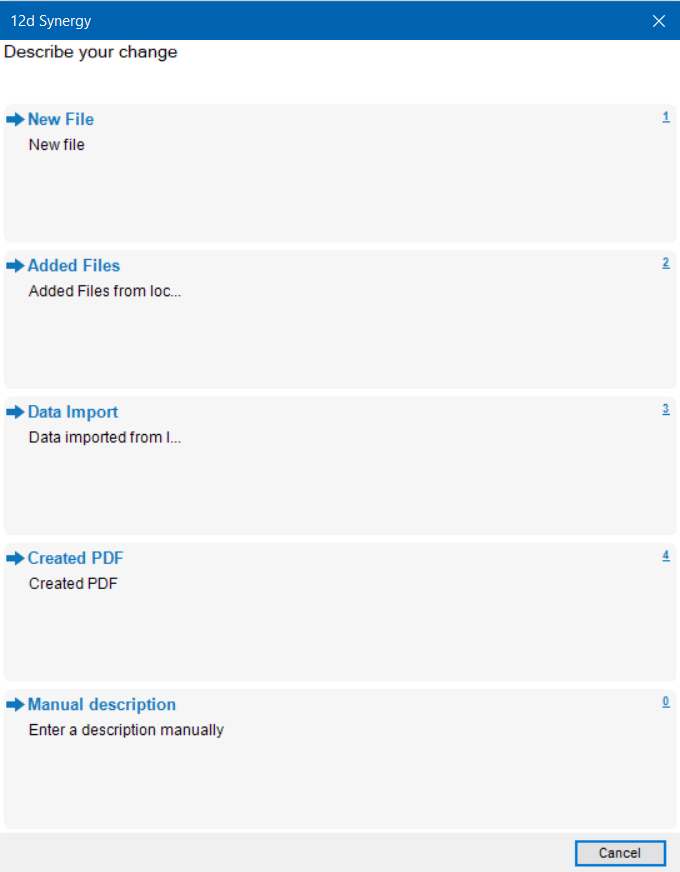
If your 12d Synergy Administrator has configured the change descriptions for adding a file, then the Describe your change prompt is displayed when you create a file.
Click the New File option.
If you are creating a new file from an existing file that has some File Attributes set, then you will be prompted to enter values for the same attributes for the newly created file.
The file is created and opened accordingly.
1.1.2. Using Library Templates
In most cases, the File Template Library is set in the 12d Synergy Administration application > Job Settings tab > File Template Job setting. This setting will have the location of the Library job which holds all the required file templates. You can create multiple files using this procedure.
Access the folder in which you want to create a new file and click the
 icon in the quick access toolbar.
The Browse for a file - <Library Folder Name> is displayed.
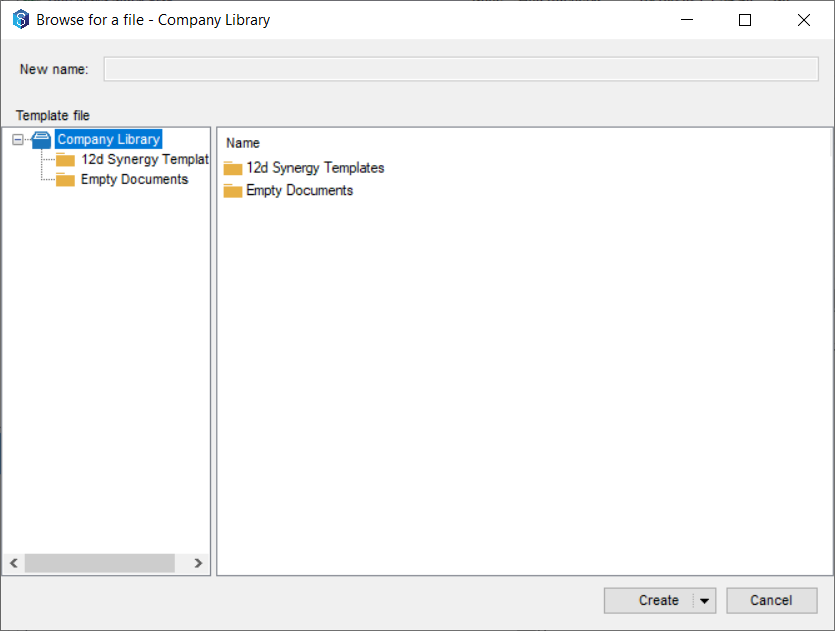
Browse the template library and select the template(s) you want to use to create a new file(s).
By selecting multiple template files, you will be creating multiple files, i.e., one file from each selected template file.
Click the arrow displayed in the Create button and do one of the following:
Select the Create and Edit option to create a new file and open it for editing.
Select the Create and View option to create a new file and open it for viewing.
Select the Create only option to create a new file.
The Describe your Change prompt is displayed.
Select the option that best suits your intent to create a new file(s).
A file with the name of the selected template is created.To rename the created file, do one of the following:
Select the file, click the F2 functional key and enter the New name in the Rename a file window.

Right-click the file, select the Operations > Rename option, and enter the New name in the Rename a file window.
The Describe your Change prompt is displayed.If your 12d Synergy Administrator has configured the change descriptions for changing a file, then the Describe your change prompt is displayed when you create a file.
If your 12d Synergy Administrator has configured the change descriptions for changing a file, then the Describe your change prompt is displayed when you create a file.
Select the File Renamed option.
The new file is created in the selected location with the name of your choice.
1.2. How to Create a Linked file
A linked file creates a mirror image of a file in one folder of the 12d Synergy Client application to another location within it. This means that whenever you access the linked copy of the file, you will always get an up-to-date version. Every time the original file is changed, the content in the linked file is also updated.
Note that you can only check out the original copy of the file. Linked files cannot be edited, and the process is not compatible with managed folders.
This feature comes in handy when you want to share a file with the team but do not want them to update it.
In the 12d Synergy Client application, browse the jobs and folders to the location of the file for which you want to create a linked file.
Drag and drop the file to another location in the 12d Synergy Client application.
The following prompt is displayed.
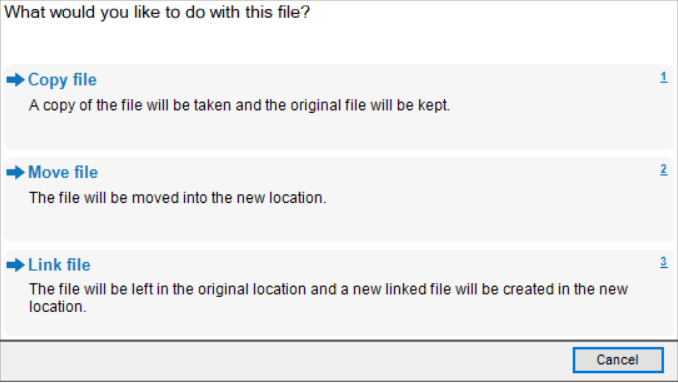
Click the Link file option.
A linked file is created in the location where the file is dropped. This file will be a read-only file, that is updated whenever the primary file is updated in its location (the location from where the primary file is dragged).
1.3. How to Delete a Linked File
When a file is linked to another file, you cannot delete either of them directly. You will have to unlink the linked file before you delete the original files. Unlinking the linked file will delete the file automatically.
In the 12d Synergy Client application, browse the jobs and folders to the location of the linked file.
Right-click the linked file and select the Operations > Unlink option.
The linked file is removed from its location and is thus deleted.To delete the original file, first unlink the file and then access the original file and delete it.
To know all the files linked to a file, right-click the file and select the Properties option > Linked Files tab.
1.4. How to Delete a File
Files are generally not permanently removed from 12d Synergy unless required by a 12d Synergy Administrator. In most cases, the files are marked as deleted, which renders them invisible until you restore the file or choose to view the deleted files. Thus, information can never be accidentally lost.
In the 12d Synergy Client application, browse the jobs and folders to the location of the file you want to delete.
Right-click the file and select the Operations > Delete option.

The Describe your Change prompt is displayed.
If your 12d Synergy Administrator has configured the change descriptions, then the Describe your change prompt is displayed when you delete a file.
Select the reason for deleting the file. Generally, the File Deleted option is selected.
The file is deleted from the selected location.All deleted files can be viewed from the View menu > Show deleted files option.
1.5. How to Purge a File
Purging files is to delete files permanently from the system. It is an irreversible action. Once deleted, these files cannot be restored to the system. However, if the purged file was previously worked upon by any other users, then it is possible that it might not be completely deleted from all locations for all users.
Do one of the following:
From the 12d Synergy Administration application
In the Jobs tab > Find tab, search for the job that has the required folder and file.
Click the Find button.
Select the required job from the Edit Jobs window.
Click the Edit button.
The Job Tree window is displayed.Expand the job and select the required folder from the Job tree.
From the 12d Synergy Client application
Login to the required job.
Expand the job and select the required folder from the Job tree.
Right-click the folder and select the Edit folder option.
Select the Utilities > Files tab.
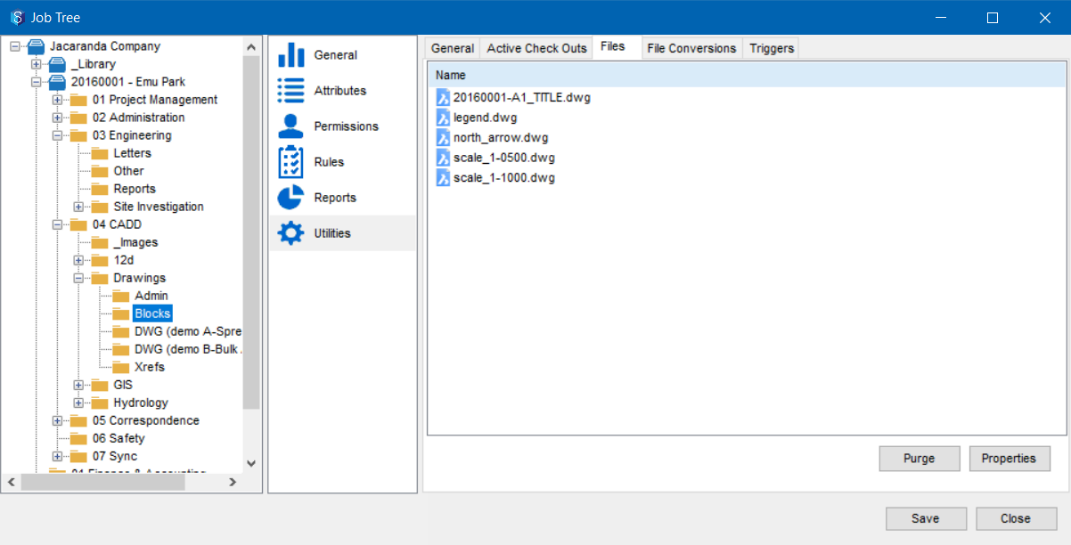
The list of files in the selected folder is displayed in the Files tab.Select the file(s) you want to purge.
Click the Purge button.
The following prompt is displayed.
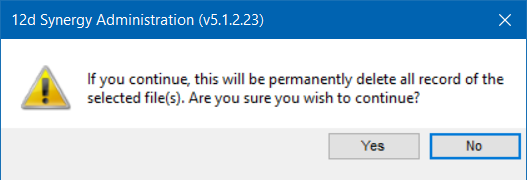
Click the Yes button.
The selected file(s) are deleted permanently from the system, and you cannot undo this action. A confirmation message is displayed.
Once deleted, purged files cannot be restored directly to the 12d Synergy Server.
You can alternatively purge a file by selecting it, clicking the Properties
 icon in the quick access toolbar to view the File Details window and then clicking the Purge button.
If the Only System Administrators can Purge Files setting in System Settings > General tab is set to yes, only users with System Administrator privileges can purge files.
If the Can file owner purge own files in System Settings > General tab is set to yes, then the creator of the file can also purge the file.
If a user is granted System Administrator permissions for the selected folder, they can also purge files.
1.6. How to Create a Link / Web Link of the File for Sharing
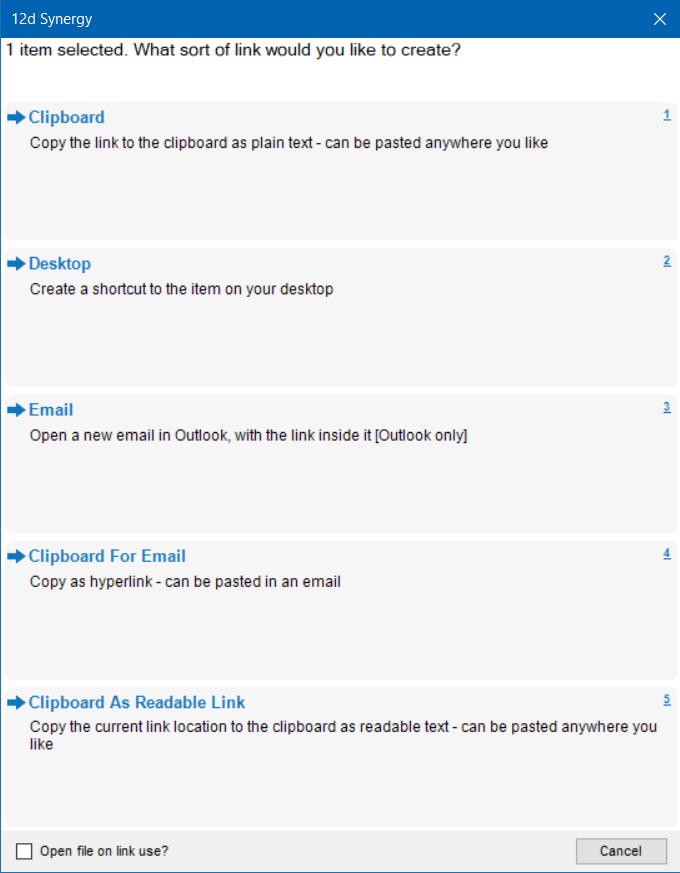
You can create a link to a file and share it as a link with other users. These links give easy access to the files they are created for. The created link can be accessed in many ways. For instance, you can paste it into the clipboard for another application to use, or copy the link as a hyperlink for use in an email. You can also create a QR code of the file for Web access.
To create a link, right-click the file and select the Other > Create Link or Create Web Link option.
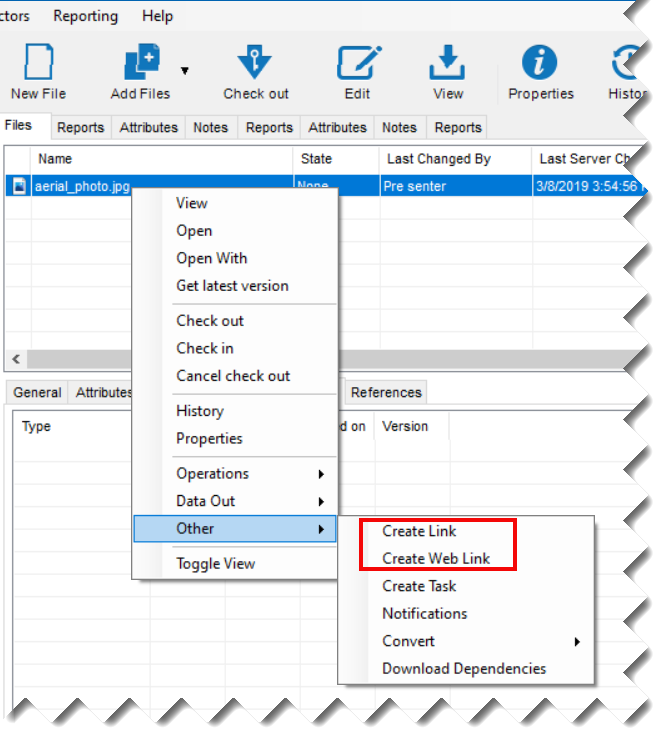
Do one of the following:
Select the Create Link option and select one option from the following 12d Synergy prompt.
Select the Create Web Link option and select one option from the following 12d Synergy prompt.

Based on selected description, the link or web link is created accordingly for use.
1.7. How to Add a File
You can add a file from your workspace to the 12d Synergy Client application. You can also move or copy a file when adding it.
In the job tree, browse for the folder in which you want to add files.
Do one of the following:
Click the Add Files
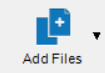 icon button on the quick access toolbar.
Right-click the folder in the job tree and select the Add Files option.
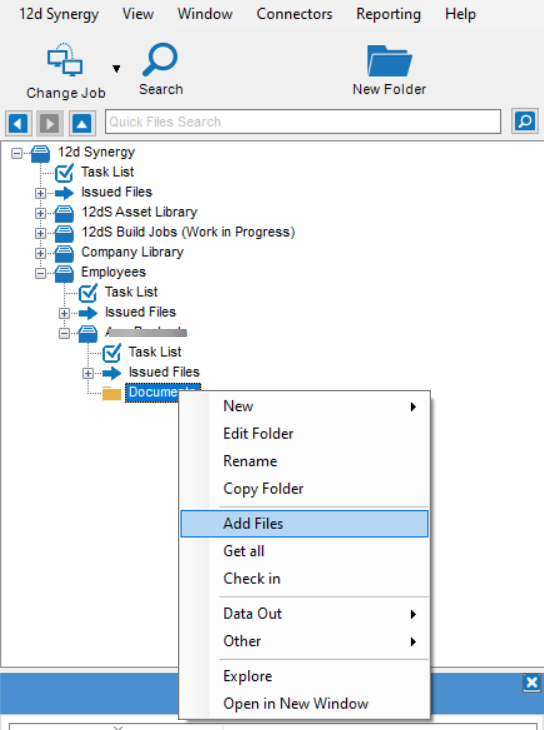
The Select files to Add prompt is displayed.
Browse and select the required files and click the Open button.
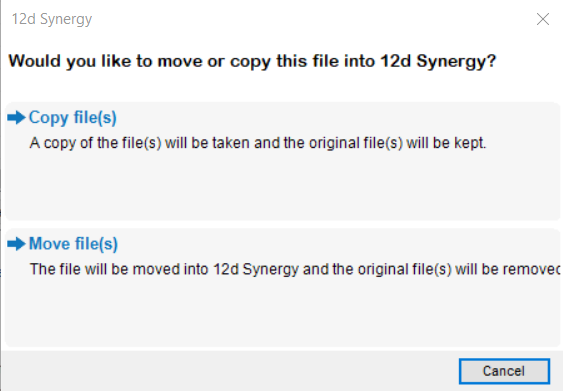
The following prompt is displayed.
You can alternatively drag and drop the required files from your system to the folder in the 12d Synergy Client application.
While adding a file, you can either copy a file from the workspace to the Synergy Server or you can move it to the Synergy Server.
Do one of the following:
Select the Copy file(s) option.
Copying a file results in the same file being in two places – one in the workspace and one on the server.Select the Move file(s) option.
Moving a file will result in it being available only in one place – on the server.
The selected files are copied/moved to the selected location in the job tree.
If your 12d Synergy Administrator has configured the change descriptions for adding a file, then the Describe your change prompt is displayed when you add a file.
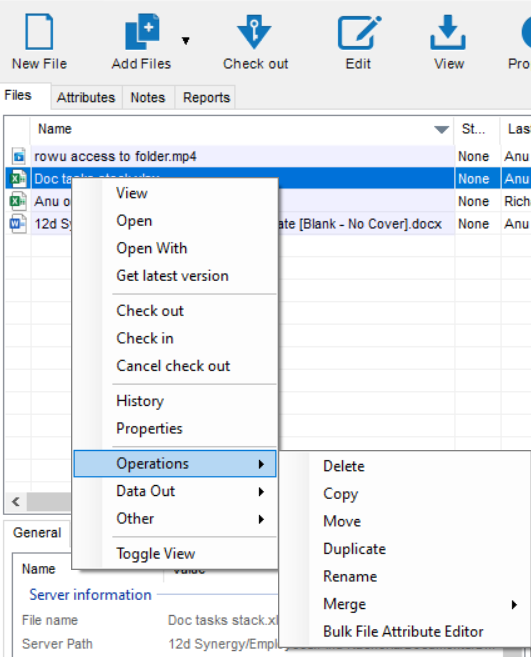
1.8. How to Copy a File
In the 12d Synergy Client application, browse the jobs and folders to the location of the file you want to copy.
Right-click the file and select the Operations > Copy option.

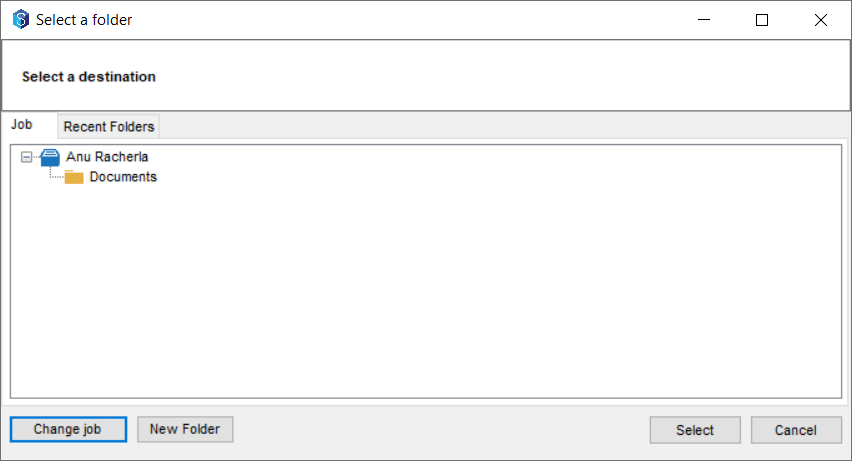
The Select a folder window is displayed.

Do one of the following:
To copy the file onto a folder in a different job, click the Change job button and browse for the required job and folder.
To copy the file into a new folder in the displayed job, click the New Folder button and create a new folder to save the file.
To copy the file into one of the recently used folders, click the Recent Folders tab and select a location to save the file.
To copy the folder into the displayed job or folder, select the job or folder.
Click the Select button.
The Describe your Change prompt is displayed.If your 12d Synergy Administrator has configured the change descriptions for adding a file, then the Describe your change prompt is displayed when you copy a file.
Select the reason for copying the file.
The file is copied to the selected location. Note that the original file still stays in its location.
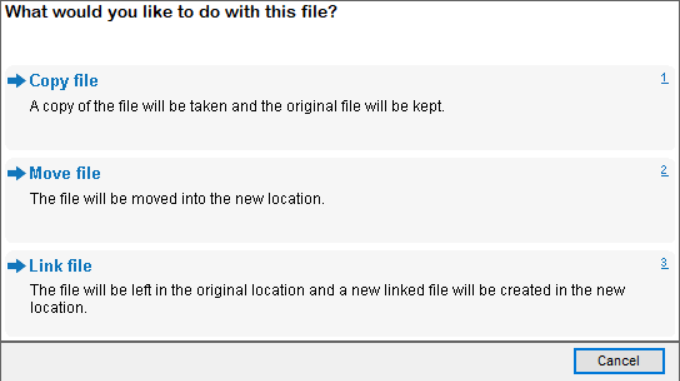
You can alternatively just drag and drop the required file into the folder where you want to have a copy of the file and select the Copy file option in the What would you like to do with this file? prompt.
1.9. How to Move a File
In the 12d Synergy Client application, browse the jobs and folders to the location of the file you want to move.
Right-click the file and select the Operations > Move option.
The Select a folder window is displayed.
Do one of the following:
To move the file onto a folder in a different job, click the Change job button and browse for the required job and folder.
To move the file into a new folder in the displayed job, click the New Folder button and create a new folder to save the file.
To move the file into one of the recently used folders, click the Recent Folders tab and click a location to save the file.
To move the folder into the displayed job or folder, select the job or folder.
Click the Select button.
The Describe your Change prompt is displayed.If your 12d Synergy Administrator has configured the change descriptions for adding a file, then the Describe your change prompt is displayed when you move a file.
Select the reason for copying the file.
The file is moved to the selected location. Note that the file is no longer there in its previous location.
Alternatively, you can drag and drop the required file into the folder where you want to move it and select the Move file option in the What would you like to do with this file? prompt.

1.10. How to Lock a File
You can lock a file for a specific user, a group of users, or a role, so that it can be checked out only by them. This way, you can prevent other users from updating the file. While any user working on the file can lock it, the 12d Synergy Administrator always has the right to overwrite these locks.
Locking and unlocking a file can also be a workflow activity. For more details about workflow activities, please see Workflows.
In the 12d Synergy Client application, browse the jobs and folders to the location of the file you want to lock.
Click the Properties
 icon.
icon.
The File Details window is displayed.
.png)
Click the Lock button.
The following prompt is displayed.
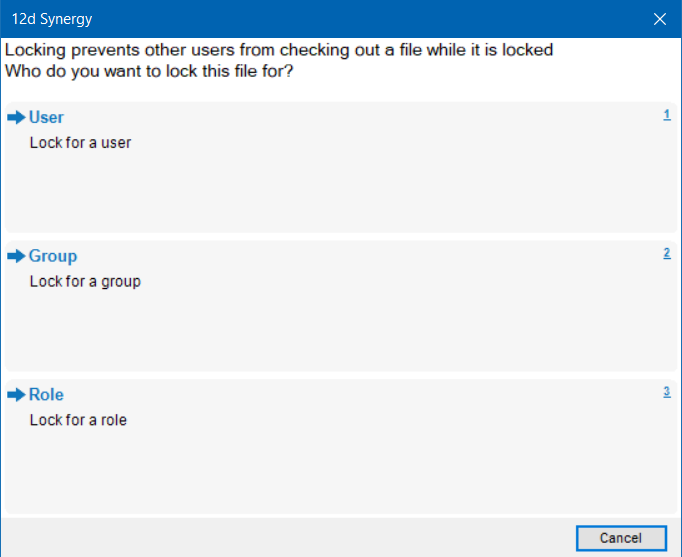
Do one of the following:
Select the User option to find a specific user and lock the file for that user.
Select the Group option to find a specific group and lock the file for that group.
Select the Role option to find a specific role and lock the file for users with that role.
Once you select a user, group, or role, the Describe this change window is displayed.
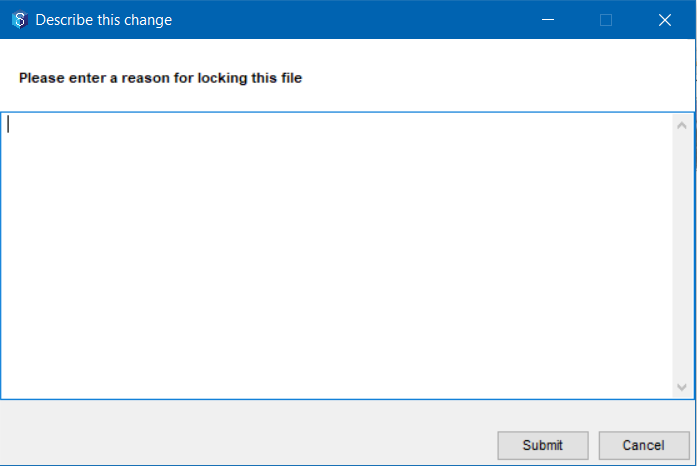
If your 12d Synergy Administrator has configured the change descriptions, then the Describe your change prompt is displayed when you lock a file.
Enter the reason for locking the file in this window and click the Submit button.
You can type @ and select a name from the list of contacts to notify the contact about the check-in via email. For example, @Cornelious Chase.
You can also type @ with the project role to notify the person working in the capacity of the specified role of the change. For example, @Drafter.
The file is locked, and the file name is displayed in red in the 12d Synergy Client window.

The Lock button in the File Details window is now changed to Unlock button.
You can unlock the file by clicking the Unlock button in the File Details window.
The 12d Synergy Administrator can also unlock a file at any point in time.
1.11. How to Search for a File
You can search for files in one of the following ways:
1.11.1. Detailed Search
You can perform a detailed search for a file using the  icon on the quick access toolbar.
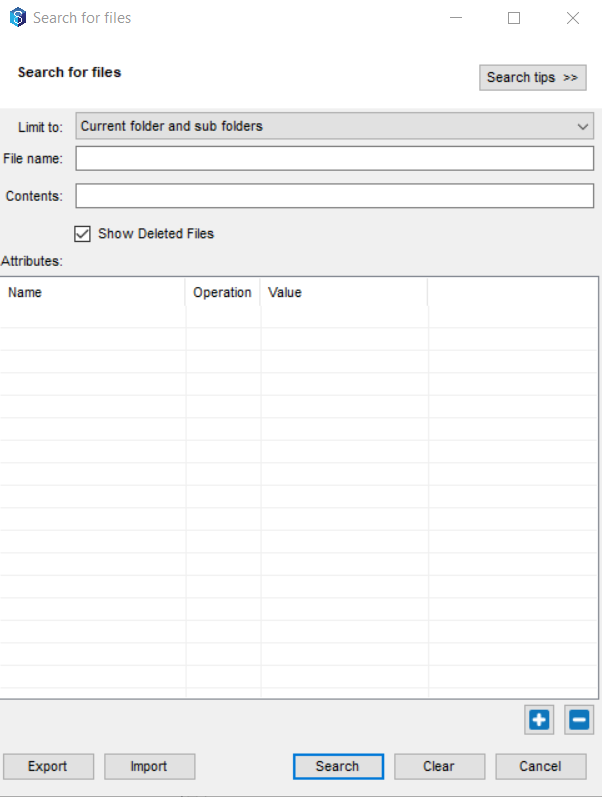
You can search based on any of the following parameters:
Limit your search to the current folder, sub-folder, job, or sub-job
File name
File contents
Job attributes
File attributes (Custom or Defined attributes)
You can configure the file and job attributes with which you want to search for a required file in the 12d Synergy Administration application > Searching tab > Files tab > Search Attributes tab. You can also configure the details displayed in the search results in the Search Results tab.
You can import your search parameters from an existing search or export the search parameters to a file using the Import and Export buttons.
Click the Search tips button to view some tips for effective search.
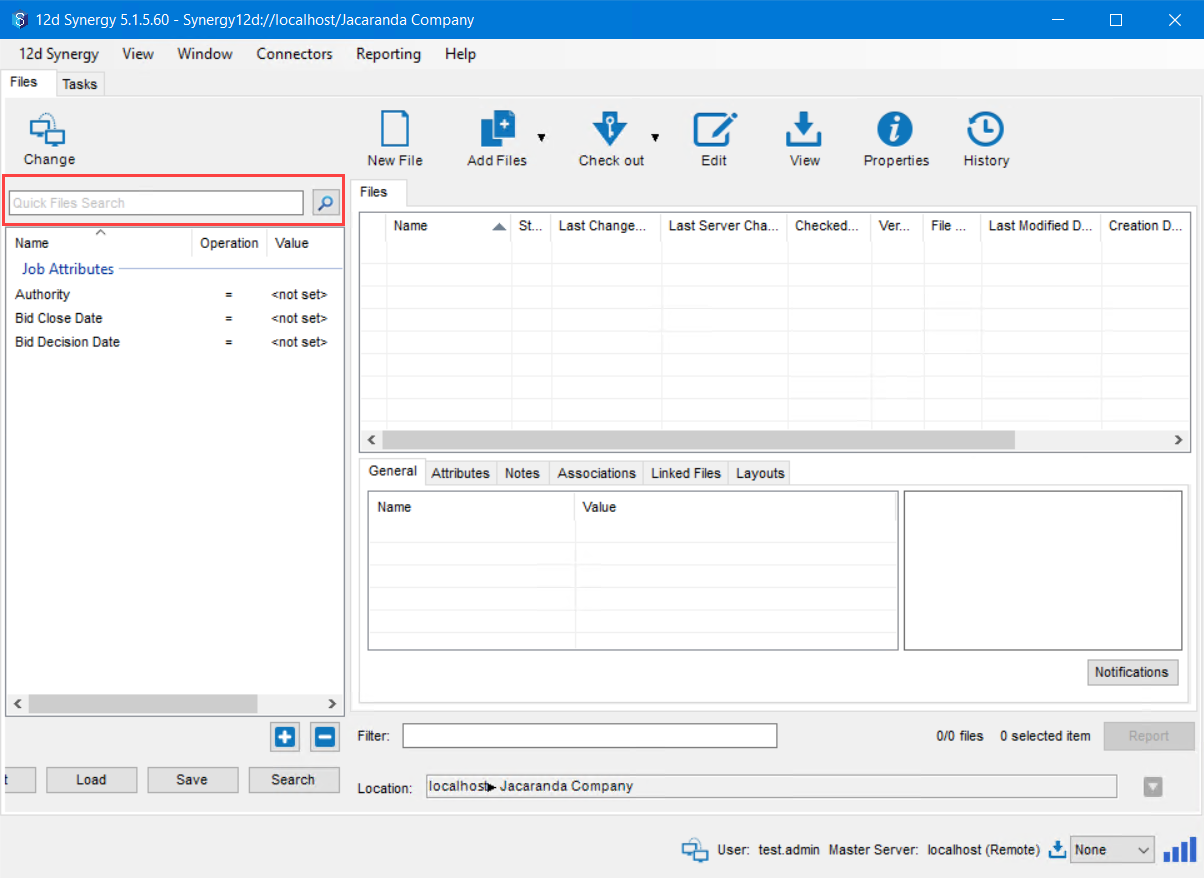
1.11.2. Quick Files Search
You can search for a file in any job, sub job, folder, or sub folder. Select the required search location (like a job, folder, etc.) in the job tree and enter the name of the file in the Quick Files Search box. All files in the selected location are searched for, including the sub folders, sub jobs or 12d Model projects that the selected location contains. The search results are displayed in the Files tab.
The search query and its results are displayed as an entry in the tree structure, as circled below. You can right-click and save the search or export the search from here. You can later import this search into any job by right-clicking the job and selecting the Import search option.
.png)
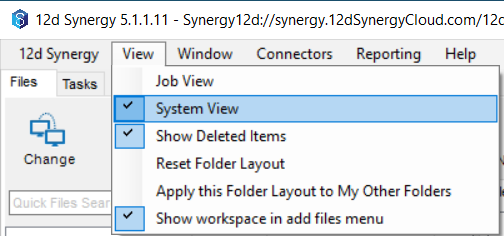
1.11.3. System-view Search
You also have an option to search for a file in the 12d Synergy Server system you are working on.
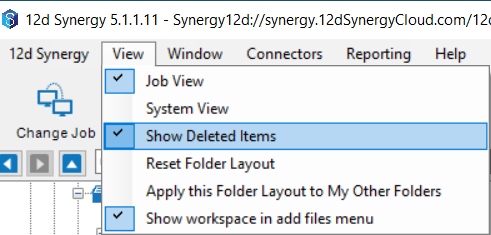
In the View menu option, select the System View option.
A tick mark is displayed next to the System View option, indicating it is selected.
The System View is displayed.You can configure the file and job attributes with which you want to search for a required file at the system level in the 12d Synergy Administration application > Searching tab > System Search tab. The selected attributes are displayed as checkboxes in the left panel of the System View window.
In the Quick Files Search box, enter the name of the file you want to search in the system.
All the jobs in the connected server are searched for the required file.
1.12. How to View the History of a File
You can view the history of a file in one of the following ways:
Right-click the file and select the History option.
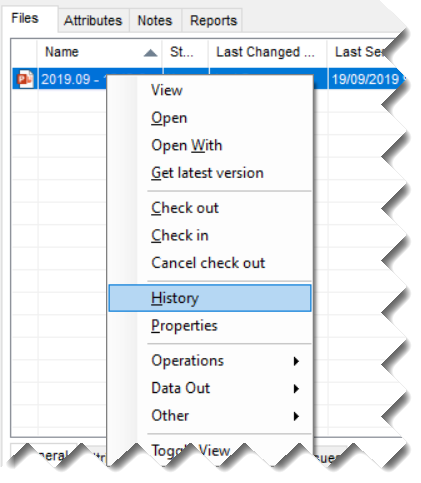
Select the file and click the History
 icon on the quick access toolbar.
The History for <file name> window is displayed. The change history of the file is displayed in this window.
1.12.1. How to Rollback a File to a Previous Version or/and Make it the Latest Version
In the History for <file name> window shown above, you also have the option to rollback the file to a previous version or/and make it the latest version of the file.
Select the version of the file to which you want to roll back the file or/and make it the latest version.
Click the Rollback button.
The following 12d Synergy prompt is displayed.
You can also right-click the required file to view the four options listed above.Do one of the following:
Select the Local Rollback option to roll back the file to a selected previous version and save it as that version in your workspace.
One of the following events occurs.If it is just a file with or without attributes set, then the file in your workspace is rolled back to the selected version.
However, no changes are made to the file on the server, i.e., it still has the last updated version as the latest version.If there's a workflow set on the file, the following prompt is displayed.
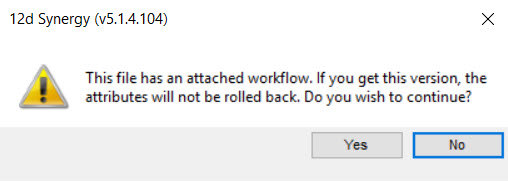
Click the Yes button to continue.
The value of the attributes is, however, not rolled back.
For either of the above cases, the Version column of the file displays both, the server's version number and the local version number of the file prefixed by the word Local in [ ]. This is shown below.
When you try to checkout a file that is rolled back to any previous version, the following prompt is displayed.
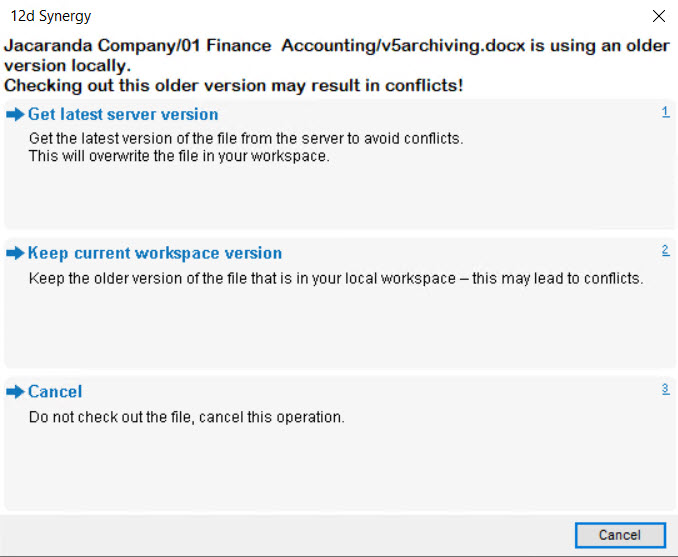
Select the Save As option to browse and save the file at a different location in your workspace.
Select the View option to just view the selected version of the file.
Select the Make Latest Version option to roll back the file to the selected version and mark it as the latest on the server.
If the file has a workflow attached to it, then you cannot use this option.
Once the process is done, a status message is displayed.
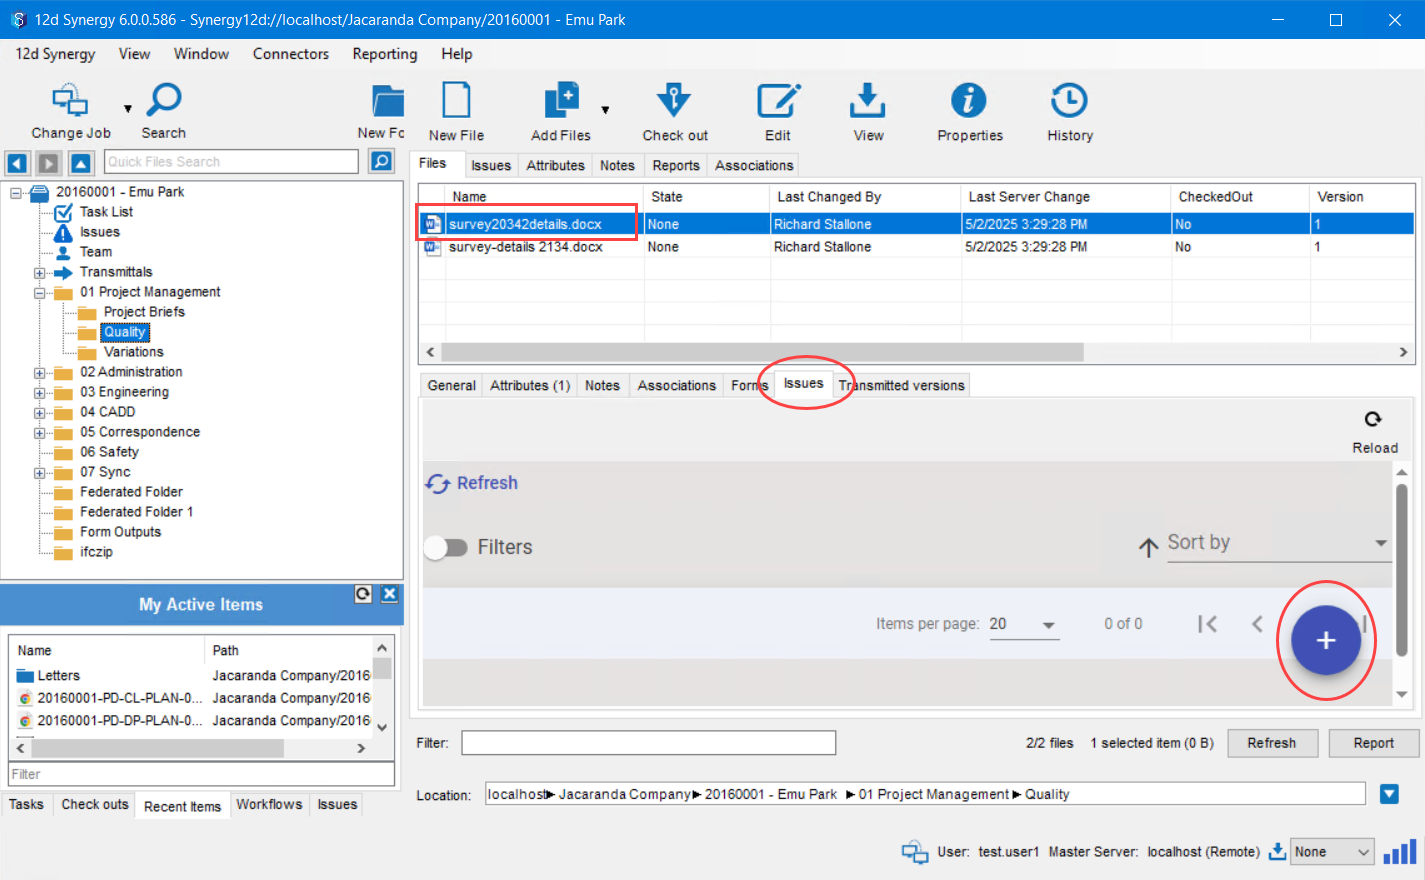
1.13. How to Create an Issue on a File
If you have the necessary permissions to create an issue, you can do so in the Issues tab.