This document will provide instructions on how to authorise and set up your WorkFlowMax connector using the new WorkFlow Max V3 API.
If you are an existing WorkFlowMax user, you should follow these instructions instead:
Migrating to WorkFlowMax V3
Please be aware that there appears to be a WorkflowMax API outage at this point in time - we will update this message when it is resolved. Until it is resolved by WorkflowMax / Xero, these instructions may not work.
Please note that WorkFlowMax is now only allowing limited access to its systems, which restricts the amount of calls 12d Synergy can make during a 24 hour period.
This means the connector can only synchronise some data for recently created items and the rest should be synchronised manually to ensure the WorkFlowMax / Xero limits are met.
Prerequisites
- You will need administrative access to 12d Synergy
- You will need administrative access to WorkflowMax and the ability to create an app in Xero
- You will need to be running the 4.3.5.86 client or later to be able to configure this connector. You can download this from here.
- Make sure you have a copy of the client open and connected to a job - this will be important during the authorisation process.
- Finally, you will need the WorkflowMax V3 Connector, which you can download here.
Create a new App in Xero
To start working with the new connector, you must allow 12d Synergy to access your data, using a new WorkFlowMax / Xero app.
Create the App
You must create an app so that 12d Synergy can access the WorkFlowMax / Xero API.
- Login to Xero Developer Portal and create an App. You can do this via: https://developer.xero.com/myapps/
- Enter the name '12d Synergy WorkFlowMax Connector' as the App name
- Select 'OAuth 2.0 grant type - Auth code(Web app)' (This is the default)
- Enter your company url, such as: https://www.mycompany.com
- Enter the OAuth 2.0 redirect URI: http://localhost:55555/xero
- Create the app
- Look for the Client ID - make sure you take a copy
- Generate a secret and copy the secret to a safe place
- Click Save
Authorise 12d Synergy to access WorkFlowMax
You must login to WorkFlowMax and set the following setting for the user account used to login in WorkFlowMax connector.
- Go t: Business -> Settings -> Staff
- Select the user that will run the Connector
- Under 'API Access Privileges' set 'Authorise 3rd Party Full Access'

Create the New Connector in 12d Synergy
- In the 12d Synergy Administrator, select Connectors
- In the Connectors pane, click Load New Connectors (found at the bottom of the screen
- Click the Upload Assembly button
- Browse to and upload the previously downloaded connector .dll file
- In the confirmation popup, click OK
- Click close
- At this point, make sure you click Save
Enter your WorkFlowMax / Xero APP details
- Select the new Connector
- You now need to configure all your connector details for access to WorkFlowMax
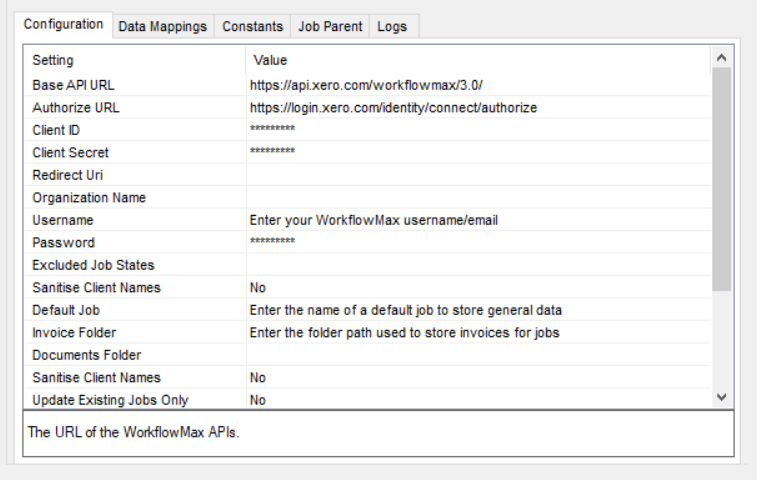
- Client ID - Enter the Client ID you copied when the app was created
- Client Secret - Enter the Client Secret you copied when the app was created
- Redirect Uri - Enter the redirect URI you entered when the app was created.
- Organisation Name - (Optional)
You only need to set this if your user account can connect to multiple WorkFlowMax accounts.
If you only have one account, don't enter this setting.
If the user running the connector does have multiple organizations, you must set this value.
This can be found in WorkFlowMax under
Business -> Settings -> Organisation Settings -> Payment Advice -> Details - Username and Password
If you want to run the connector from the same WorkFlowMax user account you used in the old connector, you can leave them as they are. Otherwise enter the new user account details - Earliest Note Date - As a new customer, you don't need to worry about this
- Set 'Only Sync Entities created in the last X days' to 5
You can see more info on this setting in the section below, 'Using the New Connector'
- You will now need to go to the "Data Mappings" tab and determine which WorkFlowMax fields you want to copy over to which entities. Not everything is required, but you need to have a GUID attribute for each field.
You can read more information about Connectors and data mappings here: Connectors - Click 'Authorize' and login, then allow access to the app
If you receive an error, it may be because you have not opened a copy of the client and connected to a job - please make sure the client is open and try again - Turn on Manual Sync and click "Save" to allow the manual sync options
- At this point, you should consider running a test to ensure it is working as expected
- It's a good idea to turn off debug logging at this point
- Congratulations, you have successfully migrated to the new WorkFlowMax Connector
Please read the next section on scheduling.
Using the New Connector
Given the new changes, the best way to use WorkFlowMax is as follows:
- Set a schedule that always synchronises new entities created in WorkFlowMax within the last few days
- Manually synchronise recent changes by hand, using new UI mechanisms
Setting a Schedule
As the connector is limited in the number of calls that it can make against WorkFlowMax, we recommend you should set a schedule to run at most every 4-6 hours.
Restricting the Data Set to a Date Range
You should now restrict WorkFlowMax to only look at data created after a given date, within a short date range, to prevent it from using too many calls against WorkFlowMax.
To get the best use out of the connector, you should aim to automatically synchronise data created recently and manually synchronise data that is changing.
You can set your date range / window in two ways:
- Set the field, 'Only Sync Entities Created in the Last X Days'
This allows the connector to only look at data, such as jobs, created in the last X days - Set the field 'Earliest Job Date'
This allows the connector to only look at data created after a certain date - such as the start of the current year.
Whether or not this is appropriate will depend on the number of entities you have in your WorkFlowMax system.
Be aware that any project in WorkFlowMax will utilise at least 2 calls against the API.
Using Manual Synchronisation
We are adding new ways to easily synchronise your data via the Connector.
You can sync jobs, contacts and companies easily as long as they have a WorkFlowMax GUID.
To make sure you can use this feature, make sure you turn on Manual Sync
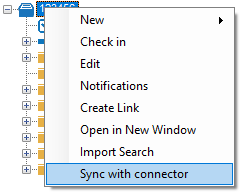
Sync a Job
To sync a job, simply right click it in the 12d Synergy Client and select "Sync with Connector"
Sync a Contact / Company
Contacts and Companies can be synchronised in the Contact and Company Editor windows.
Simply select the contact or company you want to update and click 'Sync with Connector'.

Using the Command Line
We are aiming to provide command line capabilities for users to script the run the connector for specific entities in WorkFlowMax, and we anticipate this will be released before the end of Q4 2020.