Overview
Connectors allow the 12d Synergy server to communicate with other software products. Data imported via connectors from those products is stored in 12d Synergy. This process allows your data to be synchronised across multiple systems.
Connectors are distributed as individual DLL files that can be plugged into the 12d Synergy server. When they are run, connectors execute within the 12d Synergy server process.
Each connector provides a different set of features and depending on the external system may import 12d Synergy entities such as jobs, tasks, contacts, companies, files, and others.
Connectors are loaded and configured via the 12d Synergy Administrator software.
The connectors that are developed and distributed by 12d are available from http://www.12dsynergy.com/downloads/connectors/. Individual help for each connector is also available on the website.
Note that some connectors must be activated in the 12d Synergy license file before being used. Contact your 12d Synergy representative for more information on licensing.
Note that in the Connectors dialog, the Save button must be clicked after any fields are updated and before using ‘Run Test’ or ‘Run Now’.
Connectors are provided as a powerful tool to connect 12d Synergy with external systems. 12d Synergy Administrators are responsible for installing and configuring connectors correctly to ensure that good quality data is imported into their systems. A misconfigured connector could create large amount of bad quality data. The directions outlined in this document must be followed by Administrators, especially the sections explaining database backups and use of the Test mode.
First Steps – Using a New Connector
Determine requirements
Connectors bring data across from external systems into 12d Synergy. The first step is to understand which data you want to transfer. The data will consist of entities and fields. For example, you may identify the need to bring across:
- Job entities - including Job Name, Create Date and an associated Contact fields
- Supplier Companies entities - including primary Contact and Phone Number fields
Each connector supports a different set of entities and fields that can be transferred into 12d Synergy. Consult http://www.12dsynergy.com/downloads/connectors/ for each connector’s supported fields.
It may be necessary to populate certain attributes for your existing data in 12d Synergy to avoid it being duplicated by the connector. See the Avoiding Duplication section below for this important consideration in determining requirements.
Apply for external access
Some connectors require access to an external system to function. For example, if the external system data lives in the cloud then you will need access to its API. Contact the external system provider for any access required.
Consult http://www.12dsynergy.com/downloads/connectors/ for each connector’s required external access.
Apply for a new 12d Synergy license
Most connectors require a new 12d Synergy license file that authorises the connector. Connectors can be used in Test Mode (explained below) without a license, but a full import cannot be run.
Contact your 12d Synergy representative to discuss licensing.
Download and load the connector
Connectors are downloaded from http://www.12dsynergy.com/downloads/connectors/ and loaded into 12d Synergy through 12d Synergy Administrator. See Load New Connectors in Figure 1.
Configure the connector and mappings
Before testing it is essential to setup the Configuration, Mappings and Constants panels.
See the following documentation for more information on these sections.
Backup the 12d Synergy server database
Before running a connector for the first time you should always create a full backup of your 12d Synergy server database.
Do a connector test run
Most connectors support Test mode via the Run Test button. This allows you to import a limited amount of data from the external system into 12d Synergy.
Test mode should always be used to ensure that good quality data is imported into Synergy, before running a full data import.
After running in Test mode use the Logs panel to ensure that the connector ran successfully. Verify that the imported entities and fields are correct by opening the imported entities in 12d Synergy. E.g. Open the jobs or contacts – and make sure that the attributes are correctly imported.
Repeat the Test mode and modify data mappings as many times as necessary to ensure good data quality.
Setup a schedule
After configuring mappings and constants, running in Test mode and checking the imported data, you are ready to configure the connector on a schedule. See below for instructions.
Connector Setup
The 12d Synergy Administrator Connectors screen is used to configure each connector:
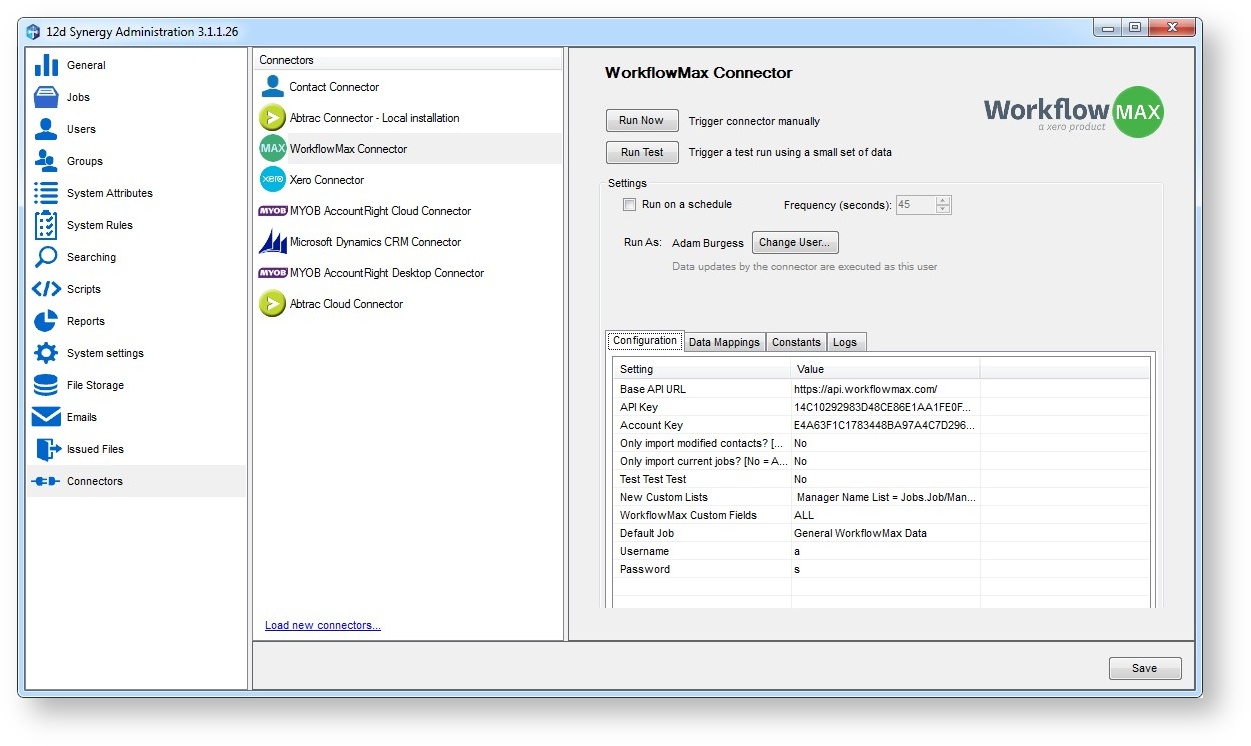
Figure 1 Connector Configuration
Run Test
Some connectors support Test mode. Running in test mode should always be used as a first step in confirming that the connector is configured appropriately to your needs. Always use Run Test prior to Run Now or to setting up a schedule.
If Test mode is not used then you risk populating your 12d Synergy database with a large amount of bad quality data.
A window will pop up which prompts for the fields used to limit the entities that are imported as part of the test. Only the entities matching your fields will be imported.
Note that any attached entities will also be imported. For example, if you set the Test mode fields to import an individual company then both that company and its attached staff contacts will be imported.
Leaving the Test mode fields blank will prevent importing entities of that type.
Run Now
This executes the connector immediately as a once off run. Execution happens within the 12d Synergy server. To view the results of the run, click into the Logs panel (described below).
Run on a Schedule
This sets the connector to run every X seconds. Execution happens within the 12d Synergy server. To view the results of each run, click into the Logs panel (described below).
Connectors take a varying period of time from start to finish. This time is spent in either retrieving data from the external systems and/or writing it to the 12d Synergy database. It is important to set the connector schedule to be higher than the time taken to complete an import. It is recommended to set this to 5 minutes (300 seconds) or higher.
Run As
This field defines which user context all imports by this connector are executed as.
This user will appear in log entries throughout Synergy. You may wish to create a user specific to the connector in order to make its log entries more easily trackable.
The Run As user will usually need to be a system admin user in 12d Synergy.
Configuration
Each connector offers its own set of configuration settings which are required to successfully complete an import. See http://www.12dsynergy.com/downloads/connectors/ for details of an individual connector’s configuration settings.
Data Mappings
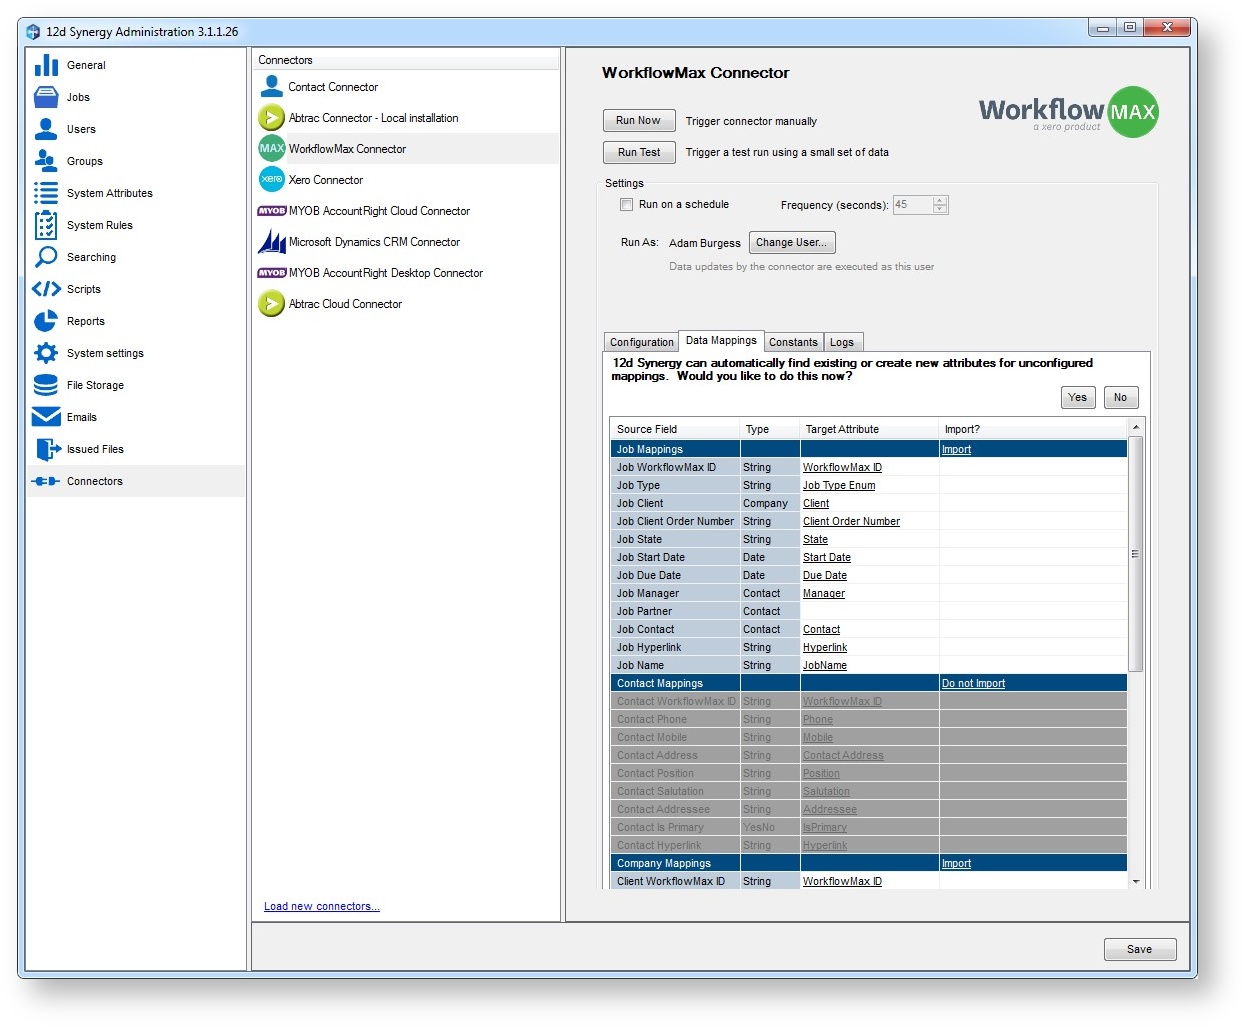
Figure 2 Data Mappings
Data mappings provide the link between source fields in an external system and destination attributes in 12d Synergy. Data mappings are one of the most important things to correctly setup before running a connector.
The mappings are broken down by entity – e.g. Job, Contact, Company, and others. For each entity there are one or more fields in the external system which can optionally be imported into 12d Synergy as attributes.
One common use of data mappings is to set job attributes which are match attributes for a template. Using this technique any job imported into 12d Synergy will use the matching job template.
Target Attributes
To import a source field you must set its Target Attribute. To prevent importing a source field you must clear its Target Attribute.
Click in the Target Attribute column to select whether to map to an existing 12d Synergy attribute, create a new attribute or clear it.
Automatic Mapping
Automatic Mapping speeds up the data mapping process and does not require you to map each source fields individually.
The Automatic Mapping option is only available when one or more source fields have no Target Attribute set.
To utilise automatic mappings click the Yes button after the message 12d Synergy can automatically find existing or create new attributes for unconfigured mappings. Would you like to do this now?
Deactivating Entire Entities
The final Import? column is used to deactivate the import of entire entities. For example, you could turn off the import of all jobs, contact or companies. In the example picture above Contacts have been deactivated.
Click the Import or Do not import link to modify this behaviour.
Constants
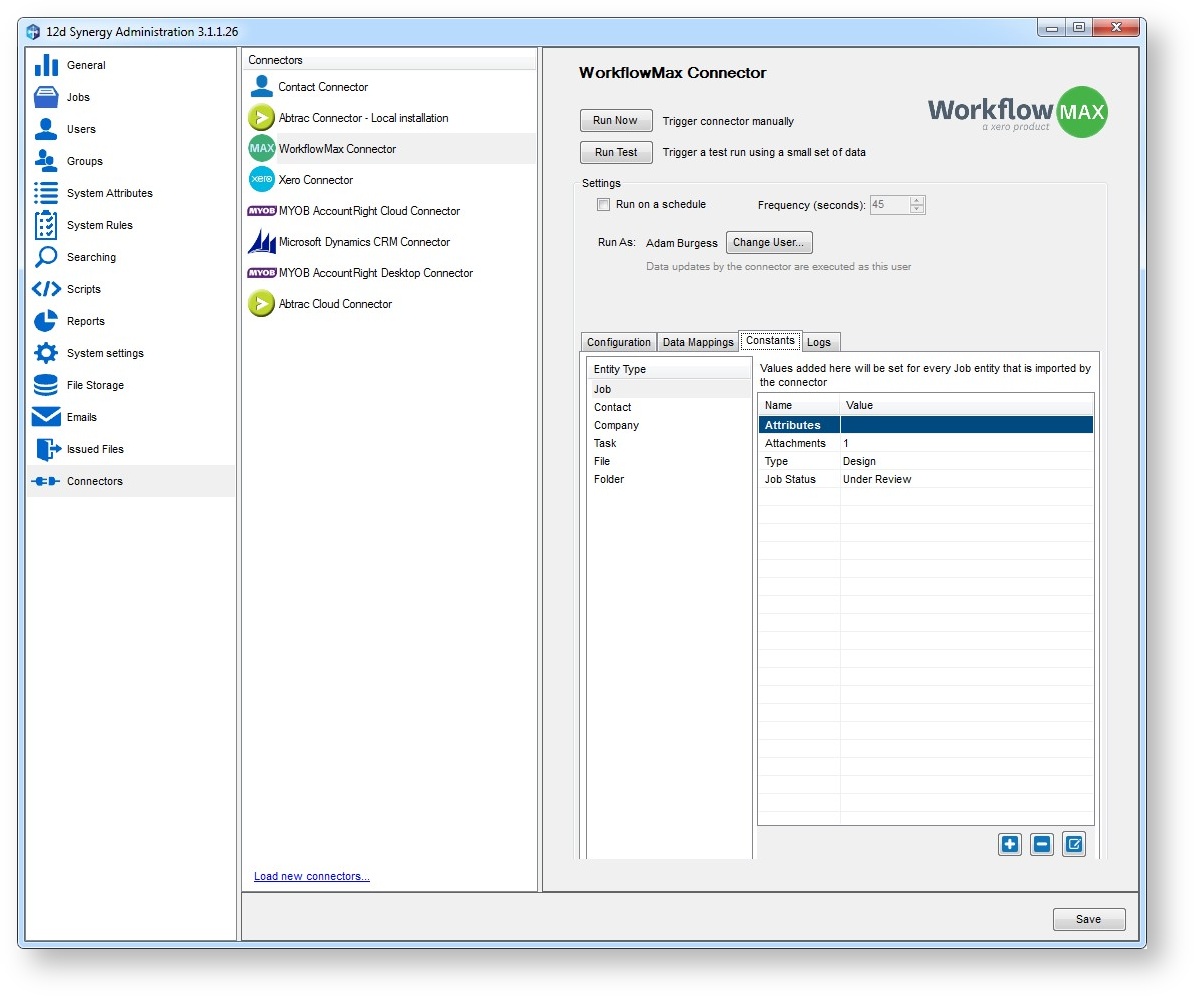
Figure 3 Constants
Constants are similar to mappings in that they control the attributes that are created in 12d Synergy during a connector import. Unlike Data Mappings, Constants are fixed attribute values that are applied to every entity created. An example of a common use of constants is to add an attribute called “Data Source” with a value of “Connector” to clearly mark every entity as originating from an external system.
Similar to Data Mappings, Constants may be used to set job attributes used to match a job template.
Logs

Figure 4 Logs
The Logs panel is used to review the progress and status of runs of connectors. Clicking on a row will pop up a more detailed view of the log entry.
The Export button allows the log entries to be extracted out into other tools for analysis such as Microsoft Excel.
Avoiding Duplication of Data
Connectors use a unique field mechanism to track individual entities between 12d Synergy and external systems. It is critical to understand which the unique field is for your connector. Incorrect configuration of the unique field could cause data duplication.
The following example of the WorkflowMax unique field helps explain this concept more clearly:
WorkflowMax Example |
|---|
The WorkflowMax connector has a source field named WorkflowMax ID. In the connector data mapping panel this source field appears under each entity - jobs, contacts, companies, etc. It is mandatory to map the WorkflowMax ID source field to a destination attribute in 12d Synergy. The destination attribute name can be customised. E.g. you may choose to name it “WorkflowMax ID” or you may choose “WFM External Identifier” or any other name.
Each time the connector extracts an entity from WorkflowMax it will pull out the WorkflowMax ID field. Let’s say the connector encounters a job where the WorkflowMax ID equals 12345.
|
Before running a connector for the first time it is important to understand that If you already have entities in 12d Synergy that correspond to entities in the external system and you do not wish them to become duplicated, you must populate their unique attribute before running the connector.
See http://www.12dsynergy.com/downloads/connectors/ for information on a specific connector’s unique fields.
GeneralStorage setting
Connectors require a server setting called GeneralStorage to be set. This is set through the Settings panel in 12d Synergy Administrator. It must be populated with a folder location accessible to your 12d Synergy server.