This topic details how to use the ‘Insert Attribute’ button on the 12d Synergy Plugin. And how to setup file templates with embedded attributes, and which syntax to use to embed those attributes.
1.1. What are Embedding Attributes?
Embedding attributes is the process of inserting a 12d Synergy attribute into a document so that the attribute’s source information can be pulled from 12d Synergy and displayed in that document. For example, if you embedded the ‘Job Number’ attribute into a document located in 12d Synergy under job number 1234; 1234 would then appear where you embedded that attribute.
You can also create document templates with embedded attributes. When a file is created in 12d Synergy using a template with embedded attributes, those attributes will auto fill with the source information of the job in which the file was created under. If the source information is changed in 12d Synergy, it will automatically update this in the document.
Document types such as Excel, Word and DWG’s can have embedded attributes so long as the applications that run them have the 12d Synergy plugin installed.
1.2. How to embed attributes
Although many document types can have embedded attributes, Microsoft Word will be used as a demonstration for this topic.
1.2.1. Before you start
- The attributes you wish to embed must exist in 12d Synergy to work.
- For an embedded attribute to display source information from 12d Synergy, the document in which the attribute exists in must be in a folder that contains the relevant attribute. For example, if the document is under ‘Example Folder 1’ which has no job number attribute associated with it, that attribute will not be available to use in that document.
- The 12d Synergy plugin must be installed on the application you are using.
1.2.2. Using the 12d Synergy tab
Please note, the ‘Insert Attribute’ ribbon button will not be available unless the document you are using is added to 12d Synergy and checked out.
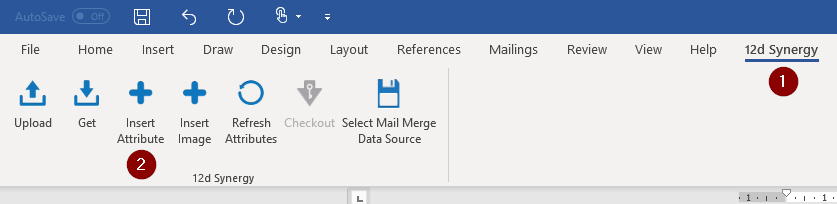
- Click on the ‘12d Synergy’ tab at the top of the application, then click the ‘Insert Attribute’ button (See Figure 1). The ‘Select Attribute’ window will open which displays the available attributes from the folder that the document is nested under in 12d Synergy (See Figure 2).
- Select which attribute you wish to embed into the document then click ‘Select’.

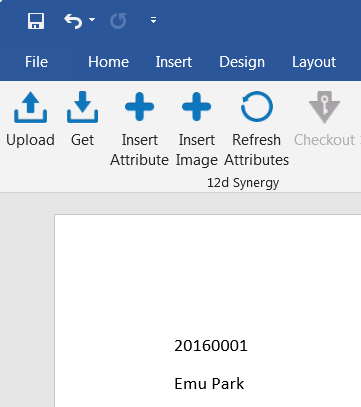
- The attribute selected will now embed into the document. In this example, the ‘Job Number’ and ‘Job Name’ have been embedded (See Figure 3). If the source information for one of those embedded attributes is changed in 12d Synergy, it will automatically update in the document by checking it out, modifying the attribute, then checking it back in increasing the version number.
1.2.3. Embedding attributes using templates
Templates can be created with embedded attributes. When these templates are added under a job with the relevant attributes, those attributes will automatically pull the source information from 12d Synergy and update. This is useful for documents which are sent regularly and only require certain fields of information to be changed each time such as an address or contact.
Creating a template
When creating a template with embedded attributes it is best to embed them by entering the syntax manually rather than embedded them using the ‘Insert Attribute’ button.
This is because depending on which job or folder you are creating the template under, not all the attributes may be available to embed. The embedded attributes will also display the current job or folder’s source information for the embedded attributes in the template rather than their original syntax (See Figure 3).
- Open a document type that is compatible with 12d Synergy embedded attributes such as a Microsoft Word document.
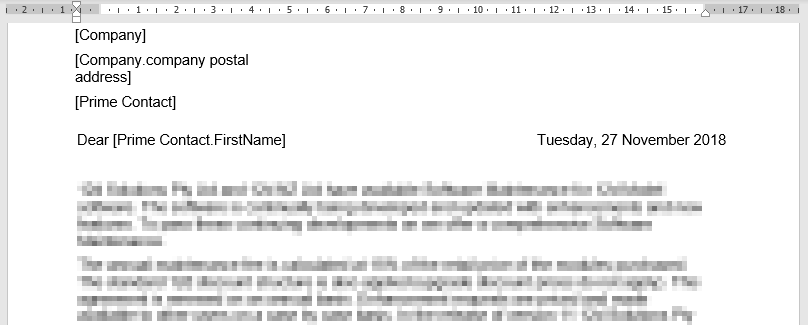
- To embed an attribute simply choose which attribute you wish to embed and enclose it in square brackets (See Figure 4). Refer to the final section ‘Attribute Names and Syntax’ for more details on attribute names and their syntax.
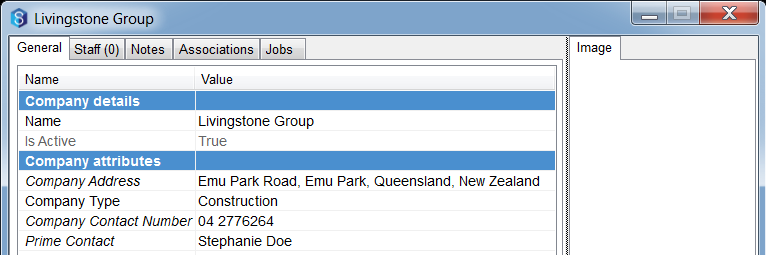
- In this example, the attributes embedded in ‘Figure 4’ relate to the attributes and source information in ‘Figure 5’.
- When finished, save the template and check it back in to 12d Synergy. Ensure the template file is in you’re the folder where your templates are stored.
- In 12d Synergy, open a folder where you want to create a new file using the newly created template and click the ‘New File’ button near the top of the window (See Figure 6).