12d Synergy drawings commands are available in most Autodesk products. Refer to the following pages for other Autodesk products:
12d Synergy Drawing Plugins are installed during the 12d Synergy Client application installation. See Installing the 12d Synergy Client for more information.
Icon Name | Command | Description |
|---|---|---|
| Opens plans in 12d Synergy directly from BricsCAD. | |
| Saves the plan with a name of your choice to a 12d Synergy location. | |
| Configures the CAD settings based on your selection. However, some settings might need Administrator access rights. | |
| Uploads/Imports the plan into the 12d Synergy Server but keeps the file open and checked out for editing on your local system. | |
| Checks out the file from the 12d Synergy Server. It is used when the file is opened in View only (read-only) mode. | |
| Cancels the checkout of the plan you are working on, but retains the drawing open in View only (read-only) mode. | |
| Inserts a block stored in a 12d Synergy location. | |
| Inserts a 12d Synergy attribute. | |
| Allows you to refresh any attributes that may have changed externally whilst in the drawing. This includes 12d Synergy attributes or any changes made to the built-in attribute editors. | |
| Pushes changes from the drawing attributes back to the built-in attribute editors in the 12d Synergy application. This is a two-way street for attribute updates and is only available for use with either the Layout Editor or the Bulk File Attribute Editor methods. | |
| Attaches external references from a 12d Synergy location. These could include Xrefs, Images and PDF files. The files attached through the 12d Synergy plugin have synergised pathing. | |
| Checks out and opens the 12d Synergy reference for editing on the local system. | |
| Manages the 12d Synergy references, similar to the built-in standard Xref Manager. | |
| Locally caches any updated reference files from 12d Synergy to update the Xrefs in the current plan. Alternatively, you can wait for the prompt to indicate an update, depending on your settings. | |
| Updates the layouts in the current drawing from a selected Excel Register file. Excel Registers cannot be used in combination with the built-in editors. | |
| These options are available in V4 and earlier versions of the plugin. They are used to disable or reset prompts when publishing drawings. If these buttons are not available on the ribbon, the plugin will automatically handle this function. | |
| ||
The following commands are available in the plugin without buttons. | ||
NA | Publishes a drawing or a set of drawings from the CAD program. | |
NA | Checks in the currently active drawing but keeps the file open in View only (read-only) mode. | |
NA | Converts the path of referenced files from a 12d Synergy process to a local path. | |
NA | Allows you to set a 12d Synergy version to load. | |




1.1. Open
You can open a file directly from the CAD package without accessing it via the 12d Synergy Client application. However, if the file is from a managed folder, you cannot open it using the Open icon button on the 12d Synergy Drawing toolbar or ribbon. You have to open it from a checked-out managed folder from the 12d Synergy Client application.
From the 12d Synergy menu, select the 12d Synergy Drawing toolbar or ribbon.
Click the Open
 button.
Navigate to the required job and folder and select the file you want to open from 12d Synergy.
1.2. Save As
You can save a file directly into 12d Synergy from a local drive.
From the 12d Synergy menu, select the 12d Synergy Drawing toolbar or ribbon.
Click the Save As
 button.
Navigate to the required job and folder and select the location where you want to save the file in 12d Synergy.
1.3. Settings
From the 12d Synergy menu, select the 12d Synergy Drawing toolbar or ribbon.
Click the Settings
 button.
The Configure Settings window is displayed.
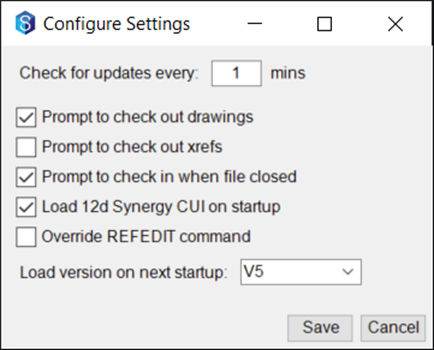
Select the checkboxes displayed against the required settings.
Select a 12d Synergy CAD plugin version from the Load version on next startup list.
The selected version of the 12d Synergy CAD plugin is loaded when you access the CAD application subsequently. If you do not want to change this version, you can choose to use the default version.Click the Save button to apply any settings updates.
It is a good practice to select the following checkboxes:
Prompt to check out drawings
Prompt to check in when the file is closed
1.4. Upload
You can use the Upload button in the following two instances:
Upload a working copy back to the 12d Synergy Server and keep the file open for editing on your local machine
Upload a file that is open outside of the 12d Synergy to the 12d Synergy Server
1.4.1. Upload an existing file into 12d Synergy
From the 12d Synergy menu, select the 12d Synergy Drawing toolbar or ribbon.
Click the Upload
 button.
The following prompt is displayed to describe the reason for uploading the file.
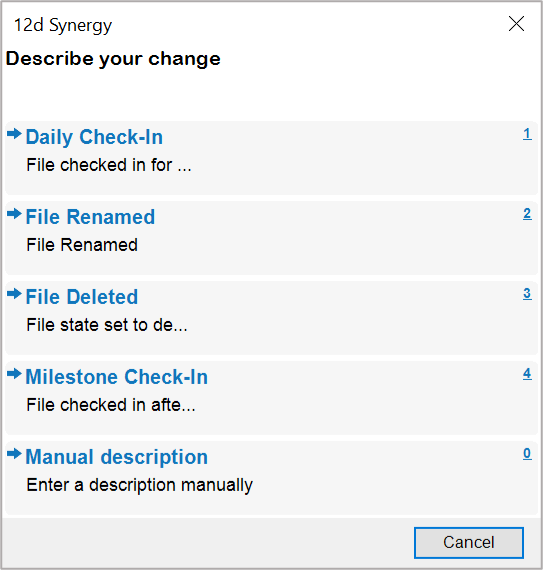
Select the reason that aptly describes your intent to upload the file.
The currently open version of the file is uploaded to the server as a working update, retaining the file checked out and open on your local system.The options displayed in the Describe your Change dialog box can be configured by your 12d Synergy Administrator in the 12d Synergy Administration application > System Rules tab > Change Descriptions tab.
1.4.2. Upload a file that is outside of 12d Synergy
From the 12d Synergy menu, select the 12d Synergy Drawing toolbar or ribbon.
Click the Upload
 button.
The following prompt is displayed.
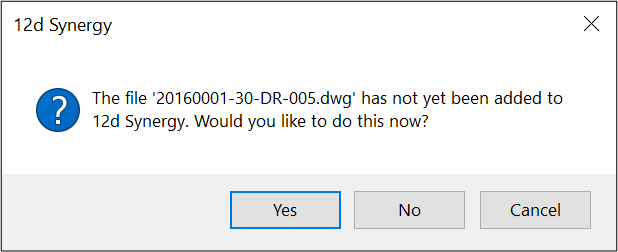
Click the Yes button to add the file to 12d Synergy.
The Save As prompt is displayed. You can rename the file here, if required.
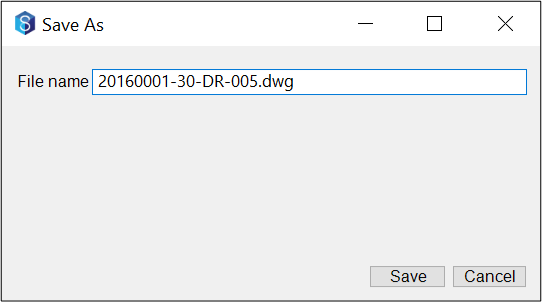
Click the Save button.
Navigate to and select the job and folder in 12d Synergy where you want to save the file.
The Add Drawings window is displayed.Click Ok to upload the file.
After the file is uploaded, the following prompt to check out the file is displayed.
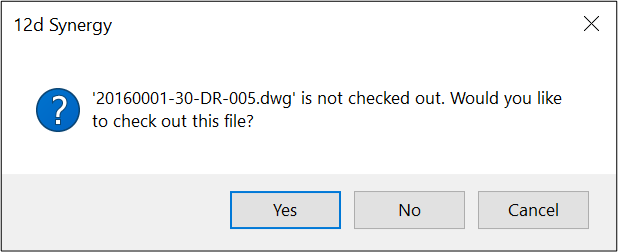
Do one of the following:
Click Yes to check out the file.
Click No to open the file in read-only mode.
1.5. Check out
You can check out and lock a read-only file for yourself to update on your system. Also, if the file is from a managed folder, you cannot check it out using the Check Out icon button from the 12d Synergy Drawing toolbar or ribbon. You have to check it out from the 12d Synergy Client application.
From the 12d Synergy menu, select the 12d Synergy Drawing toolbar or ribbon.
Click the Check Out
 button.
12d Synergy will check if the file is available for check out and reopen it for editing.
1.6. Cancel Check Out
This button is used to cancel an accidental or unnecessary checkout and make the file available for others on the 12d Synergy Server.
From the 12d Synergy menu, select the 12d Synergy Drawing toolbar or ribbon.
Click the Cancel Check Out
 button.
The file is returned to read-only status, with any updates being discarded. The read-only file that is open on your system is retained open in your CAD application.
1.7. Insert Block
From the 12d Synergy menu, select the 12d Synergy Drawing toolbar or ribbon.
Click the Insert Block
 button.
Navigate to the job and folder that holds the file you want to insert.
Follow the prompts displayed to specify the insertion point, scale and rotation by selecting points on the screen, or by entering values in the command line.
1.8. Insert Attribute (from 12d Synergy)
The simplest way to use a 12d Synergy attribute in your CAD package is with the Insert Attribute button. This inserts the attribute value in the drawing as a field. Changes made to the value of this attribute in 12d Synergy will be dynamically reflected in the drawing when the file is opened.
From the 12d Synergy menu, select the 12d Synergy Drawing toolbar or ribbon.
Click the Insert Attribute
 button.
The following prompt is displayed.
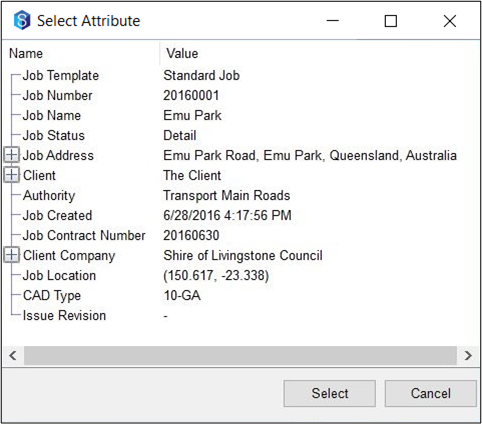
Select an attribute from the list of available attributes.
Click the Select button.
Specify an insertion point in the drawing.
The attribute is inserted accordingly.
1.9. Refresh Attributes
The Refresh Attribute button refreshes any attributes that may have changed externally while drawing. These attributes could be 12d Synergy attributes or attributes updated by the built-in editors (layout editor or bulk file attribute editor).
From the 12d Synergy menu, select the 12d Synergy Drawing toolbar or ribbon.
Click the Refresh Attributes
 button.
12d Synergy will check whether any attributes in the current drawing need to be updated and perform the update.
1.10. Push Block Attributes
Push Block Attributes push the changes from the drawing attributes back to the built-in attribute editor in 12d Synergy.
This feature is only available for use with either the layout editor or the bulk file attribute editor.
The 12d Synergy Client application must be open for this feature to work.
From the 12d Synergy menu, select the 12d Synergy Drawing toolbar or ribbon.
Click the Push Block Attributes
 button.
12d Synergy will analyse the drawing file and push the attribute updates from the drawing back to the built-in editors.
1.11. Attach References
The 12d Synergy Attach Reference button will bring Xrefs in with Synergy pathing, which is trackable. If you move or rename an Xref file in 12d Synergy, the pathing will also get updated, keeping your drawings intact.
For DWG files, 12d Synergy tracks references for Xrefs, images and PDFs.
From the 12d Synergy menu, select the 12d Synergy Drawing toolbar or ribbon.
Click the Attach Reference
 button.
The following prompt is displayed.
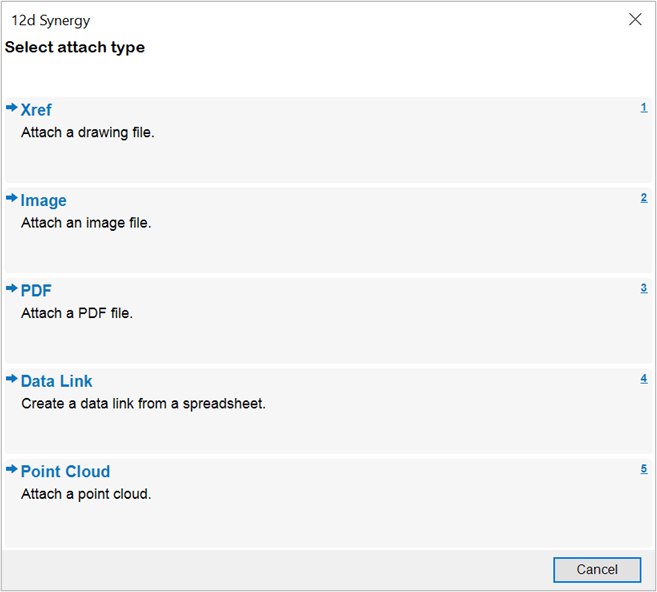
Do one of the following:
If you want to attach an Xref, do the following:
Select the Xref option from the above prompt.
Navigate to the required job and folder and select the required Xref file or files.
The Attach External Reference window is displayed.
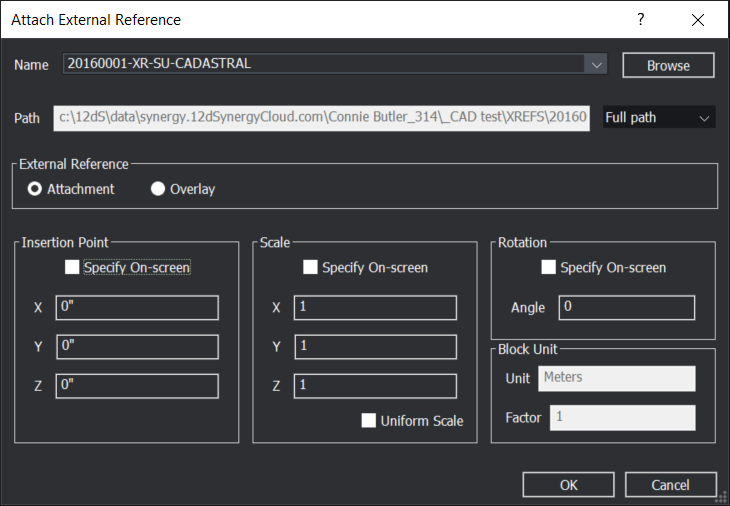
Select the settings for attaching the Xref and click OK.
The Xref is attached based on your placement options and other settings.
If you want to attach an image, do the following:
Select the Image option from the above Select attach type prompt.
Navigate to the required job and folder and select the image you want to attach.
The Attach Image From 12d Synergy window is displayed.
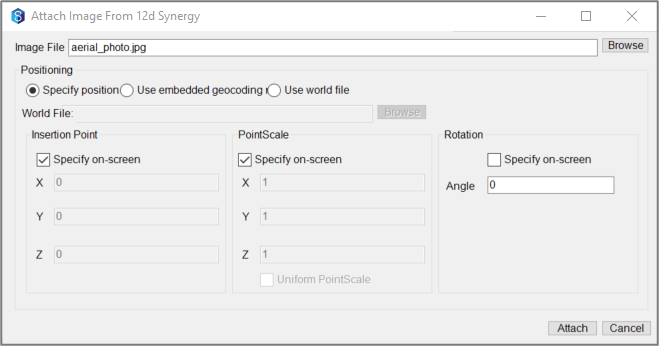
Select the settings for attaching the image and click OK.
The image is attached based on your placement options and other settings.
If you want to attach a PDF, do the following:
Select the PDF option from the Select attach type prompt.
Navigate to the required job and folder and select the PDF you want to attach.
The Attach PDF From 12d Synergy window is displayed.
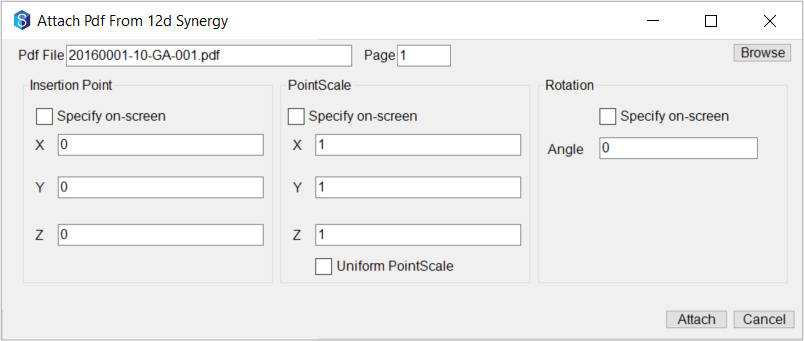
Select the settings for attaching the PDF and click the Attach button.
The PDF is attached based on your placement options and other settings.
1.12. Edit Reference
To edit an Xref, you can use either the Edit Reference icon on the 12d Synergy toolbar, ribbon or by using the RefEdit command override. However, after the edit, you will not be prompted to check in the Xref. Because of this limitation, you will need to manually check in Xrefs from the 12d Synergy Client application.
You can edit an Xref drawing directly from within the current drawing.
From the 12d Synergy menu, select the 12d Synergy Drawing toolbar or ribbon.
Click the Edit Reference
 button.
Pick and select an Xref entity within the drawing file.
If the selected Xref is not checked out, you will be prompted to check out the file.
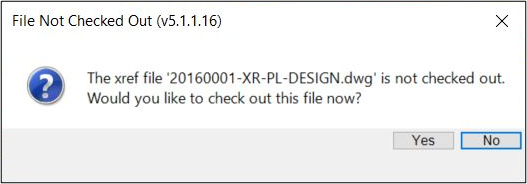
Make the necessary edits to the Xref.
Click the Save button.
The changes are saved.Check in the Xref file using the Reference Manager.
1.13. Reference Manager
From the 12d Synergy menu, select the 12d Synergy Drawing toolbar or ribbon.
Click the Reference Manager
 button.
The Manage 12d Synergy References window is displayed.
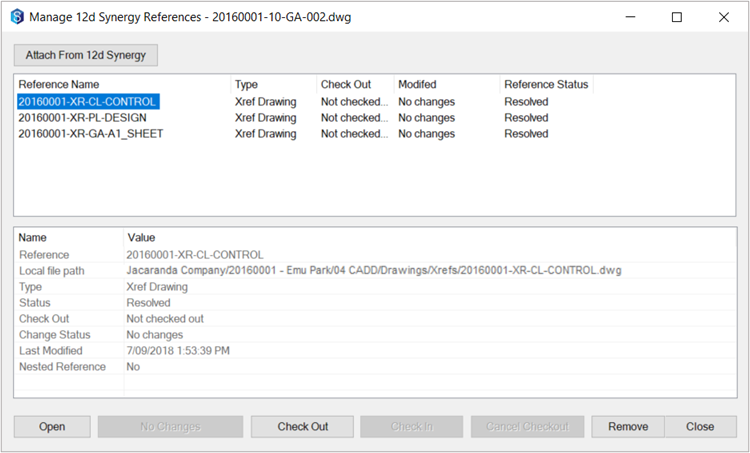
Select the required file.
The contents of the file are displayed in the section below.You can do any of the following:
Open the Xref
Check-in the Xref
Checkout the Xref
Cancel the checkout of the Xref
Remove the Xref from this drawing
1.14. Get All References
When a file that is referenced in an open drawing file is checked into 12d Synergy by another user, you will be notified of the changes in accordance with your configuration settings. Alternatively, click the Get All References  button on the 12d Synergy Drawing toolbar or ribbon to download the latest versions of all referenced files.
1.15. Update from Register
You can use the Update from Register option to update the drawing register with the changes made by others while you have the drawing open.
From the 12d Synergy menu, select the 12d Synergy Drawing toolbar or ribbon.
Click the Update from Register
 button.
The following window is displayed.
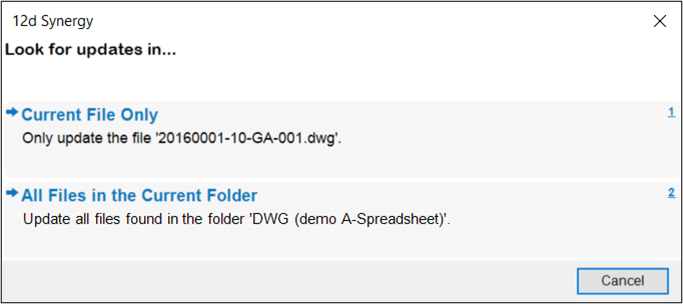
Do one of the following:
Select the Current File Only option to update the current file you are working on.
Select the All Files in the Current Folder option to update all the files in the folder that holds the current file you are working on.
The following prompt is displayed.
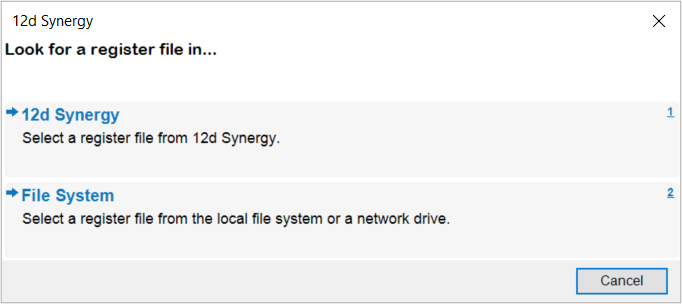
Select the option that applies to you and browse and navigate to the location of the register file from which updates have to be made.
12d Synergy will compare the register file against the drawing attributes and update the attributes that do not match the latest register file.
1.16. 12dSynergyPublish Command
The 12dSynergyPublish command allows you to publish the drawing file(s). Version 5 of the 12d Synergy plugin disables and re-enables the checkout prompts in the background. This occurs before and after the publish function, making the process of publishing much smoother.
Version 4 and earlier versions of the 12d Synergy plugin require you to manually select the Disable Prompts  button and the Reset Prompts
  button before and after publishing, respectively.
In a drawing file, type 12dSynergyPublish in the CAD command bar.
The BricsCAD Publish dialog box is displayed. You can select the publishing options and configure the required settings in this window.Click the Publish button to execute the print.
1.17. 12dSynergyCheckin Command
In an open drawing file, type 12dSynergyCheckin in the CAD command bar.
The following prompt is displayed to describe the reason for checking in the file.
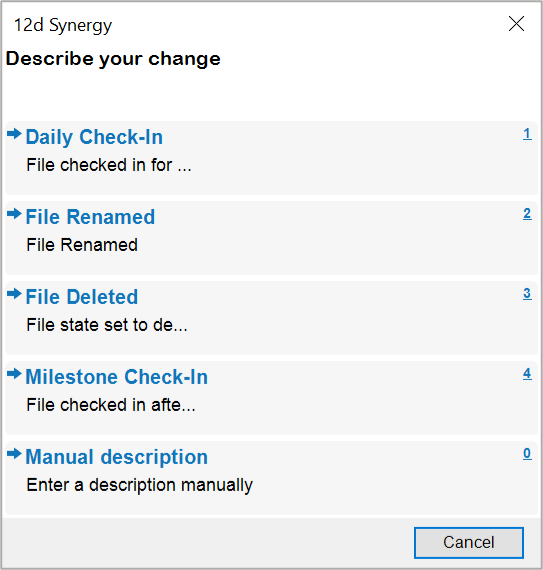
The options displayed in the Describe your Change dialog box can be configured by your 12d Synergy Administrator in the 12d Synergy Administration application > System Rules tab > Change Descriptions tab.
Select the reason that aptly describes your intent to check in the file.
The file is uploaded to the server and is now in View only (read-only) mode.
1.18. 12dSynergyRepairReferences Command
The 12dSynergyRepairReferences command is used to manually repair references when the export process fails to update pathing. All processes to relocate data from 12d Synergy to a local drive will attempt to reconcile the pathing. However, if an error occurs or another process causes this to fail, the option to manually repair the reference is available.
1.19. 12dSynergySetVersionToLoad Command
The 12dSynergySetVersionToLoad command is used to set the version of 12d Synergy to load. This can also be set via the Settings button on the ribbon or toolbar.
In an open drawing file, type 12dSynergySetVersionToLoad into the CAD command bar.
Enter the 12d Synergy major version number that you want to load.
The major version of a release is the first number of the version number. For instance, if you are using version 5.1.1.16, then the major version of the release is 5.
Press the Enter key or execute the command.
From now on, your CAD package will load the entered version of the 12d Synergy plugin.