Admin Content
This feature is available in 12d Synergy version 5.1.7.413 and later. Please check with your Account Manager for more details.
How to Configure a Single Tenant Setup?
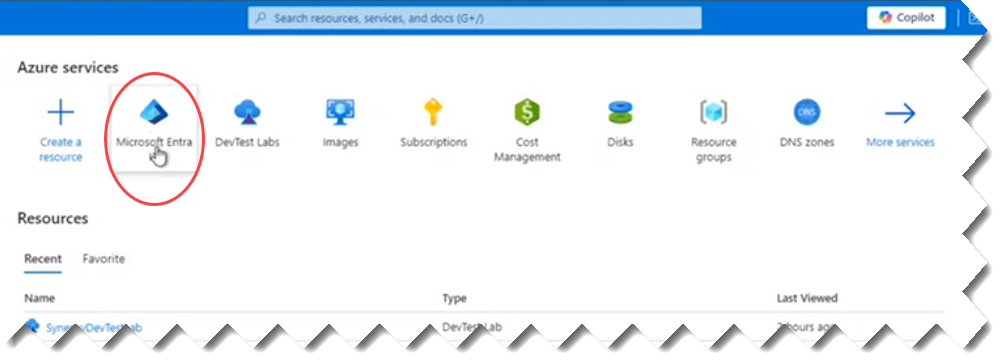
Log in to your Azure portal and click the Microsoft Entra service link.
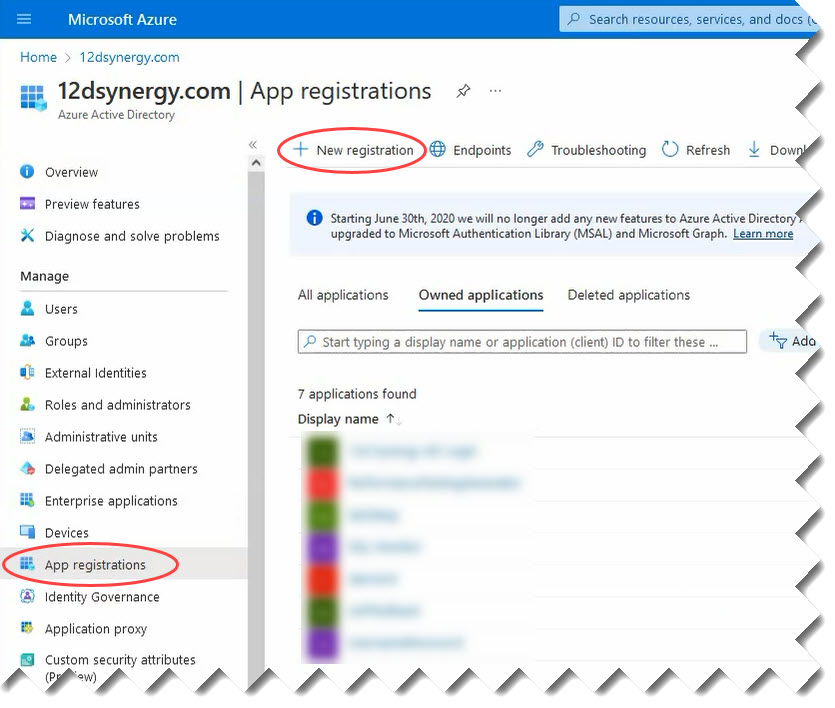
Select App registrations from the left panel and click the New registration link.
The Register an application screen is displayed.Enter a name for your application in the Name box. Let’s say 12d Synergy MS365 Integration.

Select the first option, Account in this organizational directory only (12synergy.com only - Single tenant), for your application from the options displayed under Supported account types section.
Click the Register button displayed towards the bottom of the page.
In the page that follows, click the Authentication link from the left panel.

Click the Add a platform link as shown in the below image.
.png "5(2).png")
The Configure platforms panel is displayed on the right side of the page.
Select the Single-page application option as shown in the image above.
The Configure single-page application panel is displayed on the right side of the page..png "image(49).png")
In the Redirect URls section, enter your server address (for example - https://synergy.12dsynergycloud.com/) in the box provided.
Click the Configure button.
Click the Add a platform link then click the Mobile and desktop applications option as shown in the image below.

The Configure desktop + devices panel is displayed to the right side of the page.
Select the checkbox that mentions nativeclient in its address. In the example above it is the first check box.
Enter "http://localhost" in the Custom redirect URIs box.
Click the Configure button.
The setup for Single-page application and Mobile and desktop application is now completed.
Click the API permissions link displayed in left panel.

As a 12d Synergy Administrator, you need to give consent to the application permissions. For that, firstly we need to add the required permissions. Click the Add a permission link.

The Request API permissions panel is displayed to the right of the page.Click the Microsoft Graph option.

Click the Delegated permissions option.

In the Select permissions section, search for the following permissions and select the check box displayed against it.
Files.ReadWrite
Offline_access
Openid
Profile
User.Read
Click the Add permissions button.
The following page is displayed with the configured permissions.
Click the Grant admin consent for 12dsynergy.com link which is highlighted in the above image.
A Grant admin consent confirmation prompt is displayed.Click the Yes button.
Once the permissions are granted, the status of the configured permissions is updated as shown below.
Click the Overview link in the left panel.
The Application (client) ID and Directory (tenant) ID are displayed in this page. Make a note of these as you have to enter them in the 12d Synergy Administration application.

In the 12d Synergy Administration application, select the System Settings > General tab.
Filter the settings by entering "Microsoft 365" in the Filter box.
Enter the Application (client) ID and Directory (tenant) ID from step 25 above in the Microsoft 365 Client ID and Microsoft 365 Tenant ID settings respectively.

Click the Save button.
Restart the 12d Synergy Server and the 12d Synergy Client applications. Single-tenant collaboration setup is now complete.