When you add or edit an activity, condition or data capture, you have to provide their input values. While some values are specific, some are based on the context in which they are being applied.
For example, you could have an activity that creates a folder called "Jacaranda Company Review Comments". But this would only make sense for one particular job. However, since your workflow might run from any job, you should consider using the expression builder to help you create a folder using contextual information. The expression for the folder name using the expression builder would be "{Entity.Job Name} Review Comments".
Continuing with the above example, say you want to name the folder after the parent job name, an underscore, and then the initials of the user creating it.

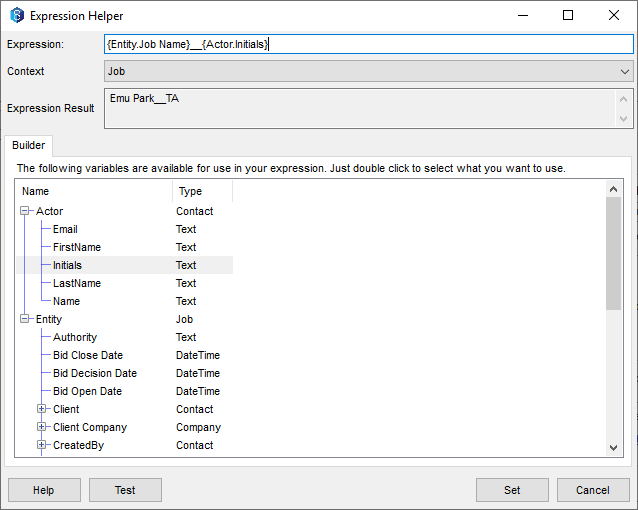
Then you can use the expression builder and build the variable expression for naming the folder as {Entity.Job Name}_{Actor.Initials} as shown in the above image.
Based on the example above, the folder created by the workflow on this activity is named as Emu Park_TA, where Emu Park is the job that contains the newly created folder and TA are the initials of the user (in our environment this is the Test Admin) running the workflow.
Anything that is entered in curly braces is a variable. You can also have constants with user-defined content, like the underscore (_) in the above example. This user-defined content is added to the folder name as it is. Suppose in our example, we add “_Review Comments” at the end, {Entity.Job Name}_{Actor.Initials}_Review Comments, then the name of the folder will now be Emu Park_TA_Review Comments.
1. How to access the Expression Builder?
When you create an activity or condition, if the value of the input(s) can be variable, then the link to the Expression Builder is displayed below the inputs table as shown below.
.png)
You can access it in instances where you have the option of selecting direct(specific) values or you can choose a variable value (manual entry). Some such instances are shown below.
.png)
.png)
When you want to add the value of an attribute to an entity in the activity, it is displayed as follows.
.png)
2. How to use the Expression Builder
After accessing the expression builder, the Expression Helper window is displayed. The parts of the of the expression helper window are displayed below:
.png)
If you have defined any attributes that are attached to any entity, then they too are displayed as sub variables under that entity.
Let us understand how to navigate the expression builder, by expanding a previous expression example and utilising it on a different entity.
Say if you are creating a variable expression for naming a file, and you want to name the file after the following three details:name of the folder
initials of the person creating the file
time at which the file was last changed
Then the expression to be built will be {Folder.Name}_{Actor.Initials}{Entity.LastChanged}.
To build that expression utilising the expression helper, the first sub expression is folder name. So, select Folder in the Context list, and expand the Entity variable, and then double-click the sub variable Name. This will add {Folder.Name} to our expression and it is displayed in the Expression box at the top of the window.
After that sub expression, we have an __ (underscore) which we manually enter in the Expression box, after {Folder.Name}.
The next sub expression we have is the actor’s initials, meaning the initials of the person creating the file. So, for this sub expression, we select File in the Context list, and expand the Actor variable and double-click the Initials as the sub variable. Thus the next sub expression {Actor.Initials} is added to the expression and it is appended to the value in the Expression box.
The next sub expression we have is the time when the file was last changed. So, select File in the Context list again. Expand the Entity variable, and select the sub variable LastChanged. This will add {Entity.LastChanged} to our expression and it is appended to the expression in the Expression box.
Thus, we built the expression {Folder.Name}_{Actor.Initials}{Entity.LastChanged}.
After the expression is built, it is always suggested to test the expression. Click the Test button to see the result of the built expression in the Expression Result box. If it is as per your requirement, click the Set button. If the expression does not meet expectations, modify the variable expression accordingly using Step 2 of this procedure. Once set, the built and tested expression is displayed as the value against the input (File name)for which you have accessed the Expression Builder.
.png)