Emails, like files, can also be managed by the 12d Synergy Client application. This means that all your emails can be uploaded and tracked in a central location, and on-demand these files can be searched for and reused. The interface to managing emails is via the 12d Synergy Outlook plugin.
When you receive an email on your Outlook and you read it, 12d Synergy can modify the subject of that email by adding a stamp, based on your configuration. A stamp is an identifier that is configured by the 12d Synergy Administrator. It is either just the Job Name or a combination of attributes (except the Job Name) and user-defined text. The stamp is always prefixed by a # key. You can define many different masks which are all types of stamps that 12d Synergy will look for and resolve them to one final stamp as required. This allows for variation or mistakes.
With the help of stamps, 12d Synergy locates the jobs or folders into which the email must be uploaded. If an email does not have a stamp or 12d Synergy is unable to locate the job or folder from the stamp, it will prompt the user for the location of the job or folder.
1.1. How to Configure the Tracking of your Incoming Mails
- In the 12d Synergy Administration application, select the Emails > Incoming Tracking tab.
- In the Settings section do the following:
- Enter the name of the folder into which the tracked emails have to be directed by default in the Default email folder name box.
- You can choose to view the following two additional columns that 12d Synergy has created for displaying custom data about emails as extra columns in your MS Outlook Inbox.
- 12d Synergy Job column – To display which job an email belongs to
- 12d Synergy column – To display whether an email has been added to 12d Synergy or not
Enter the names of the column(s) you want to add in the Default columns box. If you are adding both the columns, separate their names with a semicolon.
- You (as a 12d Synergy Administrator) can define the mode of interaction between MS Outlook and 12d Synergy at an Administrator level by selecting a submission mode from the Submission Mode list. If you want the user to choose the submission mode on their 12d Synergy instance, leave the Undefined option as selected in this list.
Option Description Undefined
Allows the user to choose a submission mode in the Settings window of the 12d Synergy menu option in MS Outlook.
Manual No prompt
Does not upload or prompt for an upload whenever an email is read or sent. The user must manually select the emails that need to be uploaded and then click the Upload button on the 12d Synergy Outlook Plugin or drag and drop the emails into the folder in their Drop Zone.
Always prompt
Prompts the user every time an email is read or sent, whether the email needs to be uploaded.
Automatic
Uploads emails that are read or sent to 12d Synergy based on their stamp. If no stamp is available, the user is prompted whether the email needs to be uploaded. If yes, then the user is prompted to select a location for the upload.
Stamp only
Uploads only the stamped emails in the inbox after they are read.
Stamp only and Outgoing
Uploads all stamped emails and prompts the user whether outgoing emails without stamps need to be uploaded.
Everything
Uploads all emails read or sent to 12d Synergy based on their stamp. If the stamp is not available, the user is prompted to select a location. In this mode, all read or sent emails will be uploaded.
- Select the Use subject as file name check box if you want to save the email as a file with the email’s subject as its name.
- Select one of the following options as a stamp source.
- Job Attribute
- Job Name
If Job Name is selected, then it alone becomes the stamp. Else a combination of attributes and user-defined strings can be the stamp.
- You can have multiple stamps set in a system. To add a new stamp, do the following:
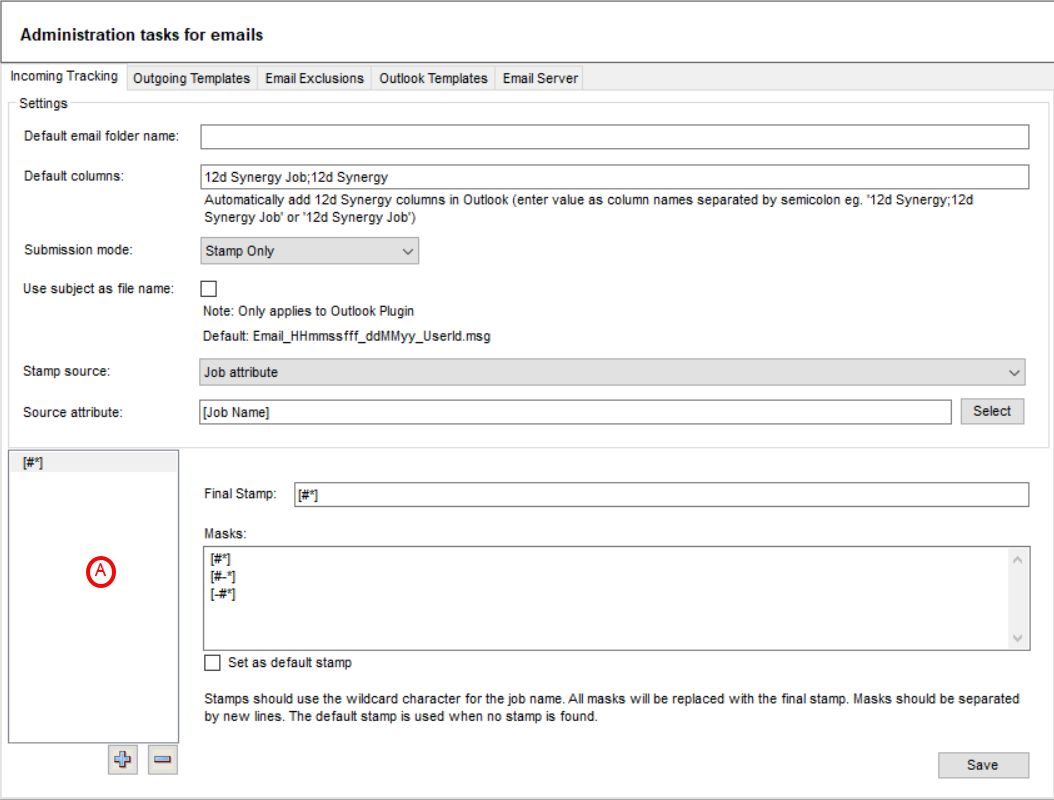
- Enter the layout for the new stamp in the Final stamp box.
- In the Masks section, list all the stamp formats you would like the plugin to look for. When emails with subjects that include one of these stamp formats is found, they will be converted to the final stamp format automatically. This is useful when someone incorrectly types in a stamp or you receive stamped emails from another organisation that also uses 12d Synergy. You should enter one mask on each line.
- Click the
 button.
The Final stamp gets added to the list of stamps in the vertical box (A) to the left Final stamp box.
- To make a stamp the default one to be used, select a stamp from that list and select the Set as default stamp check box.
- Click the Save button.
1.2. How to Exclude Tracking Specific Mails
Automated emails generated from known sources may not need tracking. You can exclude such mails from tracking by adding their addresses to the Email Exclusions tab.
![]()
- Select the Email Exclusions tab.
- Click the
 button.
You will be prompted to enter an email address in the Sender Email Address column. - Enter the email address of the known source in the Sender Email Address column.
Mails from this source will not be tracked. - Double-click the corresponding cell under the Active column.
A small check box is displayed. - Select the check box to activate the exclusion.
The word True is displayed in the Active column. - Double-click the corresponding cell in the Description column to add a brief description for the exclusion you are setting.
- Click the Save button.
The email tracking exclusion is set.