v6 feature Admin Content
Form Templates are used to organise your form outputs in a required format. The templates can be used only when the output of a form is set to .DOCX or .XLSX. This is an optional feature.
1.1. How do Form Templates Work
You can create templates only for MS Word and Excel files (.docx or .xlsx). A form template in that output type is created and saved at a location in the 12d Synergy Client application. The path to that template is saved in the Forms Definition tab > Outputs tab in the 12d Synergy Administration application > Forms tab. When a form is submitted, its output is displayed in the template format in the output file, the location of which is also mentioned in the Forms Definition tab > Outputs tab.
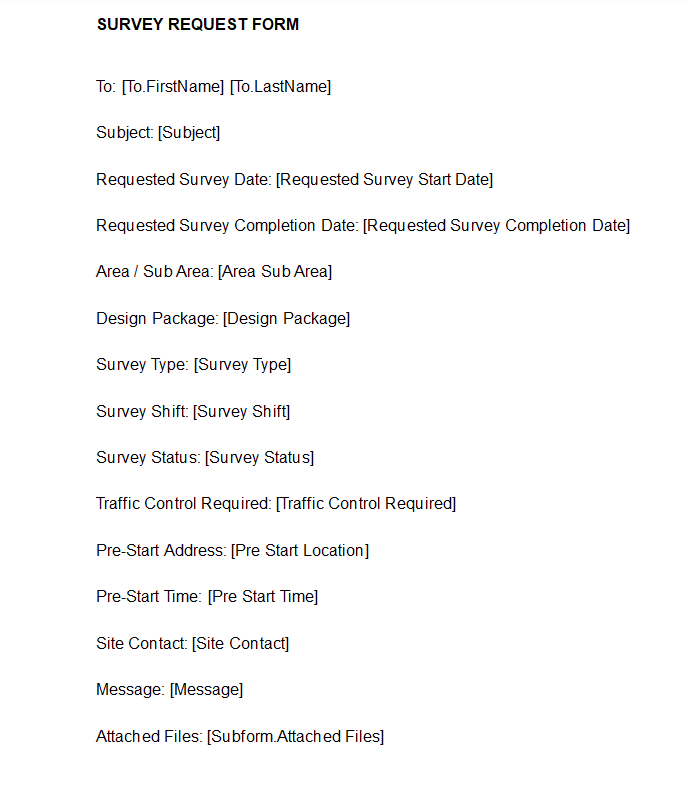
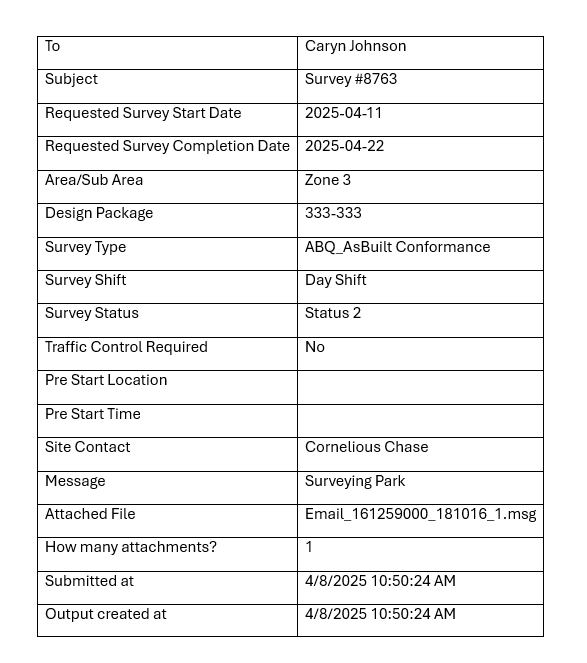
You can also choose not to have a template for your forms. The output in such cases is in a tabular format as shown in the table below.
Form Template | Form Output with the Template | Form Output without the Template |
|---|---|---|
|
|
|
.png)
There is another simple format of the template where you can just have the company header and footer added to the template. The form output is displayed in the same way when there is no template defined. This comes in handy when you want to have your company branding on the output of the form.
The above result can be achieved by typing the following in the template.My company header is displayed here. [Form]
My company footer is displayed here.
.png)
1.2. How to Create a Forms Template
We will demonstrate with an MS Word document output type, where you can design the layout of the template as required. You can also add what details you want to see and how you want to see them. In this procedure, we will see how to do the following:
Customise labels against which the answers or attribute values are displayed
Add the other 12d Synergy attributes from the system
Add attributes used in other forms
Add conditions for the display of output
In some versions of MS Word and MS Excel, particularly when scaling has been used across multiple monitors, some windows may not render correctly. In this instance, these applications may need to be switched to Optimize for Compatibility mode in MS Word (or MS Excel) > File > Options > General tab. It is recommended to do so to ensure that the 12d Synergy plug-in options are correctly displayed.
Open a new MS Word document.
Place the cursor where you want to add content in the template.
On the 12d Synergy menu option, click the Insert Forms Placeholders
.png) icon on the ribbon.
icon on the ribbon.
The Select Form Definition is displayed.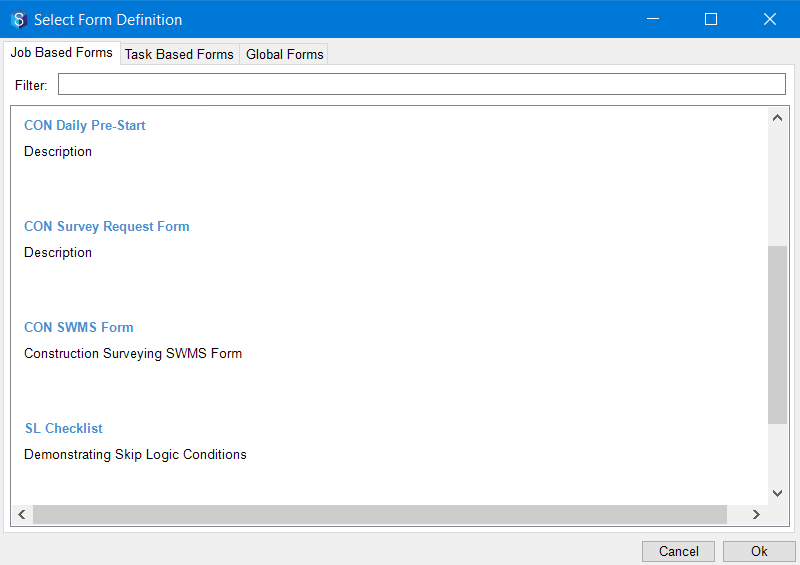
You can select a form from one of the following tabs:
Job-based forms
Task-based forms
Global forms
The process for creating the template is the same for whichever type of form you choose.
If the form you have selected has a subform defined in it, then the subform template must be defined prior to defining the template for the form. The process of defining templates for forms with subforms is detailed in the next procedure. Hence, in this procedure, we will NOT select the Subform type of question for creating a template.
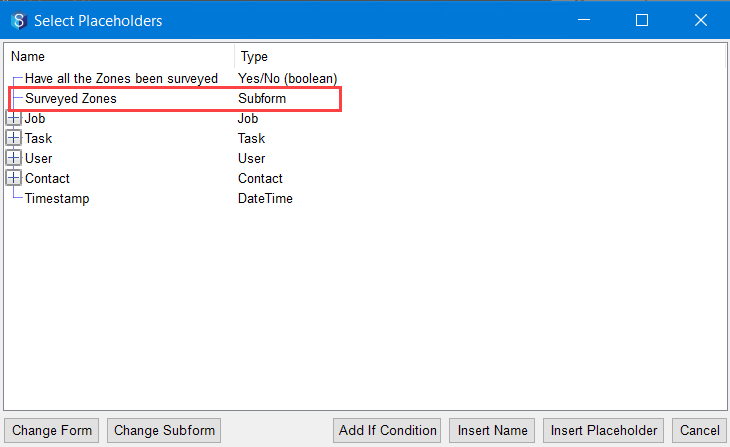
After selecting the form, the Select Placeholders window is displayed.
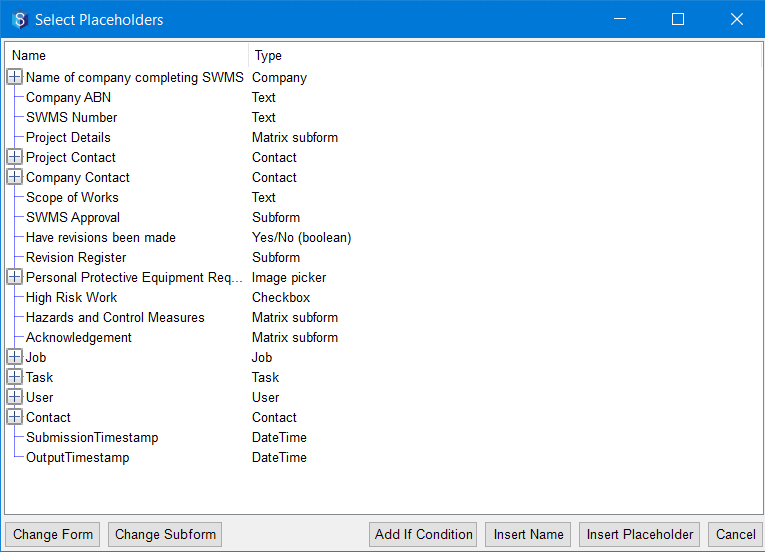
Only if the form you have selected has a subform defined in it, the Change Subform button is displayed.
You can do any of the following from this window:
Select (or double-click) an attribute or a form value to insert a placeholder for displaying its value in the form output.
A placeholder for the selected attribute or form value is inserted in the template at the cursor. Say you have selected Job Name attribute, then the placeholder [Job Name] gets added to the template where the cursor is initially placed.Change the form to insert placeholders for adding an attribute or form output value from the newly selected form.
If you want to insert an attribute or an available output value that is being used in another form, then click the Change Form button and select the required form. The Select Placeholders window then displays the attributes and available output values in the newly selected form.Select an attribute and insert its name in the form template
If you want to merely insert the name of the attribute or question title in the template, select it in the Select Placeholders window and click the Insert Name button. Say you have selected Job Name attribute. Then the label Job Name gets added to the template where the cursor is initially placed.Add conditions for output display
Consider a requirement where you want the section detailing traffic control details to be displayed in the form output only if traffic control is needed. In such a case, an If condition can be added to the template, saying if “is traffic control required” is “Yes,” then display details related to traffic control.
1.2.1. How to Create Templates for Forms with Subforms
When you have subforms in your forms, you might want to have multiple instances of the subforms in your form fills. 12d Synergy allows you to choose the way you want to display such forms. You can have a main template that embeds a subform template. This displays one output file in which the questions that are not included in the subform are added once, and then the multiple instances of subform output (displayed in the lines of the subform template) are added. If no template is used for the output form, the form fill just displays the content in a linear manner.
Form Definition | No Template | Main Template with Embedded Subform Template |
|---|---|---|
|
|
|
Firstly, ensure that the form that you are defining has a subform definition included, as shown in the first column of the above table. If you just have an empty MS Excel file as the output file, after a form fill, the output file is displayed like the image in the second column of the above table.
Now, let us create a template to be able to view the form fill details in a formatted template, as shown in the third column of the above table.
In some versions of MS Word and MS Excel, particularly when scaling has been used across multiple monitors, some windows may not render correctly. In this instance, these applications may need to be switched to Optimize for Compatibility mode in MS Word (or MS Excel) > File > Options > General tab. It is recommended to do so to ensure that the 12d Synergy plug-in options are correctly displayed.
Step 1 — Create a Subform Template
Create an MS Excel file, and name it to represent the subform template.
In the 12d Synergy plugin, click the Insert Forms Placeholders
icon.
The Select Form Definition is displayed. Select the form (which includes subforms) from the list of forms displayed.
The Select a subform area prompt is displayed.
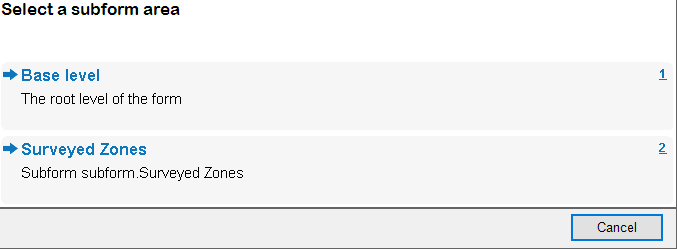
To insert the subform responses, one response at a time, select the <name of the subform> level option. In the example shown above, the name of the subform in the form definition is mentioned as Surveyed Zones.
.png)
The placeholders highlighted above are those of the subform. You can select (or double-click) each of the form output values to insert a placeholder at the cursor point for displaying its value there.
The following placeholders are added in the template at the cursor point.[Name of the Zone]
[Surveyed date]
[Surveyed by]
If you want to add a label for the placeholders, you can edit the template accordingly and add it.
Save the template.
The subform template is defined.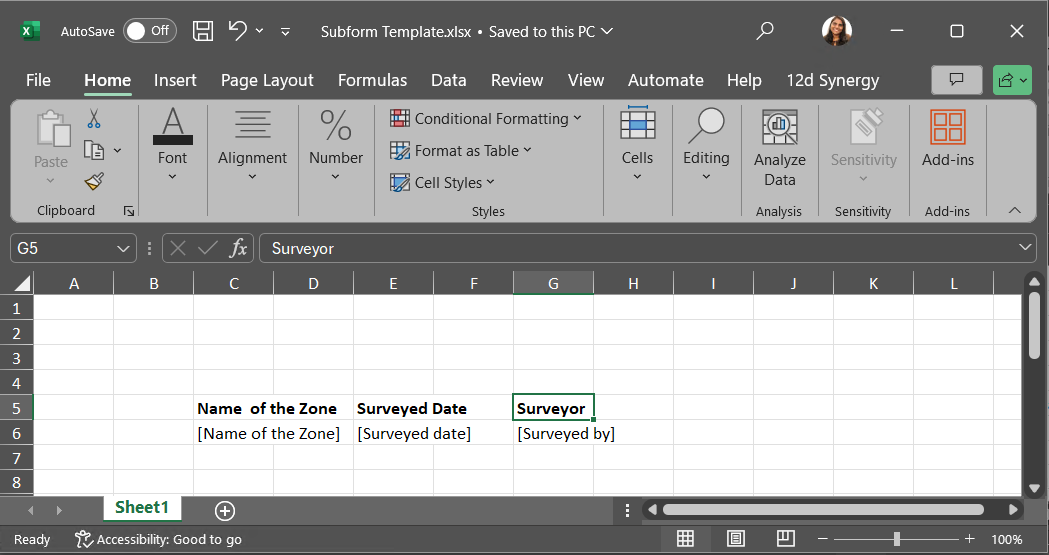
Since you have added labels in the Subform template for the three questions of the subform, the labels will be repeated for every instance of the subform that is generated.
If you want to have the labels displayed only once, enter them in the main template that you will be defining in step 2 below.
Step 2 — Create a Main Template
Create an MS Excel file, and name it to represent the main template.
On the 12d Synergy menu option, click the Insert Forms Placeholders
icon on the ribbon.
The Select Form Definition is displayed. Select the form (which includes subforms) from the list of forms displayed.
The Select a subform area prompt is displayed.
To insert the questions other than the subform, select the Base level option.
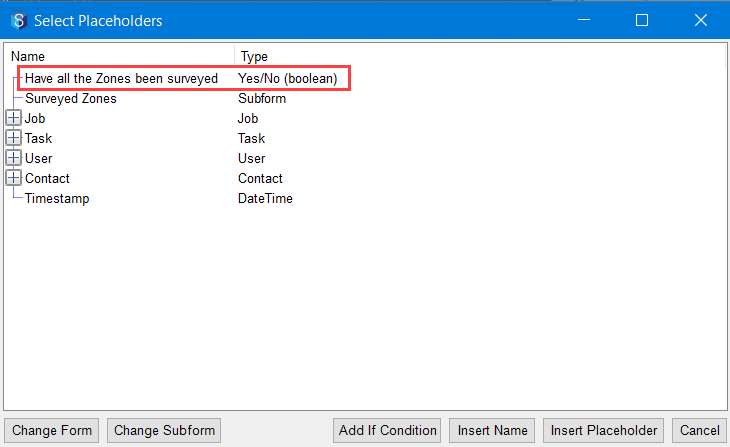
The question highlighted above is in the form, but NOT in the subform. You can select (or double-click) that form output value to insert a placeholder for displaying its value in the output file.
The following placeholder is added in the main template at the cursor point.[Have all the Zones been surveyed]
If you want to add a label for this placeholder, you can edit the cell to include a label. For instance, I have entered Have all the Zones been surveyed as a label in the cell prior to the placeholder. (Refer to the image in column three of the above table.)
Now, place the cursor where you want to have the subform entries lined up.
From the Select Placeholders window, select or double-click the subform name.
The Choose a template file for the subform Subform.<Subform Name> prompt is displayed.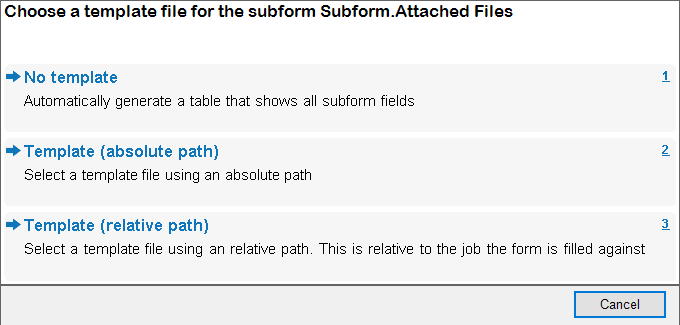
Do one of the following:
Select the No template option to get all the subforms listed in a tabular form with each row for a subform field.
The output will then be displayed as follows..png)
To select the subform template that you created in Step 1 above, select either the absolute path or the relative path options.
The output will then be displayed as follows.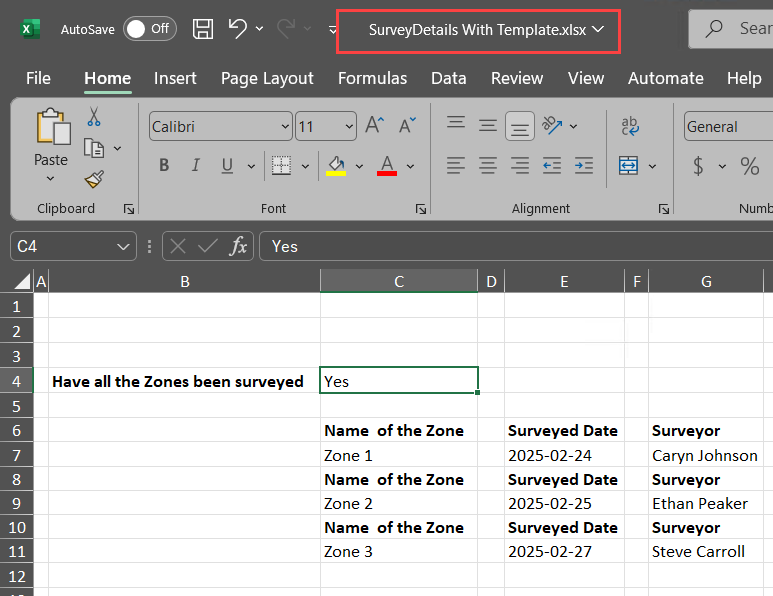
The location of the subform template is added to the cell, meaning the details from the subform template will be embedded there.
Since you have added labels in the Subform template for the three questions of the subform, the labels are repeated for every instance of the subform that is generated. If you want to have the labels displayed only once, enter them in the main template that you defined in step 2 above.
Save the main template.
This is how the main template will look after the subform template has been embedded in it.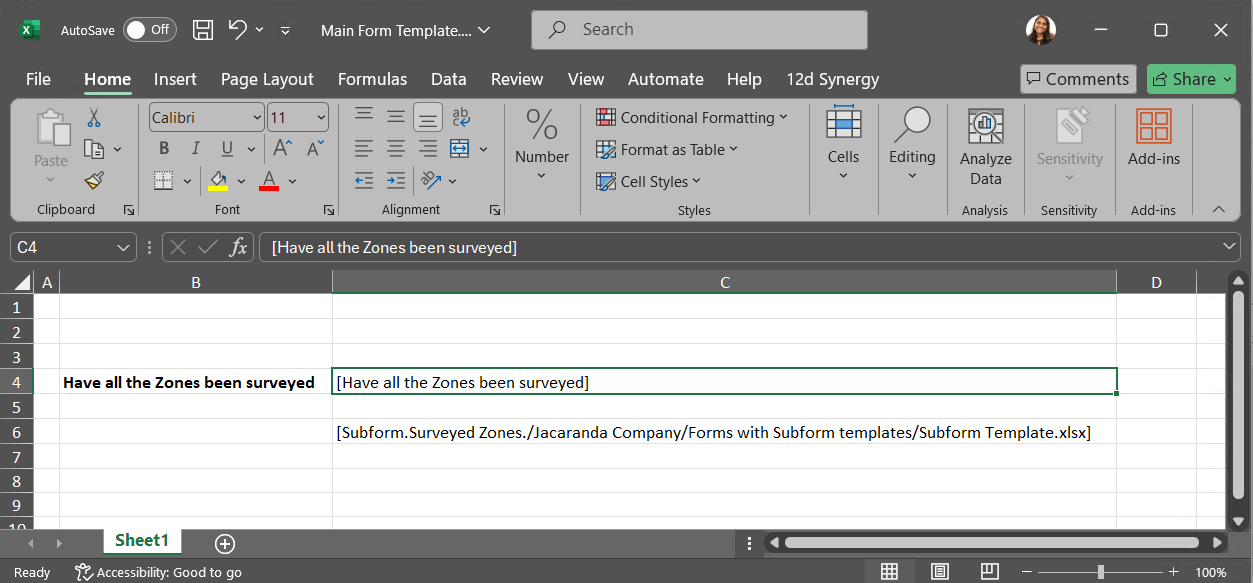
Step 3 — Update the Form Definition
In the 12d Synergy Administration application > Forms tab > Forms Definition tab, update the location of the main template in the Path to Template box of the form for which you have just created the main and subform templates.
Save the form definition update.
Step 4 — Fill out and Submit the Form
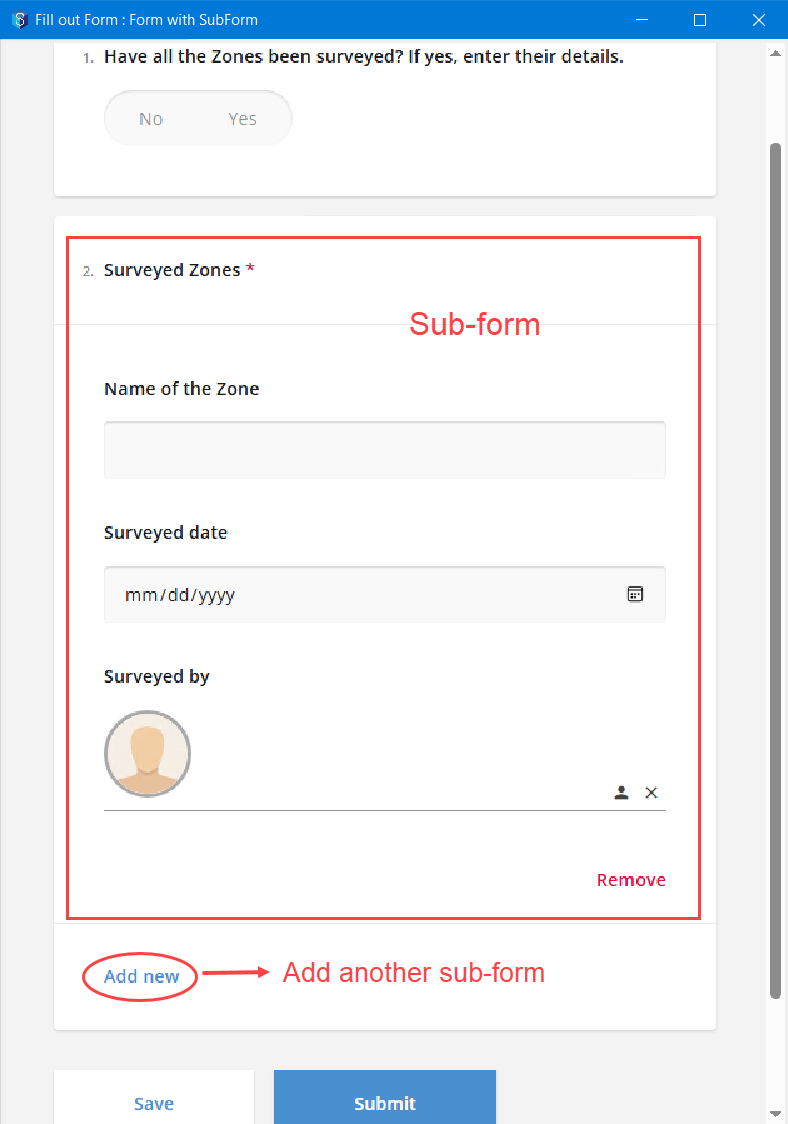
Fill out the form and add as many subform instances as you need. Submit the form.
Step 5 — Access the Output File
The output file is displayed based on your template definition.
1.3. How to Mark a Template as a Global Template
In the 12d Synergy Administration application > Forms tab > Settings tab, do any of the following:
.png)
To mark a template as a global template for MS Word files (.docx), click the
.png) button displayed against the Docx Global Template box, and browse the jobs and select the required .docx template.
button displayed against the Docx Global Template box, and browse the jobs and select the required .docx template. The selected template is displayed in the Docx Global Template box.
To mark a template as a global template for MS Excel files (.xlsx), click the
button displayed against the Excel Global Template box, and browse the jobs and select the required .xlsx template. The selected template is displayed in the Excel Global Template box.
1.4. How to Attach an Output Template to a Form
While defining a form from any of the following locations, select the Outputs tab.
In the 12d Synergy Administration application, select the Forms tab > Form Definitions tab.
In the 12d Synergy Client application, right-click the job on which you want to define a form and select the Edit option. In the Edit a Job window, select the Forms > Job Forms tab.
Click the
.png) button against the Path to template file.
button against the Path to template file.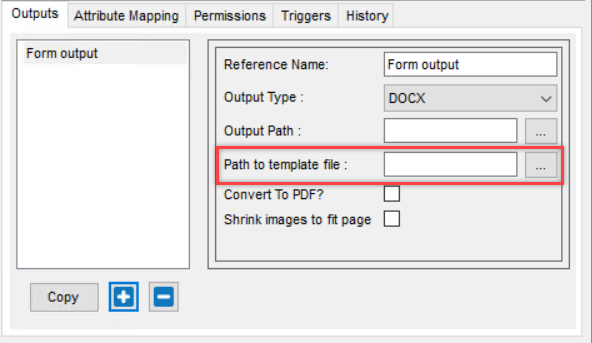
The following prompt is displayed.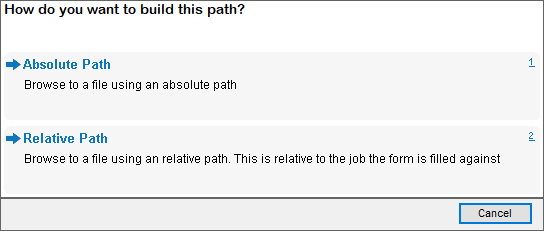
Browse and select the absolute or relative path to the template file of the form.
The selected path is displayed against the Path to template file box.When you select the relative path option, ensure to have a template in the mentioned relative location in the job for which you are filling out the form. Or else, the output file cannot be written in the template format.