Setting up a Simple Workflow
- 21 Aug 2023
- 1 Minute to read
- Print
- PDF
Setting up a Simple Workflow
- Updated on 21 Aug 2023
- 1 Minute to read
- Print
- PDF
Article summary
Did you find this summary helpful?
Thank you for your feedback
1.1. Setting Up a Workflow
Now that we know a workflow is just a list attribute, it’s very easy to set up. It’s important to know that things like Activities, Conditions and Data Capture are all optional. It is recommended you get used to workflows before you go too advanced. In general, while attributes can be re-used, it’s best to start a workflow from the editor where you are most likely going to use it. In this case, we are going to set up a Design workflow, so we will do it as a File Attribute for a Folder.
1.1.1. Adding a List Attribute

- Right-Click and edit a folder
- Go to Attributes→File Attributes
- Add a new attribute of type list
- Add the following states:
- Pending Design
- In Progress
- Pending Review
- Approved
- Now save your workflow, and your attribute - you must save it before you can attach a workflow to it.
1.1.2. Creating the work flow
You'll note we have removed the "rejected" state in the last step - when it's rejected, our workflow will go back to "in progress"
- Edit your attribute once you have saved it
- You can now click the "workflow" button, which will give you the workflow canvas
- Click "All States", which add all available states to the canvas
- Using your mouse, click to link them together so they look like the below image and then click save
These links between states are our workflow Transitions.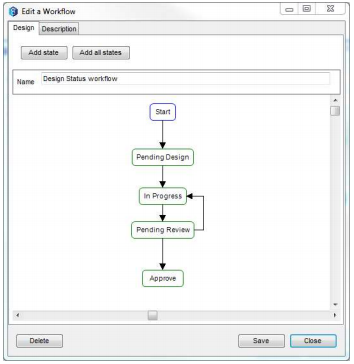
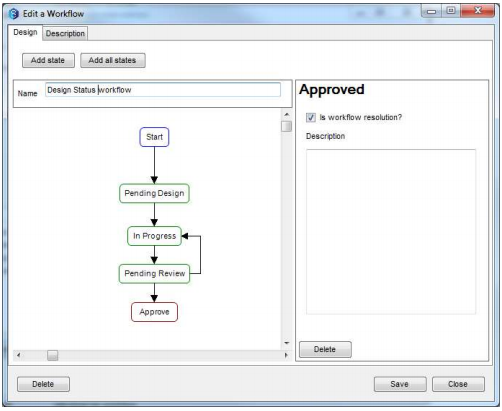
- Select the Approved step and mark it as a resolution. This means the step completes the workflow, and it will not show up as active.


1.2. Using a Workflow
1.2.1. Getting Started
Once you have set up the workflow, add a file to the folder. You should see your new workflow in the popup.

You only need to set the value, as per a normal attribute, to begin the workflow. Note that you will only be able to pick the initial state, due to the workflow constraints.
To transition from one state to another is simple as just changing the attribute. Note that if this is a File, Managed Folder or 12d Model Project workflow, the item must be checked to change the attribute, and check in to transition to the next state.
You’ll notice when moving on from the “Pending Review” state, you can move to either “In Progress” or “Approved”.
Was this article helpful?