Setting up an Advanced Workflow
- 30 Aug 2023
- 4 Minutes to read
- Print
- PDF
Setting up an Advanced Workflow
- Updated on 30 Aug 2023
- 4 Minutes to read
- Print
- PDF
Article summary
Did you find this summary helpful?
Thank you for your feedback
Setting up an Advanced Workflow
In this section, we are going to look at converting the simple workflow from the section above into something a bit more advanced, with some activities and data capture. This will look at assigning the workflow at the appropriate times, prompting for extra information, and locking and unlocking the file to prevent edits when it is in a review.
Prerequisites
This assumes that your job has the following roles:
- CAD Operator
- Reviewer
This also assumes that there's a File Attribute for each CAD File called "Revision:, which is a list attribute that contains values A through to Z.
Begin Work
The first thing we will do is modify the workflow so that when the workflow is set to “Pending Design” it will be automatically assigned to the CAD Operator. Note that Pending Design is the first state you can select, so as soon as the file is added, the workflow will begin. Select the transition between Start and Pending Design. And follow these steps.
Assign the Workflow
- Click the + to add a new Activity
- From the list, select General - Assign this Workflow
- This will add the activity and prompt you for cosmetic only
- Set the name to "Assign to CAD Operator" - this is cosmetic only
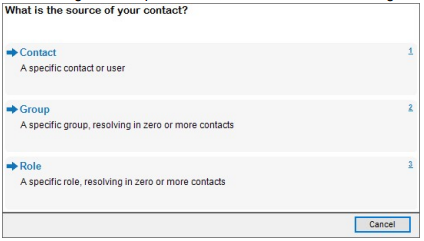
- Select Assign To and pick: "Role", because we want to assign it to a specific role

- Select "Specific Value", because we know the name of the role is CAD Operator
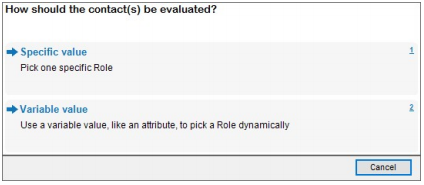
- Select "CAD Operator" from the list
- Leave "Send email" to Yes


The result of this transition is that the CAD Operator for the job will be assigned to the workflow, and will receive an email to tell them that has taken place. Here is a preview of the configuration.

Begin the Review
Next, we want to allow the CAD Operator to automatically inform the Reviewer that they have something to look at. We are going to do the same thing that we did in the “Begin work” stage, but will assign it to the Reviewer instead. We are also going to lock the file to prevent anyone from editing while it is in the review stage. Click on the transition between In Progress and Pending Review.
Assign the Workflow
- Add a new General - Assign this Workflow to the list
- This will add the activity and prompt you for configuration
- Set the name to "Assign to the CAD Operator" - this is cosmetic only
- Select Assign To and pick: "Role", because we want to assign it to a specific role
- Select "Specific Value", because we know the name of the role is CAD Operator
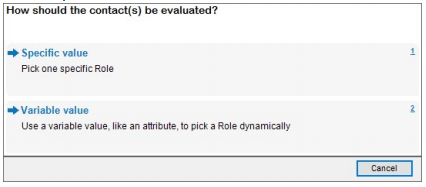
- Select "Reviewer" from the list


Lock the File
- Add an additional Activity and select Files - Lock a File
- Select "File to lock" on the configuration panel. We get several options here - but because this is a file workflow, we can use our current entity / file right away. Select "Use the current file"
- Select Lock For - and again, we want to lock this for the Reviewer role. This means only Reviewers can check out and edit the file.


Accept the Work
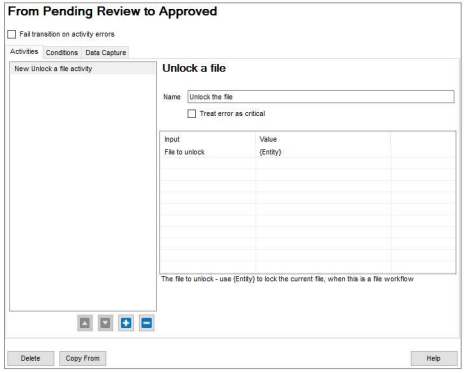
The next part of the workflow to look at is the moving from Pending Review to Approved. All we need to do here is unlock the file
- Select the transition between Pending Review and Approved
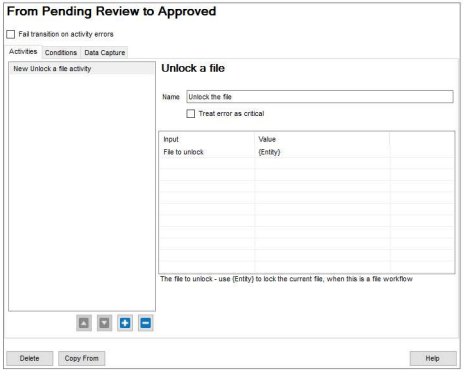
- Add a new Activity - Files - Unlock a File
- Select File to Unlock and again pick "Use the current file"

Reject the Work
When the work is rejected, because perhaps it doesn't meet company standards, it will go back to In Progress. As part of this, we will want to:
- Unlock the file
- Assign it back to the CAD Operator
- Increment the revision
But we also want to tell the CAD Operator why this didn't pass the review phrase.
Setting up the Activities
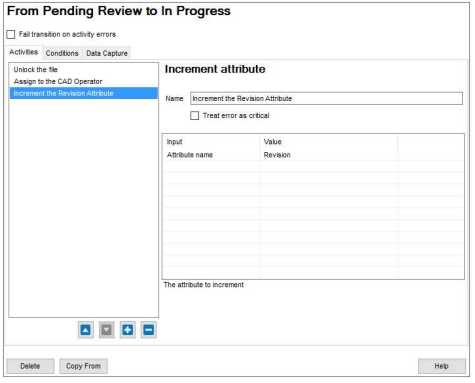
Select the transition between Pending Review and In Progress
Unlock the File
- Add a new Activity - File - Unlock a File
- Select File to Unlock and again pick "Use the current file"

Assign the Workflow
- Add a new General - Assign this Workflow activity
- Set the name to "Assign to the CAD Operator" - This is cosmetic only
- Select Assign To and pick: "Role", because we want to assign it to a specific Role
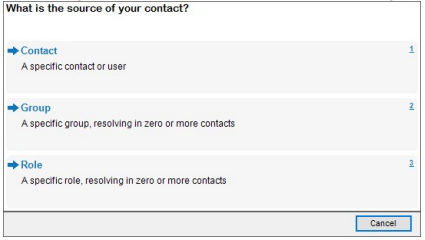
- Select "Specific Value", because we know the name of the role is CAD Operator

- Select "Reviewer" from the list


Increment the Revision
- Add a new Activity: Attributes - Increment Attribute
- Select "Attribute Name" and simply type in "Revision" - this assumes you have set up

Setting up the Data Capture
As we discussed earlier, we are now going to make the workflow prompt the user to explain to the original CAD Operator why this failed the review. In this case, we are going to ask for an association to a CAD Markup File.
- Select the Data Capture tab and click +

- Select Association
- Set the Association type to File and enter a description - "The review markup pdf"


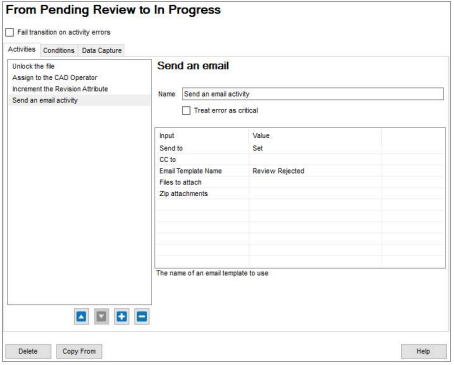
Sending a Custom Email
It might make more sense to send a tailored or custom email to the CAD Operator, rather than the standard ‘a workflow has been assigned to you’ email. To set this up, follow these steps:
- Edit your 'Assign this Workflow' activity and set 'Send Email' to 'No'
- Add a new General - Send an Email activity
- Click "Send To" and add a new contact
- Select the CAD Operator role, as per the other contact steps
- Now we need to send a template, which you may not have setup. Click "Email Template Name"
- On the bottom left, Click + to add a new Custom Template
- Consider writing an email like the one below:
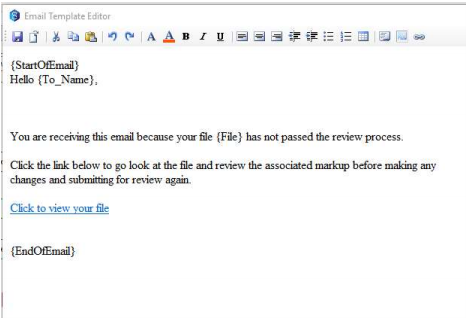
Note the use of variables for {To_Name} and {File}
You can also create a link that references the File, using the Expression Builder. - When you are ready, click Set and set a name and a subject for your template, such as "Review Rejected" and a subject of "{File} has been rejected in the Review process".
- When you are ready, select your new template


Was this article helpful?