1.1. Adding a Sheet Set to 12d Synergy
Sheet set DST files and their associated sheet files can be tracked by 12d Synergy. To add a sheet set to 12d Synergy:
- Select the "12d Synergy Sheet Set" button group
- Select "Add Sheet Set to 12d Synergy"
- The currently active sheet set will be selected, or if there is more than one open, you will be prompted to select one of the active sheet sets.
- Enter the name that the sheet set file will be saved as in 12d Synergy and select "Save"
- Select a location to save the file
1.2. Opening a Sheet Set
To open a sheet set from 12d Synergy:
- Select the "12d Synergy Sheet Set" button group
- Select "Open"
- Navigate to the correct job and folder and select the sheet set DST file you want to open.
1.3. Editing a Sheet Set
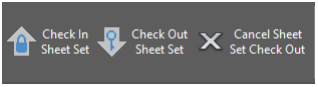
The sheet set will be locked whenever you don’t have the sheet set checked out. Options to add and remove sheet files and edit the sheet set properties will be greyed out and a lock symbol will appear next to the name of the sheet set in the AutoCAD sheet set manager.
To unlock a sheet set:
- Select the "12d Synergy Sheet Set" button group
- Select "Check Out Sheet Set"
- If there is more than one sheet set open, you will be prompted to select one of the active sheet sets.

- Once the sheet set is checked out, the lock symbol will be removed and the options will no longer be greyed out.
Once you have finished making changes, you can check the sheet set back in using the “Check In Sheet Set” button in the “12d Synergy Sheet Set” button group. Other users with the CAD plugin who have the sheet set open will receive a notification that it has changed and they will be given the option to download the new version
1.4. Import Layout as Sheet
To add a layout from a 12d Synergy drawing as a new sheet in a sheet set:
- Ensure that the sheet is checked out
- Select the "12d Synergy Sheet Set" button group
- Select "Import Layout as Sheet"
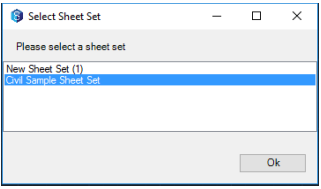
- If there is more than one sheet set open, you will be prompted to select one of the active sheet sets.

- You will then be prompted with a dialog with layout and sheet options
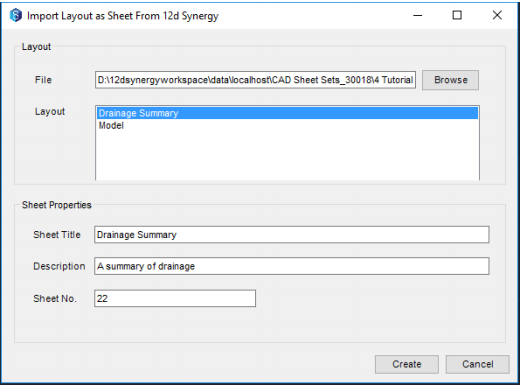
- Select "Browse" to select a drawing file from 12d Synergy
- Select the layout you want to use as the new sheet
- Select "Create"
- The sheet will then appear in the AutoCAD sheet set manager
1.5. Set Default Sheet Layout
To change the default sheet used for a sheet set:
- Ensure that the sheet set is checked out
- Select the "12d Synergy Sheet Set" button group
- Select "Set Default Sheet Layout"
- If there is more than one sheet set open, you will be prompted to select one of the active sheet sets.
- You will then be prompted with a dialog with file and layout options
- Select "Browse" to select drawing file from 12d Synergy
- The layouts from the selected drawing file will appear. Select the layout that you want to use as the default sheet layout
- Select "Select"
- This drawing will now be set as the sheet creation template in the sheet set properties
1.6. Rename and Renumber Sheets
To rename and renumber sheets:
- Ensure that the sheet set is checked out
- Select the "12d Synergy Sheet Set" button group
- Select "Rename and Renumber Sheet"
- If there is more than one sheet set open, you will be prompted to select one of the active sheet sets.
- You will then be prompted with a dialog with sheet options
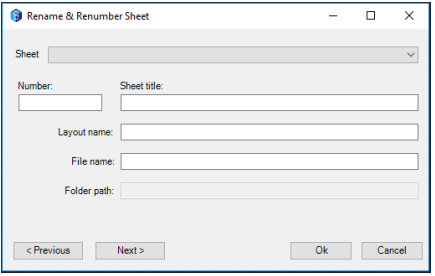
- Select the "Sheet" drop down menu and select from the list
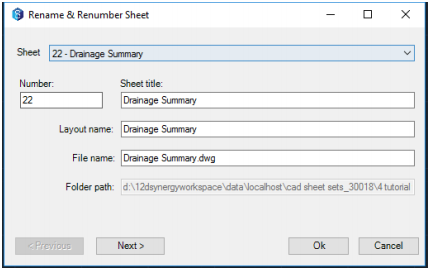
- The remaining fields of the dialog will be populated with the existing values for the selected sheet
- Edit the values as desired for "Number", "Sheet title", "Layout name", "File name", and "Folder path"
- To continue making changes to other sheets, select "next" or "Previous". Otherwise select "Ok"
- If the sheet set file is not checked out, you will be prompted to check out the file now
1.7. Sheet Set Plotting
To ensure you have all the necessary sheet files and to prevent popups during the plotting process, you will need to enable sheet set plotting mode.
- Select the "12d Synergy Sheet Set" button group
- Select "Enable Sheet Set Plotting Mode"
- If there is more than one sheet set open, you will be prompted to select one of the active sheet sets.

- Sheet set plotting mode is now active and you can begin plotting with the existing AutoCAD tool from the sheet set manager.
- Once you have finished plotting, select "Disable Sheet Set Plotting Mode" in the "12d Synergy Sheet Set" button group.