Installation
- Download the connector .dll file to your computer - Download Connectors? Click here
- Run 12d Synergy Administrator
- Connect to your server
- In the left pane, click Connectors
- In the Connectors pan, click Load New Connectors (found at the bottom of the screen
- Click the Upload Assembly button
- Browse to and upload the previously downloaded connector .dll file
- In the confirmation popup, click OK
- Click the Close button
Configuration
The Contacts Connector has the following configuration options:
Import File Path: The path to the input file with the contacts that you want to import. Please note, as this runs on the 12d Synergy Server, the path to the file must be from the server. If the file is stored on a network drive, you must use the full UNC path as opposed to a local file system path.
Import File Format
The Contacts Connector currently supports imports from CSV and XML files.
CSV Files
CSV files must include the names of each field in the first row. Spaces and underscores in the field names are interchangeable.
XML Files
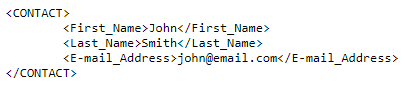
XML files must include a separate element named 'CONTACT' for each contact. Each 'CONTACT' element must have a separate child element for each field for that contact.
Eg:
Required Fields
- First_Name
- Last_Name
- E-mail_Address (Will also accept Email or E-Mail)
Optional Fields
- Phone
- Mobile
- Address
- City
- Region
- Country
- PostCode
- PostalAddress
- PostalCity
- PostalRegion
- PostalCountry
- PostalPostCode
- Fax
- SecondaryEmail
- Position
Before running a connector for the first time you must:
- Create a backup of your 12d Synergy database
- Test your mappings via the 'Run Test' button
Read your version's 12d Synergy Administration manual for detailed instructions on how to setup connectors here.
Contacts Connector Video