CAD Plugins
- 25 Sep 2023
- 5 Minutes to read
- Print
- PDF
CAD Plugins
- Updated on 25 Sep 2023
- 5 Minutes to read
- Print
- PDF
Article summary
Did you find this summary helpful?
Thank you for your feedback
1. Working with Drawings
1.1. Adding a Drawing to 12d Synergy
When working with a new drawing, you can add it to 12d Synergy directly from the plugin. To add a drawing you have open:
- Select the "12d Synergy Drawing: button group
- Select "Save As"
- Enter the name that the drawing will be saved as in 12d Synergy and select "Save"
- Select a location to save the file
1.2. Opening a Drawing
To open a drawing from 12d Synergy:
- Select the "12d Synergy Drawing" button group
- Select "Open"
- Navigate to the correct job and folder and select the file you want to open
1.3. Working on a Drawing
You can check your drawing file in and out directly from the CAD plugin with the "12d Synergy Drawing" button group.

"Upload" will upload the changes you have made to your drawing without checking the file in, allowing you to keep working.
1.4. Inserting a Block
The "Insert Block" button allows you to insert a block into the current drawing from a drawing file saved in 12d Synergy. To insert a block:
- Select the "12d Synergy Drawing" button group
- Select "Insert Block"
- Navigate to the correct job and folder and select the file you want to insert from
- Then follow the prompts to specify the insertion point, scale and rotation by selecting points o the screen, or by entering values into the command line.

1.5. Inserting Attributes
1.5.1. Inserting Attributes from 12d Synergy
The simplest way to use an attribute from 12d Synergy is with the “Insert Attribute” button. This does not associate with a layout and can be inserted in the drawing as a field. Changes made to the value of this attribute in 12d Synergy will be dynamically reflected in the drawing when the file is downloaded.
- Select the "12d Synergy Drawing" button group
- Select "Insert Attribute"
- Select an attribute from the list of available attributes
- Select an insertion point in the drawing

1.6. Making Changes to Attributes
1.6.1 Changes from 12d Synergy
Changes can be made to inserted attributes or linked layout attributes from the 12d Synergy Client. When a drawing file is loaded in the CAD plugin, it will automatically update any inserted attributes or layout attributes with their values from 12d Synergy. Changes made in the 12d Synergy Client after the file was opened can be loaded into the drawing by selecting the “Refresh Attributes” button found in the “12d Synergy Drawing” button group.
1.6.2. Pushing Layout Attribute Changes to 12d Synergy
When a drawing file in 12d Synergy has been linked to its layout attributes, you can push changes made in the file back to 12d Synergy. Simply select the “Push Block Attributes” button found in the “12d Synergy Drawing” button group.
1.6.3. Changes from a CAD Register Spreadsheet
To update attributes in your drawings from a register file:
- Ensure that all of the drawings that need to be updated are located in the same folder as the current drawing
- Select the "12d Synergy Drawing" button group
- Select "Update from Register"
- Select the spreadsheet file
- Any drawings in the same folder as the current drawing file that match the file names in the 1st column will now be updated
The drawing file names are required to be in the 1st column and the layout names in the 2nd column. Attribute names are to be entered in the 1st row from the 3rd column onwards.

1.7. Attaching References
For DWG files, 12d Synergy is able to track references for XREFs, images, PDFs, excel data links and point clouds. To begin attaching a file:
- Select the "12d Synergy Drawing" button group
- Select "Attach"
- Select the type of file you want to attach
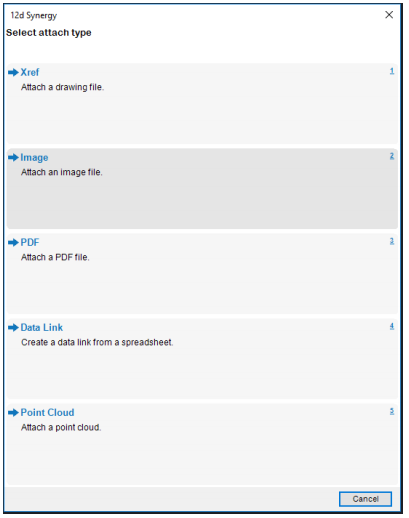

1.7.1. Xref
After selecting the drawing file from 12d Synergy, you will be prompted with an AutoCAD dialog to specify the attachment options.

1.7.2. Image
After selecting the image file from 12d Synergy, you will be prompted with an AutoCAD dialog to specify the attachment options.

1.7.3. PDF
After selecting the pdf file from 12d Synergy, you will be prompted with an AutoCAD dialog to specify the page and attachment options.

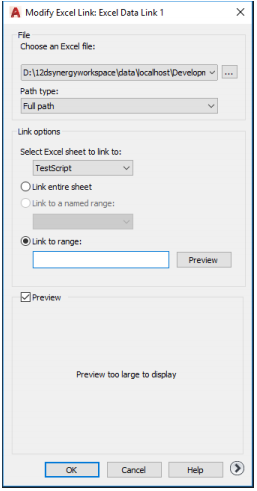
1.7.4. Data Link
You will be prompted with a dialog to select data link attachment options.

- Select "Browse" to select an excel file from 12d Synergy that you want to attach
- Fill in the remaining details and select "Create"
The data link has now been created and can be inserted as a table into the current drawing. By default, the link will have been created for the whole spreadsheet. To modify the data link to use a specific range:
- Use the "_DATALINK" command in the AutoCAD command line or Insert→Data Link
- Right-Click on the name of the data link you have created and select "Edit"
- You will be prompted with a dialog where you can specify the range from the chosen excel file.

1.7.5. Point Cloud
When prompted to select a point cloud, you have the choice of selecting a point cloud scan file (RCS) or a point cloud project file (RCP). In order to use a point cloud project file, the project folder must have been added to 12d Synergy as a managed folder. This will allow all the files in the point cloud project to be downloaded when a file with this reference is checked out. Once you have selected the point cloud, you will be prompted with a dialog to specify the attachment options.

1.8. Managing References
References that have been added to the current drawing can be viewed by selecting "Reference Manager" in the "12d Synergy Drawing" button group.

Selecting a file will show the details of the file and will allow you to get the latest changes, check in/out, cancel check out and remove. Xref drawing references can also be opened from here.
1.8.1. Editing Xref Drawings
To edit an xref drawing directly within the current drawing:
- Select the "12d Synergy Drawing" button group
- Select "Edit Reference"
- Select an xref object in the drawing
- If the selected xref has not been checked out you will be prompted to check out the file first
- You will then be prompted with an AutoCAD dialog when you can select options to edit the xref
- When you have finished editing the reference and the changes have been saved, you can use the "Reference Manager" to check the xref file back in
1.8.2. Downloading Referenced Files
When a file that is referenced in an opened drawing file is checked into 12d Synergy by another user, you will be notified of the changes. Alternatively, select “Get References” from the “12d Synergy Drawing” button group to download the latest versions of all referenced files.
1.9. Publishing
To publish:
- Select the "12d Synergy Drawing" button group
- Select "Publish"
- You will be prompted with an AutoCAD dialog where you can select the publishing options
Was this article helpful?