1. The Preview Window
Selecting a 12d Model project in the client will bring up basic information about the project, including:
- The project preview
- The project description
- The project details
This screen also gives you access to check out/in the project, or view the history.
1.1 The 12d Model Project Structure
1.1.1 Folder Structure
Following is a diagram of the 12d Model Project structure and represents how a 12d Model Project is stored inside 12d Synergy.
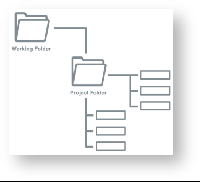
Even when uploading an existing project, 12d Synergy will rearrange the project to ensure each 12d Model project has its own unique working folder.
Working folder: Typically contains all working files generated over the life of a 12d Model Project that are not part of primary project database. Files generally include configuration for specific options or reports. Users may generally edit these at will or outside of 12d Model.
Project Folder: The Project Folder contains all files associated with the project database and should not be modified. Doing so is not supported by 12d Solutions.
1.1.2. Customization, Global Configuration and Setup Files
12d Model uses a number of different files for customization and configuration purposes. These includes files such as:
- Env.4d - general environment settings
- Linestyles.4d - describes how lines are drawn
- Symbols.4d - describes how symbols are drawn
- Drainage.4d - configuration for drainage options
- Colours.4d - configuration for the colours to be used
And many more.
These can exist in several locations, including pre-configured and user defined locations, allowing complete flexibility and control for each user of 12d Model. Please consult your 12d Model Administrator for more information.
This guide is not intended to provide information on how to configure 12d Model, but at a very high level glance, this includes a search path that looks at:
- The working path
- The Customer User Folder
- The User Folder
- The installation Setups folder
or
- The working path
- The Customer Library Folder
- The User_Lib folder
- The installation Library folder
Which path 12d Model takes depends on the type of file.
Typical pre-12d Synergy installations will involve placing the User and Library folders on a network drive for live access or scripts that copy them down to the local PC at set up time.
Using the 12d Synergy and 12d Model integration, this may no longer be necessary; please see section 3.1.2.5 Storing Customization in 12d Synergy for more information.
1.2. Creating and Editing 12d Model Projects
When adding 12d Model Projects to a job, you can create new 12d Model Projects from scratch or you can upload an existing one.
1.2.1. Creating New Projects
To create a new 12d Model Project, simply select the job or folder you wish to add it to.
Right click and select 'Create 12d Model Project'
You will be prompted to configure the required details, including the name of the project, the version of 12d Model project you wish to create and any attributes.
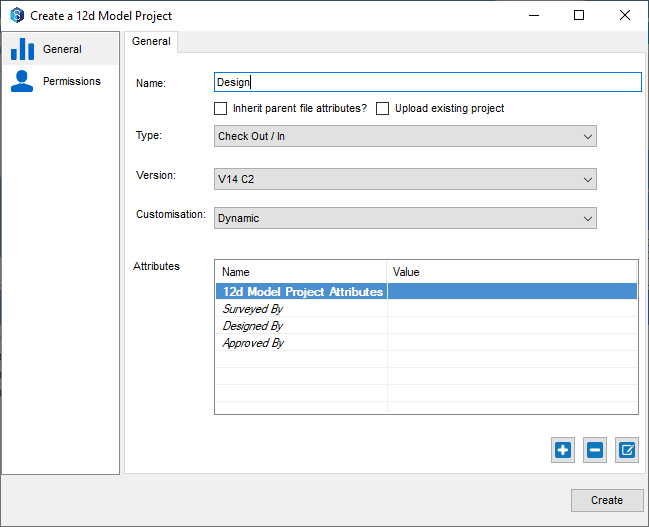
You may also be prompted to fill in required attributes.
1.2.2. Uploading Existing Projects
To upload a 12d Model Project, simply drag and drop the folder, including the working folder, onto your 12d Synergy Job in the client.
if you have more than one 12d Model Project inside the working folder, you will be prompted on how you wish to resolved this issue.
Note that 12d Synergy will attempt to preserve your shares, if you are using relative paths - it is best to upload shared data at the same time.
1.2.3. Editing Projects
To edit and change details for a 12d Model Project, simply select it on the job tree, right click and select 'Edit 12d Model Project'.
You can then modify attributes and permissions.
1.3 Applying Permissions
Once a 12d Model Project is created, you can apply permissions to control who can access it. Right click and select 'Edit 12d Model Project'.
You can apply permissions to Users, Groups and roles.
12d Model projects have the following permissions:
- Can View 12d Model Projects
- Can Share from 12d Model Projects
- Can directly open 12d Model Projects
These can also be inherited from the job and folder levels.
1.4 Locking a 12d Model Project
You can also choose to lock a 12d Model project for a specific user; this prevents other users from gaining a checkout on it.
To lock a 12d Model project, simply Edit it and click ‘Locked’.
You may then select who the 12d Model Project should be locked for.
1.5. Sharing Data
12d Synergy provides additional functionality to the standard sharing features provided by 12d Model.
1.5.1. Setting up Shares
1.5.1.1. Setting up Shares in 12d Model 10
If you are working with a 12d Model 10 project, you must setup sharing from within the 12d Model Project.
1.5.1.2. Setting up Shares in 12d Model 11 and Beyond
In 12d Model 11 and beyond, you can set up shares by editing your 12d Model Project directly from 12d Synergy.
Note that your models and tins must have been checked in at least once to be shareable.
To share data, simply right click and select ‘Edit the 12d Model Project’ in the 12d Synergy Client. Select the Sharing tab. From here, you can choose which models or tins you wish to share.
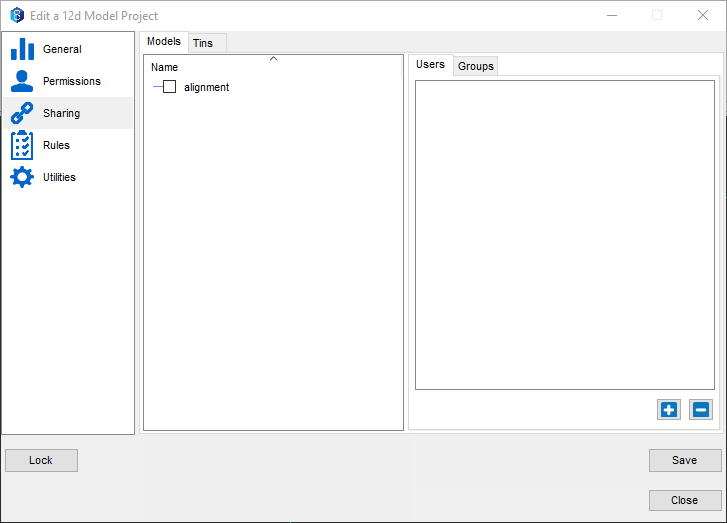
1.5.2. Setting up Share Permissions
If you are using 12d Model 11 or later, you can control who can access which shared model or tin. If no explicit users or groups are supplied, everyone can access them.
Sharing permissions are setup per model or tin, in the Sharing tab of the 12d Model Editor - see section 2.3.1 for more information.
1.6. Opening a Project
12d Model Projects stored inside 12d Synergy can be opened from the 12d Synergy client. In 12d Model 11 or later, they can be opened directly from within 12d Model.
1.7. Viewing History and Rollbacks
Like with all files in 12d Synergy, you can always view the history of a 12d Model Project. You can see who made a change when and why.
Simply click the History button from the Preview Window. You can also tick on the ‘Show Preview’ option to display the project preview at each check in time.
If you want to perform a local rollback, you can – simply select the version you wish to rollback to and hit ‘rollback’. This will perform a local rollback only. This means only the files that version will be delivered to your machine.
If you wish to roll back the server version, you must check out the project, roll it back to the version you wish and check it back in.
1.8. Viewing Access History
12d Synergy also tracks when people access a 12d Model project, either for edits or to share data. You must have administrative permissions to see this list, but if you do simply Edit the 12d Model Project in the 12d Synergy Client and select the 'Access Log' tab.